Administration and Organisation
Course Element "Enrolment"
The course element "Enrolment" is used to let participants enrol in one or more OpenOlat groups. To do this, define in the "Configuration" tab in which and how many groups participants can enrol. You can also define the order of the groups in the selection list. If you have not yet created any groups or need more, you can do so directly in the "Configuration" tab by clicking on "Select" and "Create". Existing and newly created groups can be edited in the member management.
Use "Allow multiple enrolments" to optionally define whether participants may enrol in more than one group, and if so, how many.
In the field "Delisting allowed" you optionally decide whether an already enrolled person has the possibility to delist again from a group. In the group management you can determine while editing the group whether there should be a waiting list and whether automatic promotion from that list should be possible.
Access via learning areas
If you have previously created one or more learning areas in the administration and assigned groups here, you can also access these learning areas in the "Configuration" tab of the enrolment course element.
Course Element "Notifications"
Video introduction: Notifications
The course element offers the possibility to embed notifications in the course structure. These notifications are visible both in the course and in the notifications of each individual user. A notification can be either a short info text or extensive information, added as a file attachment (max. 5 MB). While creating a notification, you can define whether it should additionally be sent by mail to certain user groups of the course (subscribers, course owners, coaches, members or groups).
Display: The maximum number of days determines how long (in days) the notifications are displayed in the course. The maximum number of notifications determines how many notifications are displayed simultaneously in the course.
Subscribe automatically: By default, the course element is automatically subscribed by course visitors. You can disable this option here so that course visitors can subscribe to notifications manually.
Video introduction: Subscriptions
Notifications can be viewed in the personal menu under "Subscriptions". The number of displayed notifications can be set in the course editor.
By default, only coaches and owners may create notifications. However, all participants may read notifications. In the "Notification configuration" tab you can adjust this setting to your needs.
The number of characters for the notification is limited to 32,000. You receive corresponding information about the number of characters already used in the bottom right of the notification editor. If the permitted number of characters is exceeded, a corresponding message is shown. Note: The number of actual characters differs from the number of visible characters, since the actual count uses the HTML code.
Tip
An element with similar functions, but without specific configuration, can also be found in the toolbar. This is the "Info messages".
Course Element "E-Mail"
Via the course element "E-Mail" you give your participants the possibility to send an e-mail to a group of recipients defined by you.
You have two ways to send messages. Either you enter the e-mail address of specific persons directly in the "Recipients" tab, or you select the groups of people the message should be sent to. You can decide in detail whether the message is sent to course owners, coaches and/or participants of the course and/or groups.
To enter several recipient addresses in the "E-mail addresses" field, you must separate them with a line break, i.e. each e-mail address must be on its own line.
Sending to course owners/coaches/participants
Mark the desired checkboxes to define the member groups you want to write to. For coaches and participants, mark in a second step whether you want to address all of them, or distinguish by course and groups. If you mark no checkbox, no mail is sent.
In the fields "Subject (template)" and "Message (template)" you can optionally define default values.
- Subject: If the subject is predefined, participants cannot adjust it. If the subject is left empty in the template, participants must define their own subject (mandatory field).
- Message: The predefined message can be edited freely by participants when sending an e-mail.
In addition, the message and the subject can be designed with variables, both personal and course-related.
Use of variables
The following variables can be used in the subject and text of the e-mail:
| Variable | Description |
|---|---|
$firstname |
The first name of the person |
$lastname |
The last name of the person |
$fullName |
The full name of the person |
$username |
The username |
$email |
The e-mail address of the person |
$courseurl |
The internet address of the course |
$coursename |
The name of the course as shown on the info page |
$coursedescription |
The description of the course as shown on the info page |
The variables refer to the person who triggers and sends the e-mail via the "Send" button.
By giving the course element "E-Mail" a suitable short title, you give your participants a hint about the group of recipients this message is sent to. For data protection reasons, the recipient addresses are not shown in the e-mail form itself.
Tip
An element "E-Mail" with similar functions, but without specific configuration, can also be found in the toolbar.
Course Element "Calendar"
With the course element "Calendar" you can embed the course calendar in the course structure. It is also possible to add several instances of the same calendar to the course.
This embedding is an alternative to embedding the calendar in the course toolbar (see "Using additional course features").
By default, only owners and coaches may create appointments. All participants may read calendar entries. In the "Calendar configuration" tab you can define whether, besides the course owners, participants and coaches of the course may also set and edit calendar entries. You can also configure here which date is displayed when the course calendar is opened from the course structure. Course calendars are automatically added to the personal calendars of the participants.
If you display one semester week at a time in the calendar and insert links to course elements, the calendar serves as an overview page for the appointments and tasks of the week.
Check whether the course element "Calendar" is really the optimal choice for you. In many cases, especially with learning path courses, it is more useful to activate the calendar in the toolbar in the settings.
Tip
If you cannot find the course element "Calendar" in your OpenOlat instance, it has been disabled system-wide by an administrator.
Course Element "Appointment scheduling"
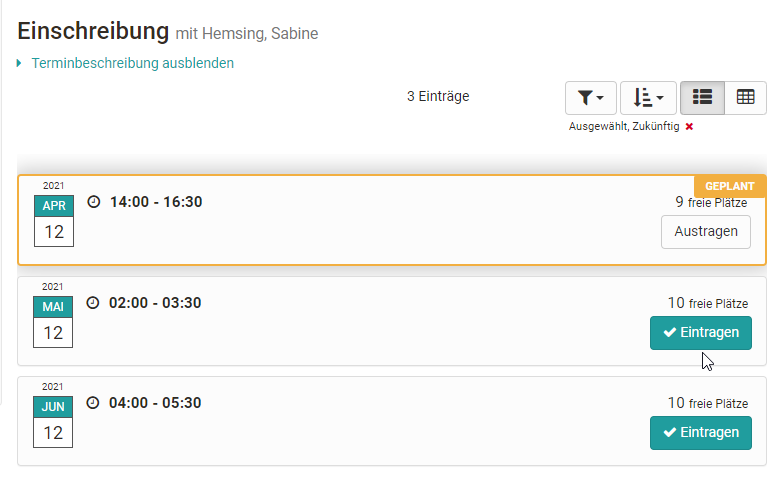
With the course element Appointment scheduling, both enrolments for specific appointments and appointment finding can be organized. In general, you can configure whether several appointments can be selected, whether there is a limit to the number of participants, whether participants can see who has registered, and whether a BigBlueButton room should be assigned.
The course element is added in the course editor, where you can also define whether coaches may also edit topics and appointments, or whether this is only possible for the course owners. If the appointment selection should only be possible within a certain time window, the time specifications must be set accordingly in the course editor, in the "Learning path" tab, or, for conventional courses, the visibility or access must be configured accordingly.
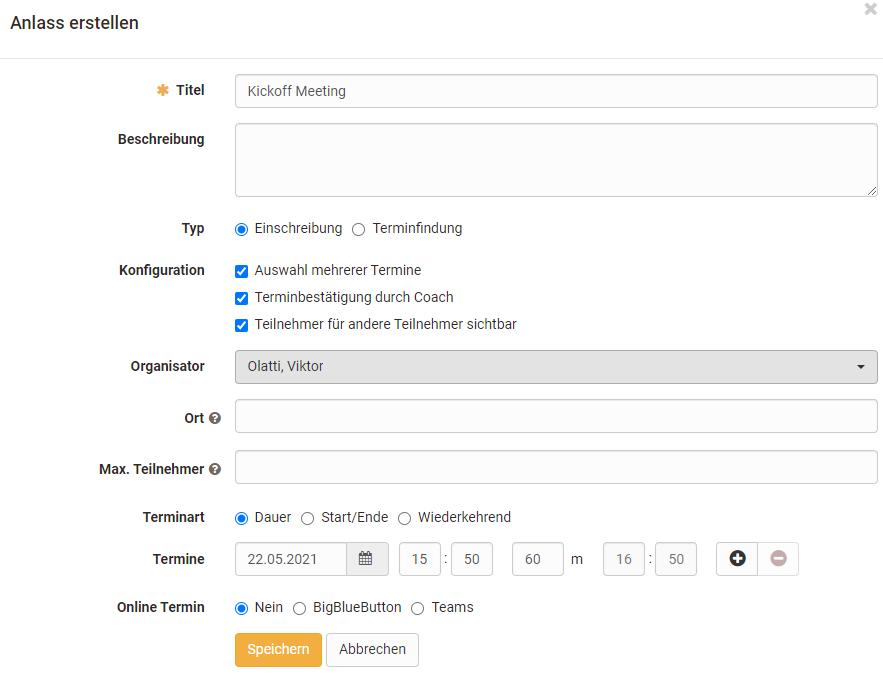
The actual configuration and setup of the appointments, however, takes place in the course run with the editor closed. For this, a new enrolment or appointment finding is first created via the "Create occasion" button, and the basic configuration is done and appointments are entered.
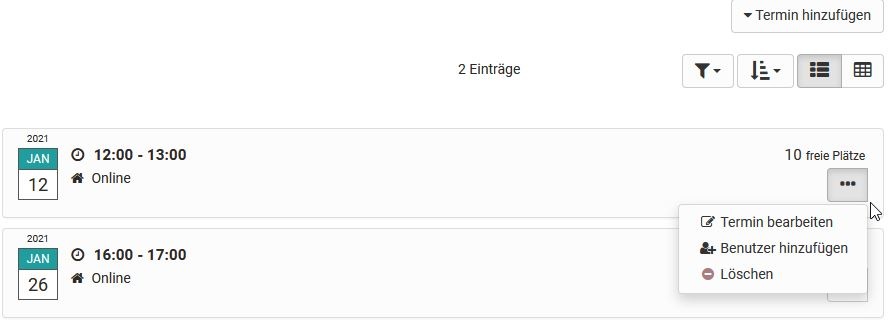
Via the button "Add appointment" you can also add further appointments to this poll later. Already created appointments can also be revised again via the three-dot link.
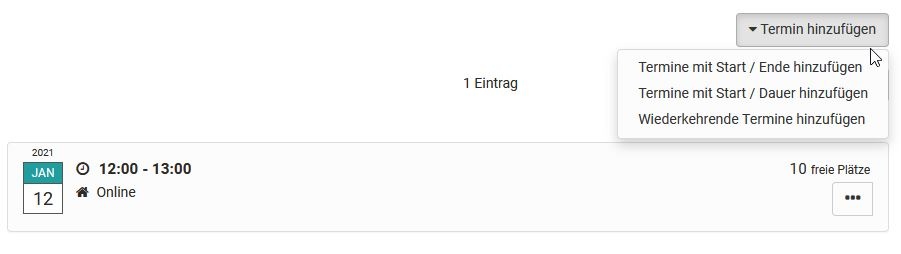
Appointments: create & edit
Menu Create occasion
How to configure an enrolment or appointment finding
Title: Enter the name of the appointment here, e.g. "Closing meeting vote", "Kick-off meeting" etc. The entry is required (mandatory field).
Description: Explain the appointment selection in more detail.
Type: Decide whether this is an appointment finding for a common appointment, or an enrolment for one or more appointments from a selection, e.g. lab appointments.
Configuration: Decide whether participants may select only one or several appointments, and whether the names of participants are visible to other participants. For "Enrolment" you can additionally define whether the coach must still confirm the appointment.
Organizer: Define here who is displayed as the organizer of the appointment scheduling.
Location: Enter the venue here.
Max. participants: You can limit the number of members for an appointment (only for "Enrolment").
Appointment type: You can create appointments based on duration, based on a start and end date, or recurring on specific weekdays. The selection makes it easier for you to create further appointments.
If "Duration" is selected, when adding further appointments, the appointments are preconfigured on the same day and the times are adjusted according to the duration.
If Start/End is selected, the selected times are retained and for new entries you only need to adjust the date.
Appointments: The concrete selectable appointments are entered here. Clicking the "+ sign" adds new appointments. Clicking the "- sign" deletes appointments again.
Online appointment: The options are: No, no online appointment, or you select the desired tool BigBlueButton or Teams directly, provided that virtual classrooms have been activated by the system administration.
Tip
If BigBlueButton or Teams is activated, a BigBlueButton or Teams room can be added and further configured for the selected appointments. In this case, "online" is automatically displayed for the location.
A created "occasion" can later be edited, duplicated or deleted by clicking the gear icon. The group of participants for an occasion can also be restricted to certain groups. Exporting the participants for an occasion is also possible.
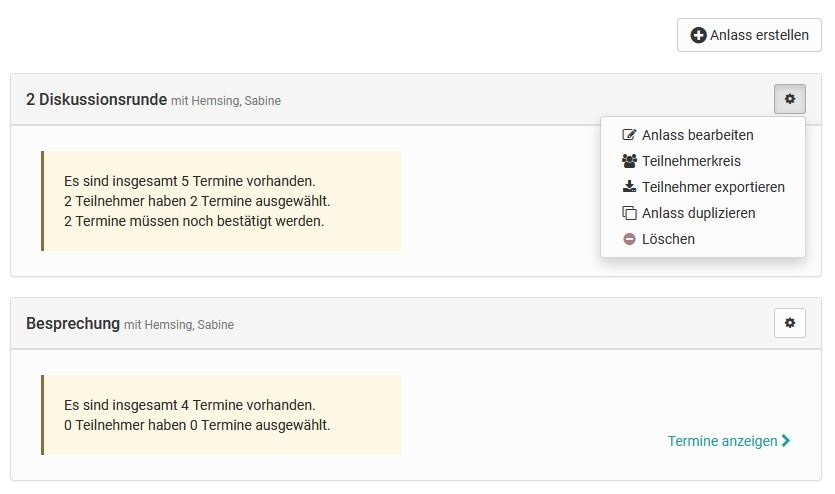
The concrete appointments of already created appointment schedules can be viewed in more detail via the "Show appointments" link and edited by the course owners or coaches. Here you can add, delete or rebook participants, adjust the description, change appointments or confirm appointments.
Participants can use the "Select appointments" or "Enrol" link to see and select the appointments they want. If an appointment has been confirmed, this is also visible.
Further information
Mentioned on this page
Members management >
Using Additional Course Features >
Personal tools: Calendar >
Learning path course - Overview >
Further reading
Course Element "Enrolment" >
Course Element "Notifications" >
Course Element "E-Mail" >
Course Element "Calendar" >