Course editor tools
In the course editor menu you have access to further configuration tools in the toolbar. Here you can insert and import course elements and display the current status with any problems.

Administration
Here you have access to various other course tools. You will find information on the separate pages of the tools. More information you will find here.
Insert course elements
Here you have access to all course elements that you can integrate into a course. Simply select and add to the course. Further information can be found here.
Quick-Add
Depending on the size of your screen window, the "Quick Add" function may also be available. This allows you to simply enter the name of the desired course element in the field and add the element even faster.
Import course elements
Here you can import course elements from other courses using a wizard.
Select a course that you own and choose one or more course modules from that course. In some cases, you can also make further configurations to the selected modules. Finally, select "Finish" and the desired course modules will be added to the current course.
Status
Here you can see if there are problems when configuring course elements. Click on the number indicated and the corresponding problems will be displayed and can be solved. The legend also indicates what kind of problem it is.
Possible configuration problems will additionally be displayed in the course navigation.
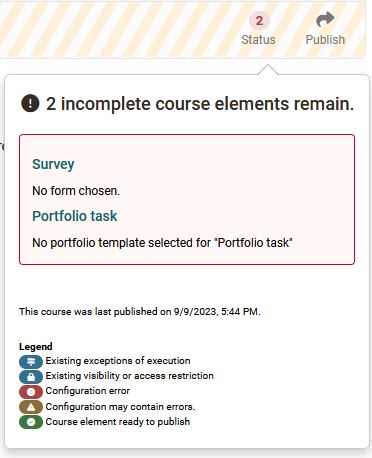
Any configuration problems are also displayed in the course navigation for the corresponding course elements.
Note
Do not confuse the "Status" in the course editor with the "Status" when the course editor is closed. These are two different functions.
Course preview (only for conventional courses)
The editor tool "Course preview" enables you to see course settings and content from the course participant's point of view. By clicking on "Course preview" you will first get to the configuration menu to simulate your course at a certain point in time, as member of a distinct group, or with other attributes used in your course.
In contrast to the view of the course content you will see all modifications or course elements not yet published in the course preview. Features depending on an interaction between participant and system will not be available in the course preview, e.g. enrolling in groups, starting a test, self-test or questionnaire, and performing tasks in the course element "Task."
More information on configuring the course preview:
By means of this form you can define the conditions of the course's preview.
Date: This field is mandatory. Please enter date or time you want the course preview to be displayed. The current date and time is pre-set.
Group: Select the name(s) of one or more groups to view the course from the perspective of the members of that group.
Learning area: Please enter the name of a learning area in order to make this course available for members of this learning area.
Role: Please select to whom this preview should be accessible.
- «Registered OLAT users» : This is how the course is presented to a regular OLAT user (e.g. student).
- «Guests» : This is how the course is presented to a guest user (who log in without an OpenOlat account), if this course is available for guests at all.
- «Tutors» : This is how the course is presented to a tutor of any learning group during this course.
- «Course owners» : This is how the course is presented to course owners (course administrators).
- «OLAT authors» : This is how the course is presented to users with OLAT author rights.
Attributes: By means of these fields you can enter up to five AAI attribute names with their relevant values. By means of this preview, this course is presented in the way a user with these AAI attributes would see it.
Example:
Attribute name: swissEduPersonStudyBranch3
Attribute value: 4600
This is how the course is presented to Chemistry students.
The course preview is useful, for example, to view a course from the participant's perspective before it starts or to check certain visibility rules.
For more information:
AAI attributes
__ General information on AAI
Note
However, this preview is usually no longer necessary, as you can simply select “Participant view” when the course editor is closed. This method is also suitable for learning path courses.
Publishing
All settings and modifications made in the course editor will be released by means of "Publish". This way you can prepare, set up and design your course in the course editor at your leisure.
Only once you have published your course it will become visible in the course run with closed editor. This does not mean that learners will already see your course. In order to be able to do that you have to publish your course and configure your access (see chapter "Access configuration").
The easiest way to publish quickly is to close the course editor by simply clicking on the course title in the breadcrumb bar. Here you will be asked whether you want to publish automatically, manually, or not at all.
The option to publish manually corresponds to the "Publish" option in the course editor and is carried out using a wizard.
Warning
In case you publish a course while others are working on it all non-saved data (such as entries in forums or Wikis) will be lost.
Manual publishing with Wizard
Step 1: First you have to select all those course elements you have modified and want to publish. Your choice will be reduced to course elements that are available for publishing.
Step 2: Modification of course access: Here you get access to the general publishing options of a course. Determine which OpenOlat- users should have access to your course. See section "Course Settings" to learn more about those options at your disposal. Now you can complete your publishing process. Just click on "Finish".
There may still be some notes that are displayed. A specific entry in the catalog is also possible when using the Catalog 1.0. When using the catalog 2.0, the entry is made automatically according to the taxonomy configuration.