Knowledge Transfer
Course Element: Structure
The course element " Structure" serves to arrange your course. By default it offers an automatic overview of all sub-elements along with short title, title, and description. Use this course element to arrange your course content and/or to clearly separate your modules. Further information can be found here.
Course Element: HTML Page
In the course element "HTML page" you can integrate various files directly into the course structure. These web-specific files (pdf, html) can already be in the folder of the course or a linked resource folder or can be created directly with the course editor as HTML page. The web files linked in this way are displayed directly in the course structure in contrast to a provision via the course element "Folder". The course element "HTML Page" is particularly suitable for the provision of quickly visible information and hypertext-based content. Further information on the course elements "HTML Page" and "Multiple Single Pages" can be found here.
Course Element: External Page
With the help of the course element "External page" you can call up an external website. Simply enter the desired URL in the configuration in the tab "Page content" to integrate the external page into your course navigation. For the display of the linked page, the variants
- "Embedded (source hidden)",
- "Embedded (source visible)",
- "New browser window" (source visible) and
- "Integrated completely (source hidden)
are offered.
For pages that require authentication and whose source is hidden, you can activate "Page pass-word controlled" and enter the corresponding values in the "User" and "Password" fields.
It is recommended to use this course element when planning to include pages containing database queries (e.g. research tools, online exercises, etc.). It is only possible to link external pages via HTTP or HTTPS protocols.
External page: configuration
URL: You have to fill in this field. Here you indicate the site on which the desired external learning contents can be found (e.g.http://www.server.com/page.html).
Configure display: You can choose between four options:
-
Integrated completely (source hidden): The external HTML page will be parsed and integrated in your OLAT page completely. HTML pages may only contain resources such as images, Flash, videos or links with relative paths. Absolute relative paths such as "/public" (relative to a bsic URI) or absolute paths such as "http://..." are not allowed.
-
Embedded (source hidden): The external HTML page will be included in a so-called «iframe« The external page's Internet address will not be visible. HTML pages may only contain resources such as images, Flash, videos or links with relative paths. Absolute relative paths such as "/public" (relative to a bsic URI) or absolute paths such as "http://..." are not allowed.
-
Embedded (source visible): This also means including your external HTML page in a «iframe« The source code of the OLAT page will show you the external page's Internet address.
-
New browser window (source visible): Another option is the possibility to display your external page in its own browser window.
By selecting the upper two options OLAT will transfer username and password in case your external page requests this.
Embedded frames («iframe«) resemble single browser windows, however, they are part of the initial window's HTML page.
Advantage of using an «iframe« : you can show any content in OLAT (e.g.complex web pages in nested frames, mathML etc.).
Disadvantage of using an «iframe« : your content might appear along with its own scroll bar.
Info
If you are not sure which variant is the right one for your case, start with the option "Integrated completely" and test the other display options until the linked page is displayed as desired.
Course Element: CP Learning Content
Use the course element "CP Learning Content" to integrate learning content in IMS-CP format (IMS-CP Version 1.1.2) into your course. You can either create the CP directly in OpenOlat, which is explained in the chapter "Five steps to your content packaging". Or you can create the CP externally, for example with eLML.
Further information on the CP can be found here.
Course Element: SCORM Learning Content
Using the course element "SCORM Learning Content", externally created SCORM packages can be integrated into OpenOlat courses. SCORM is a standard with which content as well as interactive e-learning modules can be encapsulated and integrated into different systems. Further information on the configuration of the course element SCORM can be found in the chapter "Course element: SCORM learning content".
Course Element: Document
![]()
By means of the course element "Document" different document formats can be integrated directly into the course. This course element is especially suitable for Office documents, PDF or the display of graphic files. It is possible to access already existing files or to upload or create new files. Word processing documents and PDF are directly displayed by using the integrated Document Viewer.
Files that are located in the course's storage folder or uploaded as separate learning resource can be used. Which file formats can be newly created depends on the settings in the administration of the respective OpenOlat instance.
The integrated documents can later be edited, exchanged or saved as a separate learning resource. Depending on the file type, other options such as editing metadata are also possible. Editing of text documents is also possible when the corresponding licenses are activated in the OpenOlat Administration, the editor then opens in a separate window.
Furthermore you can set user rights for your course element in the course editor and thus define which roles are allowed to edit and download the respective document (if possible).
The height of the display area can also be defined.
After downloading a corresponding document, the metadata shows who edited the document last.
Note
For video files the course element "Video" should be used and for HTML pages the course element "Single page".
Course Element: Folder
In the course element "Folder" you can offer files for download. The course element folder is often used to provide course materials such as slides or scripts. In addition, the course element "Folder" can also be configured as a collaborative tool for the learner's file upload.
Further information on the configuration and use of the course element "Folder" can be found here.
Course Element: Podcast
The course element "Podcast" can either be used to easily provide others with your own audio and video files or with external podcast episodes in OpenOlat. Course participants can see episodes directly within OpenOlat; or they can subscribe to podcasts, upload those by means of online services such as iTunes before copying them to a mobile device.
How to create and configure a podcast is explained in separate chapters.
Course Element: Blog
Via the "Blog" you can inform the participants of the course about current topics in the form of text, pictures or video. You can integrate external blogs as well as create and use a new OLAT learning resource "Blog". Course owners can, for example, maintain a blog more or less regularly in a blog and thus inform course participants about new current content on the event topic. Participants can then comment on these contributions and rate them with 1-5 stars. It is also possible to give course participants the right to write a blog, so that they can jointly run a course blog.
How to create and configure a blog is explained on separate pages.
Course Element: Video
With the course element "Video" you can add self-made videos or videos imported via a URL, which are available as learning resource video in OLAT, to your course. One video per course element is linked. The video can be annotated and evaluated and thus optimally integrated into the learning and teaching process of a course.
Further information about the course element video can be found here. Information on postprocessing the video with OLAT Quiz and jump marks can be found in chapter "Learning Resource: Video".
Course Element: Video Livestream
Course Element: Opencast
With the course element Opencast, recordings of meetings and courses that are stored on an Opencast server can be integrated into OpenOlat courses. The configuration and connection of the Opencast server is done in the administration. In the course element either single videos or whole series can be integrated.
Course Element: edu-sharing
Course Element: card2brain

The course element card2brain allows learning with flashcards. To use this course element an enterprise login of card2brain is compulsory. Clients of frentix please contact card2brain@frentix.com. Non-clients please contact card2brain directly.
Further information on the course element can be found here.
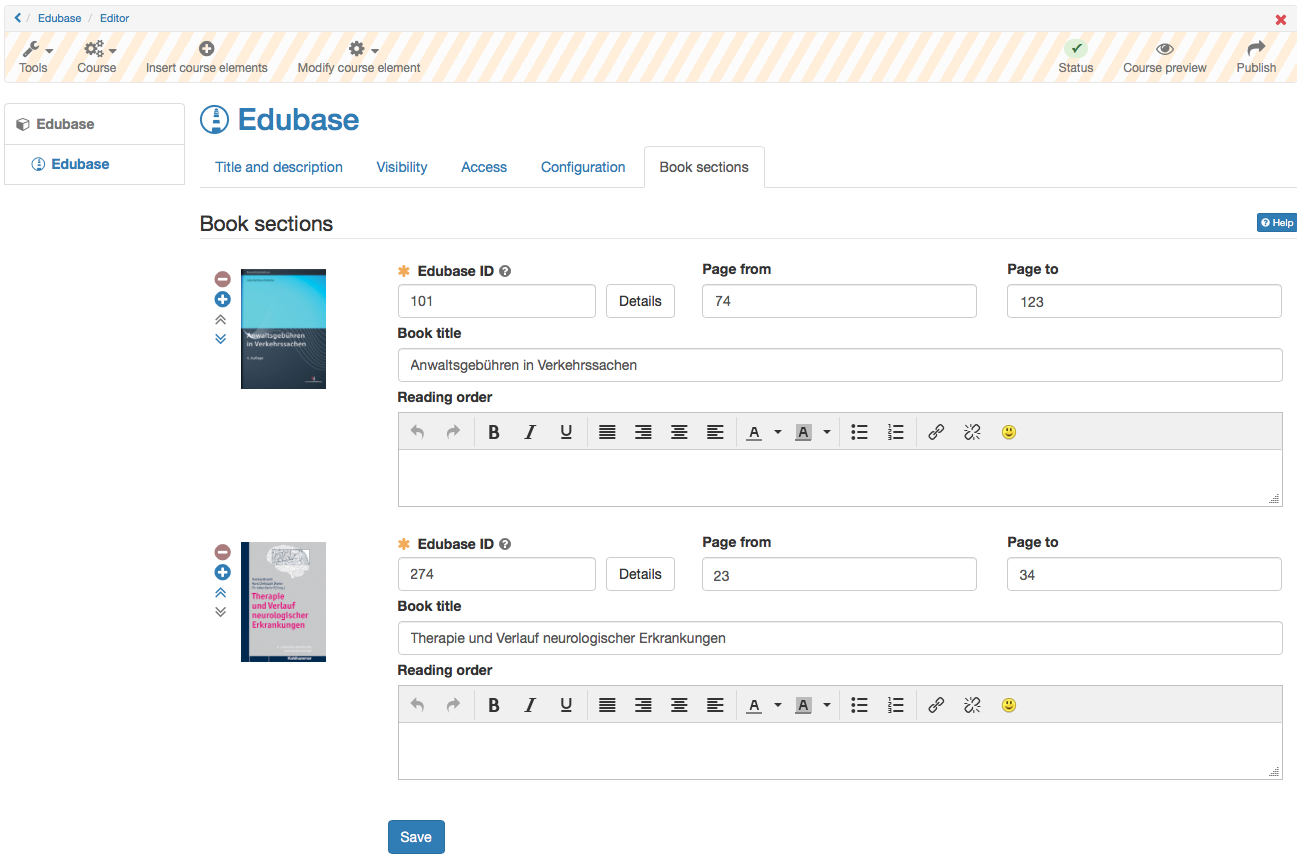
Course Element: Edubase
![]()
This course element allows you to link to e-books from Edubase. The e-books can then be opened in OpenOlat.
A prerequisite for using this course element is an Edubase account, plus the allowance to use a specific e-book. Clients of frentix please contact edubase@frentix.com. Non-clients please contact Edubase directly.
Info
The module must first be activated and configured in the administration, and authorization keys for the eBooks are also required. As soon as the pre- settings are done, the course element can be added in OpenOlat. By using the editor, you can define specific reading orders for the users for an embedded e-book.