Personal tools: Calendar

The calendar function is available in various places:
-
In the group:
Access to the group calendar and any external imported calendars. -
In the course:
Access to course dates and access to all calendars of integrated groups. Course calendars can be integrated into a course element as well as into the toolbar.
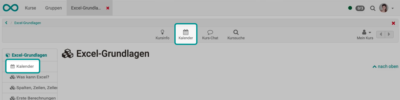
Video Introduction (German): Course calendar
- In the personal menu (Personal tools):
In addition to your personal appointments, all appointments from the various courses and groups of which you are a member can be combined in your personal calendar. This gives you an overview. External calendars can also be imported according to individual requirements.
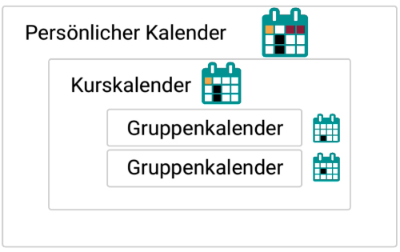
Important
If you cannot find a calendar in the list of your personal tools, administrators have switched it off in the system administration:
Administration > Core functions > Calendar
Create / Edit entry
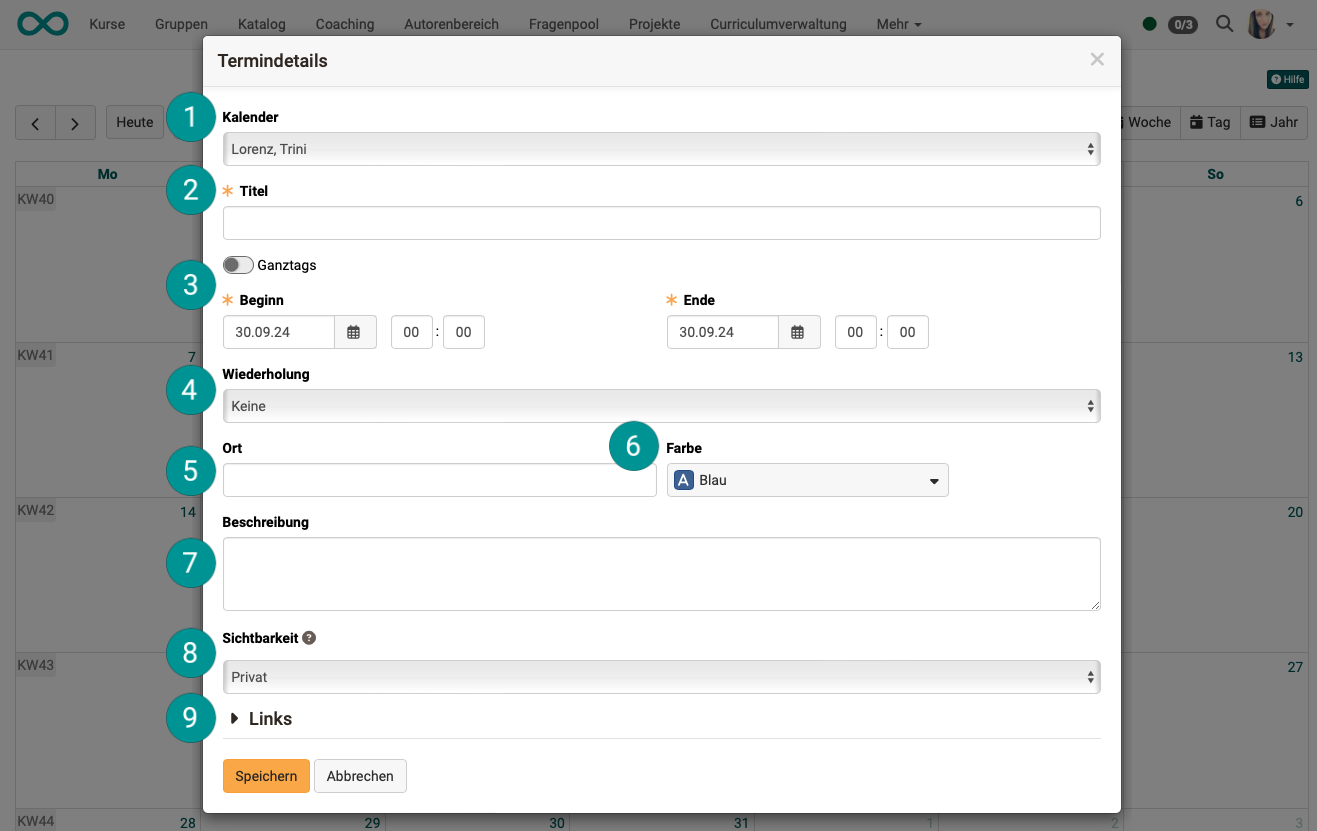
To add a new appointment, click in the corresponding calendar field. A pop-up opens for the event details.
-
If you are a group member, first select the calendar in which you would like to create an appointment (personal calendar or group calendar) in the calendar pull-down menu at the top.
-
The "Event details" must include a subject.
-
A start and end date is also mandatory. The toggle button can be used to hide the time fields and create all-day appointments.
-
For recurrences, select one of the options in the selection field.
-
In the "Location" field you record where the appointment takes place.
-
With the "Color" selection field you give this appointment a color of its own.
-
In the "Description" field you add further details about the appointment.
-
Which details of an appointment are displayed for whom is described in the Visibility section.
-
You can only add links after the appointment has been created. Simply save the existing appointment and edit it again. You will then see an "Add link" button under "Links".
Appointments can be subsequently edited or deleted by clicking on the appointment and then on the "Edit" button.
An appointment can also be moved using drag & drop.
Important
Links to course elements can only be created within the course calendar. All other calendars will display the message: Link not possible.
Attention
The "Delete this entry" button in the event details deletes the appointment permanently. The appointment cannot be restored!
Recurring events
In the event details, the desired frequency of recurring appointments can be selected under "Recurrence". As soon as a recurrence is selected, the input field appears with which the end of the series is defined (mandatory field).
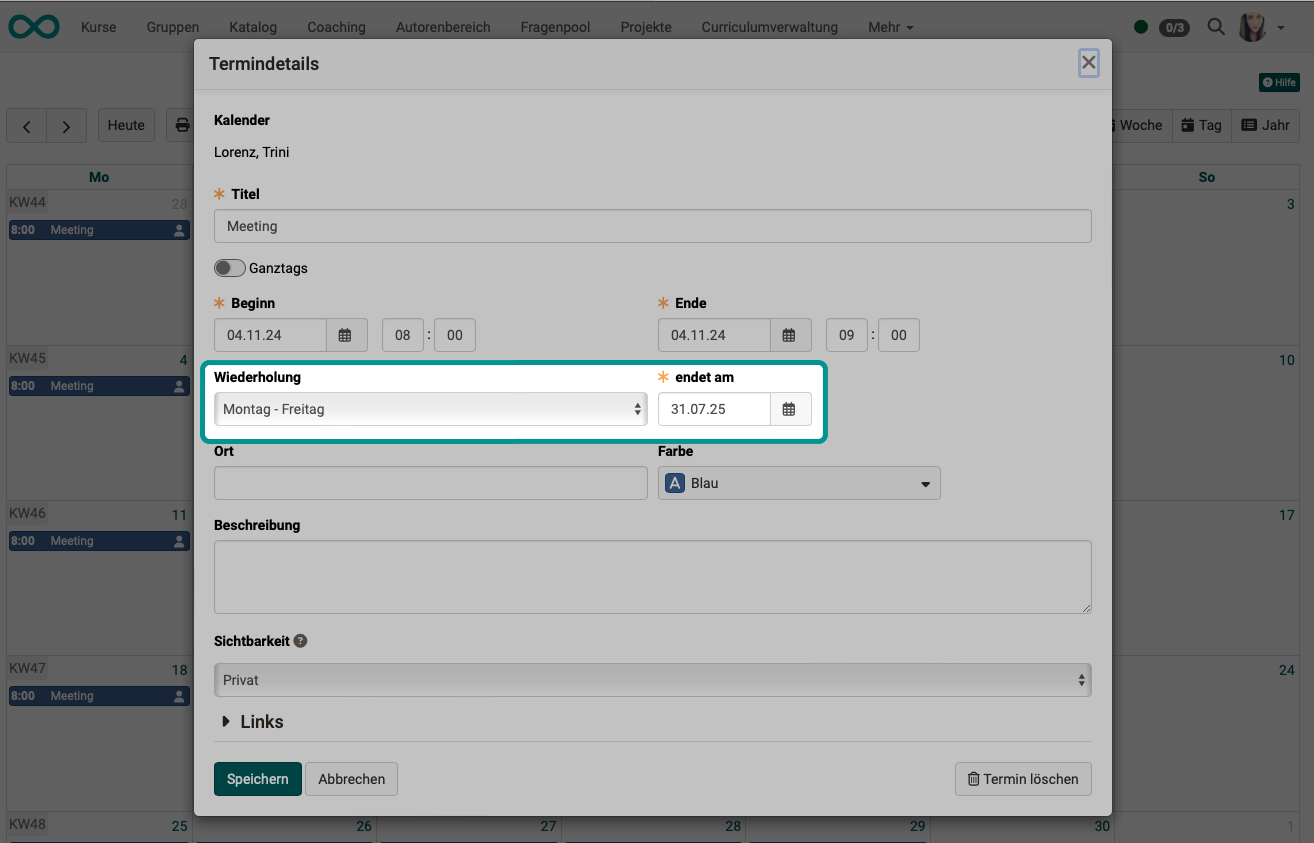
Serial appointments can also be edited. To do this, click on one of the appointments in the calendar. When saving the adjustment, you can select whether the change applies to all appointments in the series or only to the selected appointment. If all appointments are to be changed, those appointments that have not previously been customized will be changed.
Visibility
Specify here who can see the calendar entry.
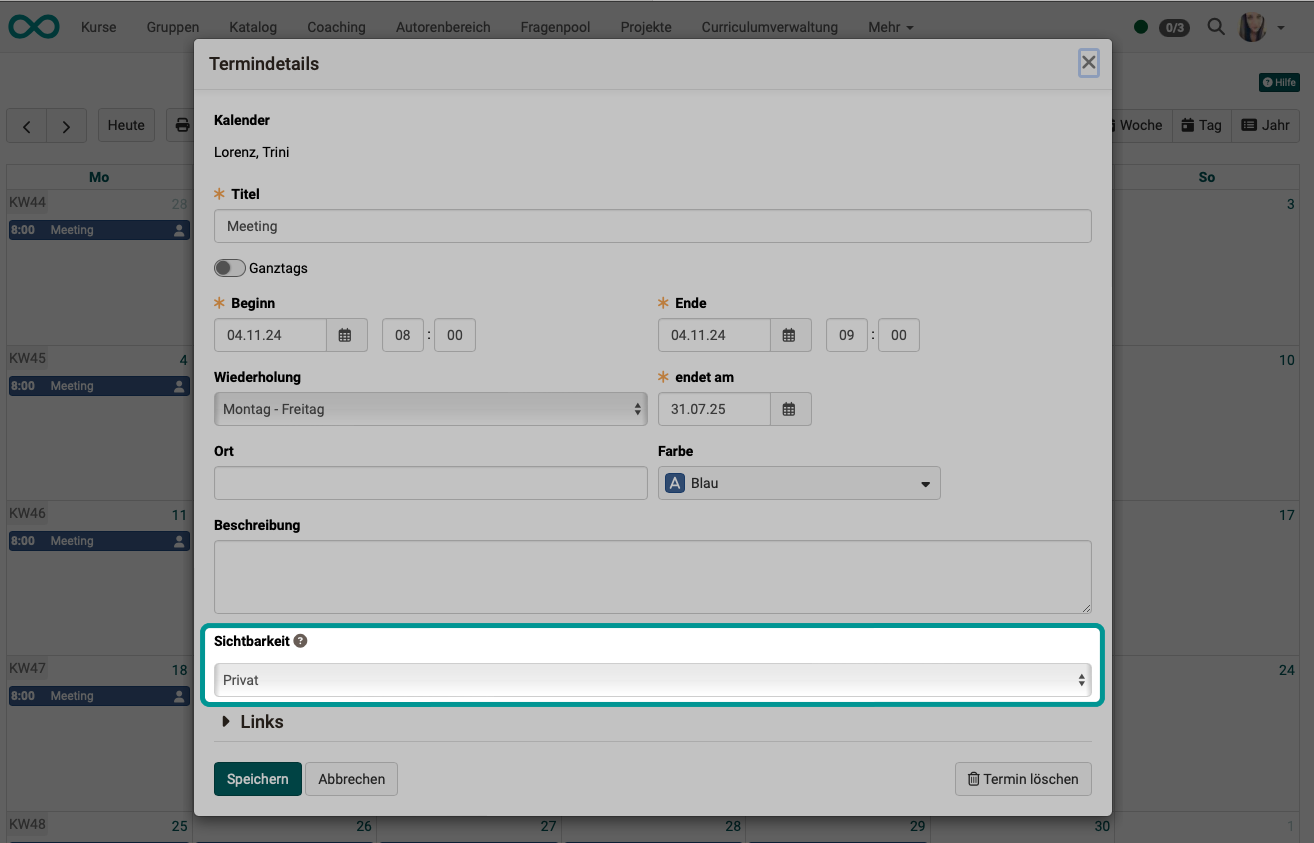
Depending on the type of calendar (Personal calendar, group calendar, course calendar) the three visibility levels "Private", "Only time information visible" and "Public" have different effects:
| Personal calendar | Group calendar | Course calendar | |
|---|---|---|---|
| Private | Only the person who created the entry is allowed to view the calendar entry, as the calendar is assigned to that person. | Only members of the group to which this calendar is assigned are allowed to view the calendar entry. | Only members of the course to which this calendar is assigned are allowed to view the calendar entry. |
| Only time information visible | As only the person who created the entry and nobody else can view the entry, these settings have no effect in this context. | All group and course members see the entry with all details. Additionally, all persons registered in OpenOlat or guests with access to the group/the course can see the time of the entry but no further details. | All group and course members see the entry with all details. Additionally, all persons registered in OpenOlat or guests with access to the group/the course can see the time of the entry but no further details. |
| Public | As only the person who created the entry and nobody else can view the entry, these settings have no effect in this context. | All group and course members see the entry with all details. Additionally, all persons registered in OpenOlat or guests with access to the group/the course can see all details of the entry. | All group and course members see the entry with all details. Additionally, all persons registered in OpenOlat or guests with access to the group/the course can see all details of the entry. |
Content
The personal calendar displays:
- The personal appointments you entered in this calendar yourself.
- Other standalone calendars that have been selected in the calendar list for the shared view.
E.g. a group or course calendar. - Aggregated calendars
Aggregated calendars, for their part, have combined appointments from several different calendars. With aggregated calendars, it should be noted that OpenOlat cannot resolve where the events originally came from. An integrated aggregated calendar does not provide this origin information for the individual appointments, only which calendars are included.
Aggregated calendar
An aggregated calendar is a collective feed that contains all calendars and their appointments that you have access to. You can use this feed from other applications to add or display all your OpenOlat appointments there. This saves you the work of having to insert each calendar individually (see Integrating calendars below). You can also use the gear icon in the list to import files and calendars and reset the appointments of an entire calendar.
Calendar list
The "Settings" button (small button with the cogwheel icon) opens the calendar list.

In the calendar list you will find all calendars that can be displayed in the current calendar (group, course, external and personal).
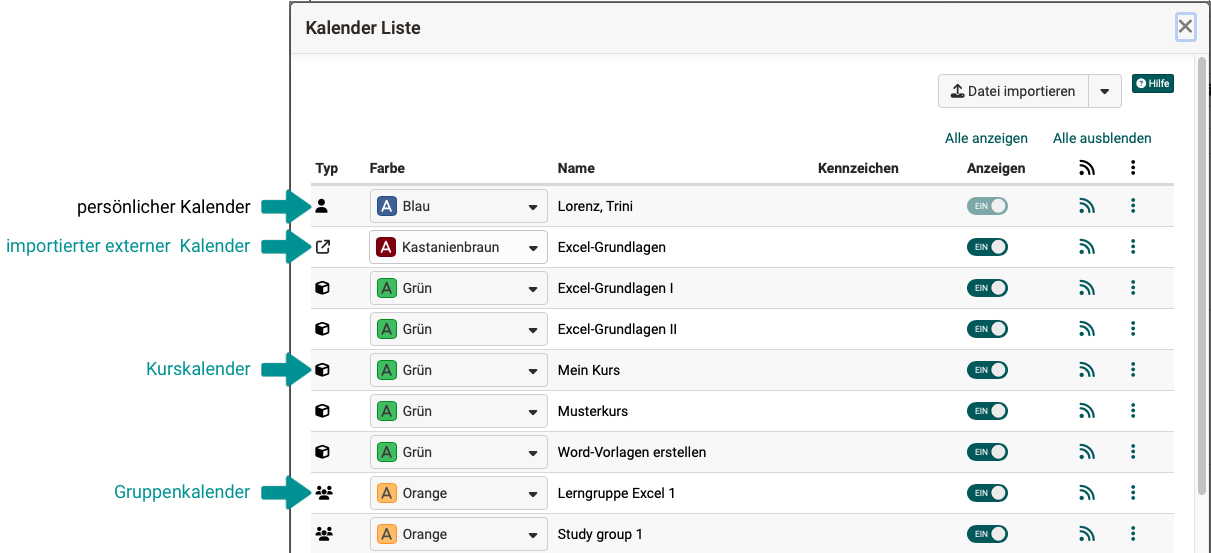
The "Type" column shows with an icon which kind of calendar it is: personal calendar, group calendar, course calendar or imported external calendar.
You can give the calendars different colors for better differentiation.
For course calendars, the "Identifier" column shows the identifier of the course. For personal and group calendars the column stays empty.
For each of these independent calendars, a toggle button in the "Show" column can be used to set whether the appointments are also displayed in your personal calendar. With the "Show all" and "Hide all" buttons you switch all calendars of the list on or off together.
Under the feed symbol you will find the URL with which this calendar can be integrated elsewhere.
Editing options are displayed under the icon with the 3 dots at the end of a line if they are independent calendars. (Editing is limited/not possible for aggregated calendars).
Add calendars to the calendar list
The course and group calendars are added to the calendar list of the personal calendar by default. If you want to add another independent calendar to the calendar list, use the buttons above the list.
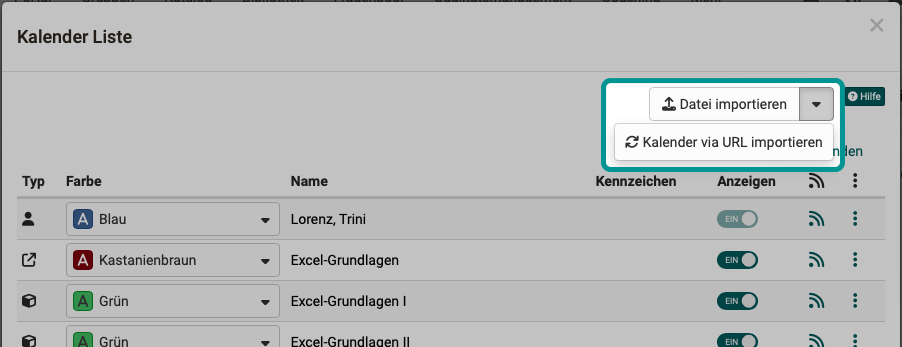
Calendar files (.ics) can be added using the "Import file" button.
Clicking the small arrow next to it reveals the "Import from URL" entry.
Please note:
Use the buttons above the calendar list to add further independent calendars to the calendar list.
- Another line appears = another independent calendar
- You can specify in the calendar list whether the appointments in this calendar should be transferred to your personal calendar (activate the toggle button).
- You can give the calendars different colors.
The options to add or delete under the 3 dots at the end of a line, on the other hand, only edit this single (aggregated) calendar.
- The calendars imported here do not appear in the calendar list, but are included in the now aggregated calendar.
- You can not differentiate by color.
Recommendation:
For a better overview, we recommend importing as a separate calendar (import via buttons in the header of the calendar list).
Tip
If your calendar appears empty or certain appointments are not displayed despite having been entered, the desired calendar may not be selected in the calendar list. (Toggle button not switched on.)
Share OpenOlat calendar
Using iCal (a standard for managing appointments), you can integrate the various OpenOlat calendars into another calendar, such as the Google calendar. To do this, click the iCal icon either in the calendar view or in the corresponding line of the calendar list and copy the iCal link.
Managed calendar
Other calendars (such as those from the PerformX system) can also be integrated into the OpenOlat calendar as managed calendars on Feed. Managed appointments are marked with a lock symbol.
Important
In course and group calendars, the editing options may differ from the personal calendar.
Further information
Mentioned on this page
Using Group Tools >
Finding courses >
Personal menu >
Personal tools >
Further reading
Using Additional Course Features >
Group Administration >
Course Element "Calendar" >
Core functions: Overview >