Course Settings
You can make the configurations that affect the course as a whole under:
Course > Administration > Settings
The "Settings" menu is available to owners of the course, learning resource managers and administrators, and also to persons who have been granted the "Course editor" right in the Members management.

Video introduction (German): Configuring course elements
Important
Every learning resource has a "Settings" menu, not just courses.
The settings of conventional and learning path courses vary slightly.
You can use the "Metadata", "Info", "Execution" and "Share" tabs to specify information that will be visible in the Course info page.
Profile
| Name | Course settings |
|---|---|
| Available since | Release 13.0 (OO-3706) |
Tab Metadata

Metadata name the course and classify it. The metadata can be used to make your course easier to find, for example. Only the title is mandatory.
After creating, copying or importing a learning resource, OpenOlat opens the settings on this tab. This way you check the title and reference right at the start .
Metadata of a course are
- Title
- Reference (An external identifier that is displayed in the course overview. E.g. the name from the course catalog or a printed course catalog.)
- Type of the learning resource (in this case: course)
- Implementation format (blended learning, self-study, ...)
- Subjects (from the taxonomy)
- License
For more details >
More about Meta data >
To the top of the page ^
Tab Info

Here you define information about the course or learning resource. This includes:
- Cover image and teaser movie
- Teaser (text line/term)
- Description
- Facts: Authors / taught by, Main language and Expenditure of work
- Display settings: which sections the info page shows
- Additional information: Objectives, Requirements and Certification
This information is also visible to interested parties without course access on the info page.
More about the Set up of the info page >
More about the content of the info page >
To the top of the page ^
Tab Execution

Here you can
- define the implementation period of the course,
- switch on the "Absence management" and configure it further (if switched on in the system administration under
Administration > Modules > Events / Absences), - convert existing conventional courses into learning path courses
- or for learning path courses define how the learning progress is calculated, based on the number of course elements or on the duration of the course elements.
For more details >
To the top of the page ^
Tab Share

In the "Share" tab, you define how and for whom a course or learning resource is released.
- Whether access is only possible for selected members, the course itself can be selected and booked or access is completely open
- When participants can withdraw from the course
- Whether only administrative roles of a specific organizational unit are granted access
- Whether and how other authors can access the course
- Whether external OER catalogs and search engines receive information
- Whether an offer is made in the catalog for the course and if so, which one
- Whether the course can also be used from another LMS via LTI
Details about Tab Share >
More about the Share >
To the top of the page ^
Tab Catalog (only applies to catalog version 1)

The "Add to catalog" button can be used to enter the learning resource in the catalog and assign it to one or more predefined categories. To enter the course or learning resource in several catalog areas, the step must be repeated. All catalog entries then appear here in the "Catalog" tab and can also be removed here.
The entire OpenOlat catalog (version 1) can be viewed by all users in the "Courses" menu.
Only enter your courses in the catalog once they have been completed and should be visible to users.
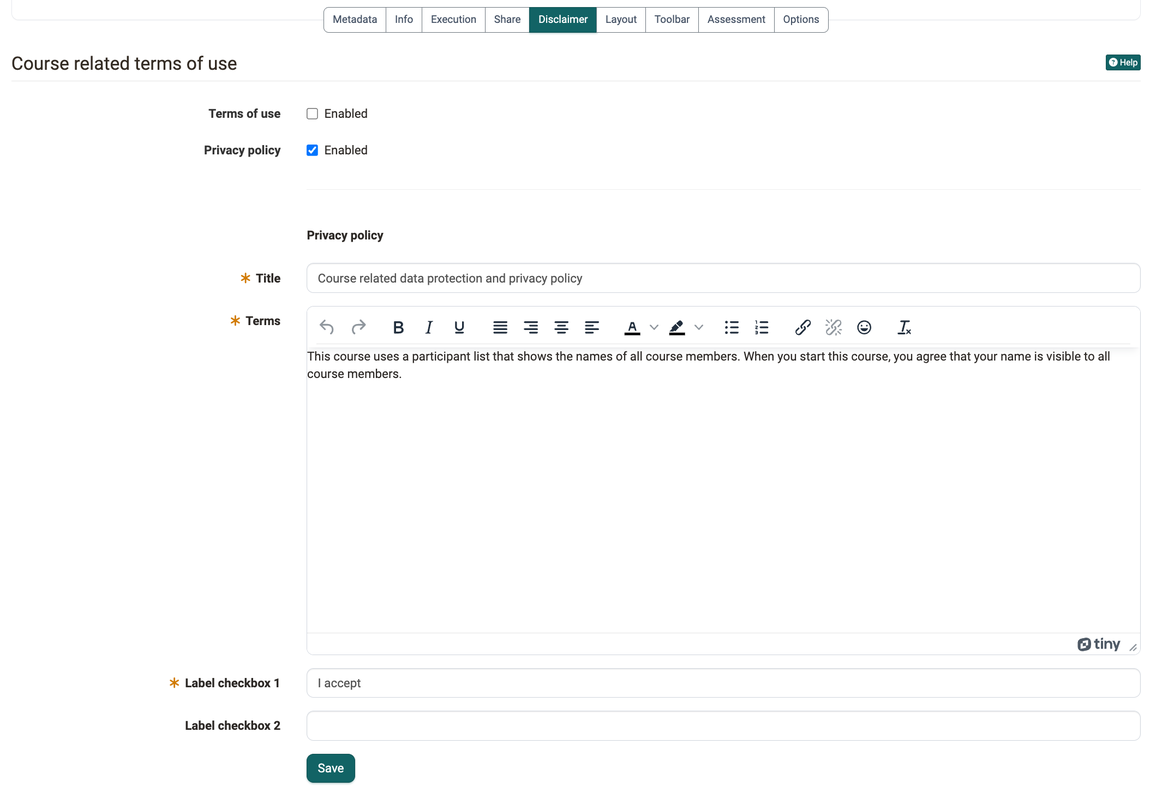
Tab Terms of use

Here
- freely definable course-related terms of use
- and a course-related privacy policy
can be activated and stored. If a person starts the course, they must first accept the conditions, otherwise access to the course is not possible. For each text you switch on, you enter a title, the conditions and the label of the checkbox that is ticked to accept. A second checkbox is possible.
In the Members management you can see in the "Consents" section which persons have already accepted the conditions.
Tab Layout

In the Layout tab you determine how the course looks and how participants move through it. Here you can
- select a layout template for a course,
- define the course navigation in more detail
- and define the style of the course elements.
Which layout templates are available is determined by the system layout (theme) that applies to your entire OpenOlat instance. The "Default" template is always available. A uniform appearance for all courses (colors, fonts, logo) is therefore implemented centrally via a custom system layout, see Layout. For a single course, choose the option "Customize...": there you set the font and colors for text, headings, links, menu and toolbox and upload a logo. In addition, you can store your own CSS files in the "courseCSS" folder of the course Storage folder. They then appear in the selection as "from course folder".
In the "Navigation" section you can set the visibility of the menu and crumb navigation. In learning path courses you also specify whether the icons and the path are displayed in the menu ("Display icons in menu", "Display path in menu"). Depending on the linear or flexible scenario, one or the other variant offers itself.
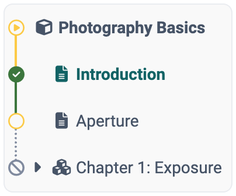
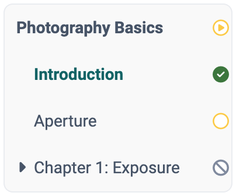
In the section "Course element default style" you can define the default presentation of the course elements and, for example, upload a background image and define the style of the image as well as assign a color category. In the preview you can see the effects.
Tab Toolbar

Here you can switch the toolbar in the course header on or off and define which specific individual tools are displayed to course participants in the toolbar.
For more details >
To the top of the page ^
Tab Assessment

In the Assessment tab, you can make settings for
- Assessment methods: total, average, weighted
- Requirements for passing the course
- The role of coaches in the assessment process
- Activate and configure course certificates
- Activate and configure credit points
- Activate and configure course certificates and also set up recertification
- Award of badges
Important
For conventional courses, only the settings for evidence of achievement, certificates and badges are available in the Assessment tab. The configuration for passing the course is done in the course editor on the top course element in the "Score" tab. There is no progression for conventional courses.
For more details >
For more details on certificates >
For more details on recertification >
To the top of the page ^
Tab Options

Here you activate as required
- a course-specific glossary
- a resource folder for your course
- a special folder for coaches
- to-dos for coaches
If you are a user with an administrative role (learning resource manager, administrator), you will be shown additional special options:
- invitation to activate external users for course owners with author rights
- activate the "LTI 1.3" release for course owners with authoring rights
For more details >
To the top of the page ^