Course Element "Document"
Profile
| Name | Document |
|---|---|
| Icon | |
| Available since | Release 15.3 |
| Functional group | Knowledge Transfer |
| Purpose | Provision of various documents, also for joint editing |
| Assessable | no |
| Specialty / Note | For office documents, appropriate licenses are required for editing |
By means of the course element "Document" different document formats can be integrated into the course. Documents in this course element are typically displayed directly to users.
For which file types is the course element intended?
The course element is well suited for displaying PDF, JPG and PNG files. In addition, if activated by the OpenOlat administrator, Office documents (Word, Excel, PowerPoint) and draw.io diagrams can also be integrated.
OpenOlat uses an integrated PDF viewer (pdf.js) which provides clear rendering. Large PDF files are loaded progressively if the file supports this. The PDF viewer is read-only: a separate editor is required for editing.
Tip
For video files the course element "Video" should be used, and for HTML pages the course element "Single page", instead of the course element "Document".
How do files get into the course element?
Configuration takes place in the "Document" tab of the course editor. There are many ways for files to get into the course element. Files can generally be uploaded, linked, or newly created.
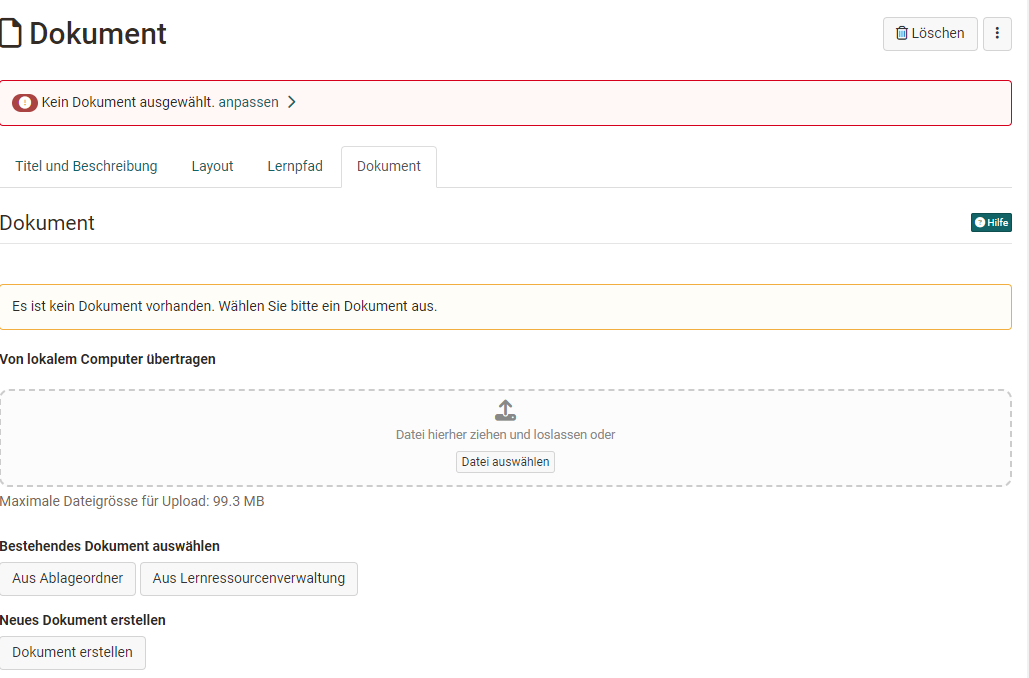
Upload a file
You can ...
- "Transfer from local computer" a file. Select "Choose file" or drag and drop the file.
- upload a file as a learning resource and import it into the course: → "From learning resource management" → "Import file".
Link a file
You can ...
- select a file already placed in the course's storage folder beforehand: → "From storage folder".
- select a file already uploaded as a learning resource: → "From learning resource management"
Create a file
To newly create a file for the course element, select "Create document" and choose the desired file format.
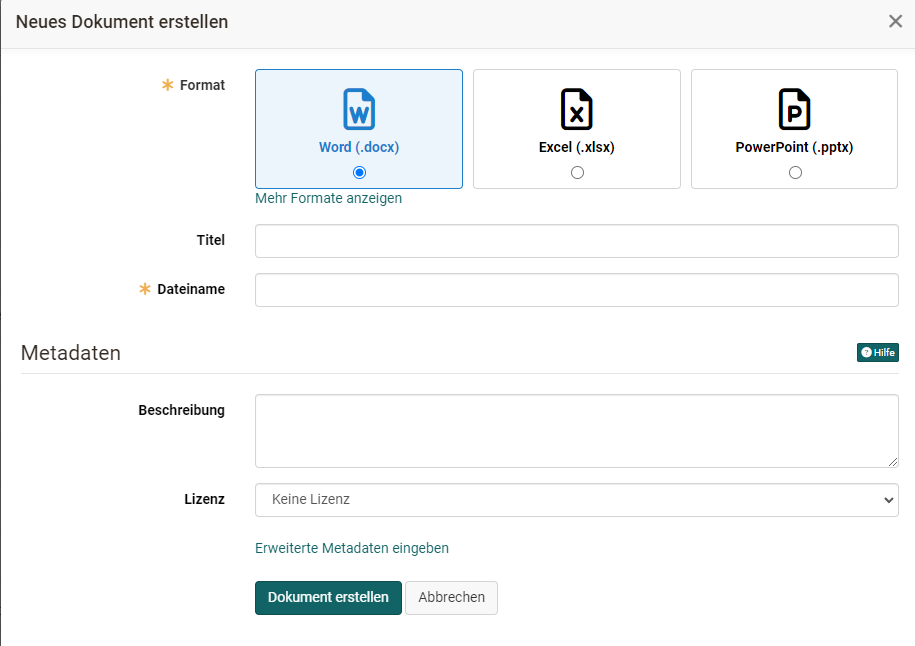
Alternatively, a new file can also be created as a learning resource. To do this, select: "From learning resource management" → "Create".
If draw.io diagrams have been activated by the OpenOlat administrators, draw.io diagrams can also be created in the Document course element and made available to users. To do this, select the option "Create document" → "Show more formats" → "Diagram" or "Whiteboard".
draw.io diagrams support simultaneous editing by multiple users . Multiple participants can open and edit a diagram at the same time. Changes are synchronized in real time. This makes the Document course element with draw.io suitable for collaborative group work.
Important
Under heavy simultaneous use, synchronization may be briefly interrupted. Reloading the document restores the connection.
Configure preview height
In the "Document" tab of the course editor, the height of the document preview can be set. By default, "Automatic" is selected: the document uses the available page space. For certain formats (e.g. PowerPoint) this may result in black borders. A fixed height allows for precise adjustment of the display.
Document display in Lightbox mode
Documents, images and videos are displayed by default in Lightbox mode: as an overlay on the current page, without opening a new browser window. When switching to editing mode, the document continues to open in a separate window.
Make changes
Integrated documents can also be edited later if needed, and their metadata can be changed. It is also possible to replace the document completely. What exactly is possible depends on the file type.
Remove a document
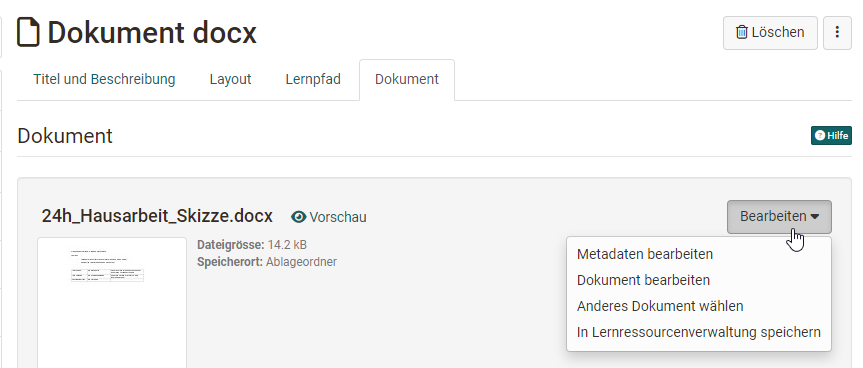
A document cannot be deleted in the course element, only replaced. You select another document in the course editor in the "Document" tab: Edit > Select other document. If the course should no longer show any document, delete the whole course element in Course > Administration > Course editor and publish the course, see Deleting, Moving and Copying Course Elements.
The file itself is kept. Where it is stored is shown by the "Storage location" below the document in the "Document" tab:
- Storage folder: Uploaded files, newly created files and files selected from the storage folder are stored here. You delete the file in
Course > Administration > Files > Storage folder, see Storage folder. - Learning resource repository: The file is a learning resource of its own. You delete it like any learning resource, see Delete (a course or learning resource).
Important
Delete the file only when no course element shows it any more. Otherwise participants see the message "No document" in the course element.
Configure permissions
After a document has been linked to the course element, it can be defined which roles are allowed to edit or download the document. After downloading a corresponding document, the metadata shows who last edited the document.
These permissions allow various scenarios to be implemented with the course element, including collaborative ones.
Important
If downloading is not permitted for a role, printing is automatically disabled for that role as well: the Print button and the menu entry in the PDF viewer are no longer displayed .