Other
Course Element: LTI Page

By means of the course element "LTI page" it is possible to integrate external learning applications in your course before having their content displayed in an OpenOlat window. LTI means "Learning Tool Interoperability" and is an IMS standard to embed external learning applications such as e.g. a chat, a media Wiki, a test editor, or a virtual lab. More information about LTI can be found on the LTI project page: __ http://www.imsglobal.org/lti/
Indicate the URL to be referenced in the tab "Page content" along with its key and password. When selecting this LTI page in the course navigation, the user must accept the data transfer for privacy protection reasons first, before any user data, course information or keys will be transferred to the embedded application, password controlled and in the background. Your learning application will check access rights and grant access with a valid key. A new query for data transfer only occurs again later if the configuration of the device changes with regard to the transmitted data.
When the user selects the LTI page in the navigation, the integrated learning application appears in the OLAT course.
Configure LTI page
The following parameters can be configured:
URL: Please indicate the address of your external learning application in the format "https://tools.vcrp.de/lti_quiz/lti_quizwand.php". Further information on this example can be found here.
Key: Please indicate the key provided by the supplier of your external learning application (in the example above this would be "lti_quiz").
Password: Please indicate the corresponding password to your key provided by the supplier of your external learning application (in the example above this would be "weeHoo1w").
Skip launch page: If this option is activated, the connected application is displayed directly, without the "Display LTI Learning Content" intermediate page. The administrator can disable this option.
Transmit firstname/name: By checking this box a user's first and last name will be transferred to your external learning application. Otherwise users will be able to use this application anonymously.
Transmit e-mail address: By checking this box a user's e-mail address will be transferred to your external learning application.
Additional attributes: You can add additional parameters inside this input box that should be transferred to a learning application. You can e.g. tell this learning application to transfer a query from the learning platform OLAT. (External learning applications have to be able to process such transferred information; therefore it is necessary to have an agreement with your provider.) You have the choice between text attributes (identical values for each user) and additional dynamic user attributes (different for each user). You can add as many attributes as you wish, but note that the LTI resource must know which attributes are sent as this is not specified in the standard.
OpenOlat roles: Here you can configure which role the user will have when launching the LTI resource. The three OpenOlat roles Author, Coach and Participant are supported. For each role the mapping can be defined to a corresponding role on the LTI resource. The following LTI roles are available: Learner, Instructor, Administrator, Teaching assistant, Content developer and Mentor .
Transfer score: Select this checkbox when the LTI resource is generating a score value that can be transmitted to OpenOlat using the LTI 1.1 standard. This is optional. The submitted score will appear on the users start screen of the LTI course element as well as in the efficiency statement of this course. Please be aware that according to the LTI standard only values between 0 and 1 are allowed.
Info
If the option "transfer score" is activated, the LTI page can be added as an assessable course element to the course, which then appears in the assessment tool. In addition to that, the score also appears on the homepage of the LTI course element.
Scaling factor: With the scaling factor the LTI results, which must have a value between 0 and 1 according to the LTI specification, can be scaled to a more practical value for the OpenOlat course. For example, if you want an LTI exam to have a maximum of 10 points in OpenOlat, you must specify a scaling factor of "10". If you want the transmitted score to be unmodified, use the factor "1".
Score needed to pass: Here you can configure an optional cut value to define when the LTI course element is considered as being passed. The cut value relates to the score value after scaling and not to the raw value transmitted by LTI. In the example above a cut value of "5" is equivalent to "50%".
Display: Select the option "Embedded in course (iFrame)" to embed the LTI resource within the course layout. The option "Display only module, hide LMS (iFrame)" completely hides OpenOlat while the LTI module is active. With the option "Open in new window" the LTI resource is opened in a separate window. This can be useful in case the resource needs a lot of space or has to be used in parallel with other course elements.
Display height: Select "automatic" or an explicit size in case the automatic feature does not work properly.
Display width: Select "automatic" or an explicit size in case the automatic feature does not work properly.
Show all information transmitted on launch (Debug): By checking this box other users will be able to see the information sent. This information includes parameters such as user identification, course title, course element, etc.By clicking on "Launch Endpoint with BasicLTI Data" in the course view on top of your display of the data sent you will get to the homepage of your learning application.
Course Element: Topic Assignment

The course element "Topic assignment" is useful if you want to announce e.g. topics for term papers in your course before having them supervised. Course authors determine the detailed configuration of their topic assignment. This comprises e.g. who has the right to announce and supervise topics, how topics have to be described, or how many topics can be selected by one course participant. What makes this course element so special is the fact that not course authors but topic authors will announce and supervise such topics.
Editor view
How to configure topic assignments
In the tab "Configuration" you determine first how many topics can be selected by one participant, if this selection is definite or if it has to be accepted by the topic author first. Furthermore you can add additional fields to describe a topic in more detail. This description will then be displayed in the table containing all topics announced. Here you can also determine if registrations and submissions shall only be possible within a certain period of time. In the tab "Sub-elements" you can choose if there should be a drop box as well as a return box in your topic assignment. Course participants will then upload their files to that drop box while topic authors will return those files by means of a return box.
Configure
- Do you want to limit the number of Topics per participant?:
When selecting this option a field will pop up to indicate the number of Topics a participant may choose from the course element Topic assignment
- Topic authors have to accept participants:
When selecting this option
participants can only register for a Topic temporarily. Topic authors will
then have to select their candidates before finally accepting them.
When deselecting this option all participants already registered for this
Topic will be accepted automatically. However, topic authors are able to
define the maximum number of participants first.
- Only one Topic allowed (participants accepted will be signed out automatically from other Topics):
When selecting this option all users accepted as participants will be automatically signed out of all other topics selected before. This means that participants may be registered for only one Topic
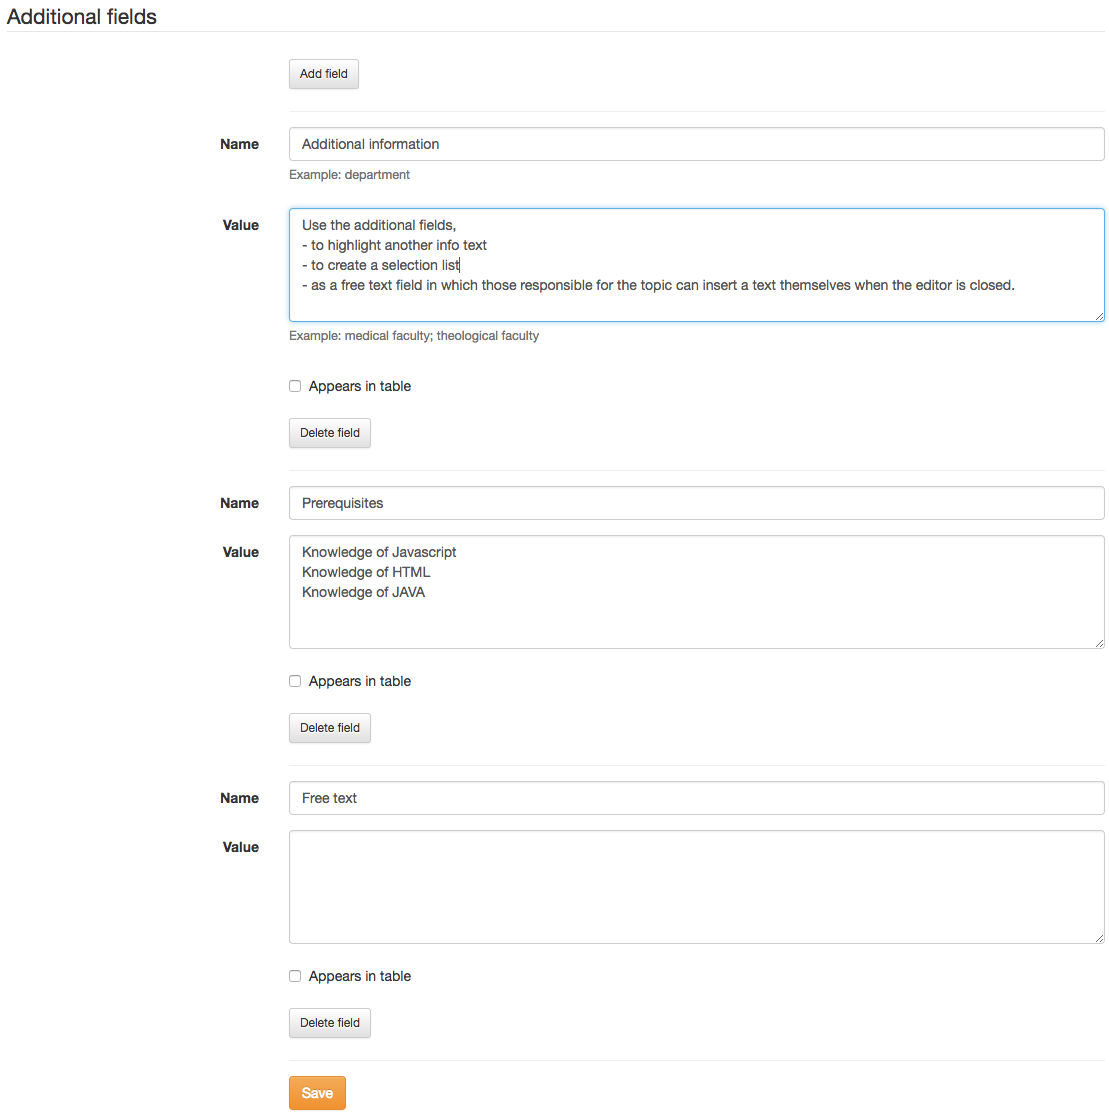
- Add additional fields:
By means of "Add field" you can create fields according to your needs. You can create up to five additional fields for further details.
In the field "Name" you can indicate a favored field name.
You can offer your topic authors a selection of predefined values displayed in a pull-down menu. Please indicate the corresponding options in the field "Value" separated by semicolons or line breaks. When using a free-text field you can leave the field "Value" blank. Topic authors can then fill in a value of their own choice.
When selecting "Appears in table" this field will be displayed in the overview as requested. Apart from that this information will appear in the detailed topic description.
By means of "Delete field" you can delete additional fields.
- Manage dates:
You can choose which dates should be at the disposal of topic authors.
- Registration date:
A topic author can determine a registration deadline for a Topic . After this deadline participants will no longer be able to select or deselect that Topic . However, a topic author still has the option to sign participants in or out.
- Deadline:
After a deadline the drop box will be closed. Participants will then no longer be able to upload documents to that drop box.
When selecting "Appears in table" your event will be displayed in the overview.
Further settings for topic assignment
- How to appoint topic authors
In the tab "Persons in charge" you add those OpenOlat users who should be able to announce and supervise topics. These persons do not necessarily have to hold author rights.
If you remove a topic author who has already announced a topic he will still be able to supervise it. However, this person will no longer be able to announce new topics.
- Role of topic authors
When being authorized by a course author to act as topic author you can announce as well as supervise topics. Just open the course view and navigate to your topic assignment. . As person responsible for a topic you can edit that Topic, administer its participants or add more persons responsible for that topic. In the box "Supervised groups" you will see those groups you are in charge of.
- Select elements
Here you can determine if the elements Drop box and Return box should be activated in the course element Topic assignment . In the Drop box participants will be able to upload files. Topic authors can store files in a Return box . If there are no modifications all elements will be enabled. When deselecting the Drop box its tab will be dimmed and no longer accessible.
- Confirmation of submission
You can optionally enter a text to be presented to the user in a new window after successfully handing in a file. If you do not enter a text, the following message (or similar) will appear: This is to confirm that John Miller (jmiller) has sent the file "test.html" on 21-09-04 at 00:14:42.
By selecting the option Send text additionally as e-mail the user will get an e-mail with the above mentioned confirmation after successfully handing in a file.
Course view
How to create a new topic
As a course owner or topic manager, you can set up new topics. If you give the learner the right to set a topic (suggestion) within a course, you can help determine how a course is to be structured, for example, or submit suggestions for potential homework or presentations.
Click on "Create new topic" and enter the topic title and description. Depending on the configuration of the topic assignment, you can describe the topic with further details, set the enrolment and submission deadlines, determine how many course participants may choose your topic and upload additional files as attachments if required. In addition, you determine whether participants are allowed to deselect topics and whether those responsible for the topic should be notified by e-mail when topics are selected or deselected.
Tip
If you want to change the configuration at a later time, click on the topic title. Now you can edit the topic, change the topic status from "free" to "occupied" or vice versa or delete the topic.
Create and edit topic in detail
- Topic:
Via Topic you will find the topic's title, which can be edited by the person responsible.
- in charge:
Here you have a list of topic authors. When clicking on these authors' names you will get to their visiting cards to contact them.
Info
When creating a Topic you will automatically be the person responsible for this topic. However, you can put others in charge of that role in the tab Administration of participants or appoint other users to persons responsible for your topic.
- Description:
The field Description contains more detailed information on this Topic.
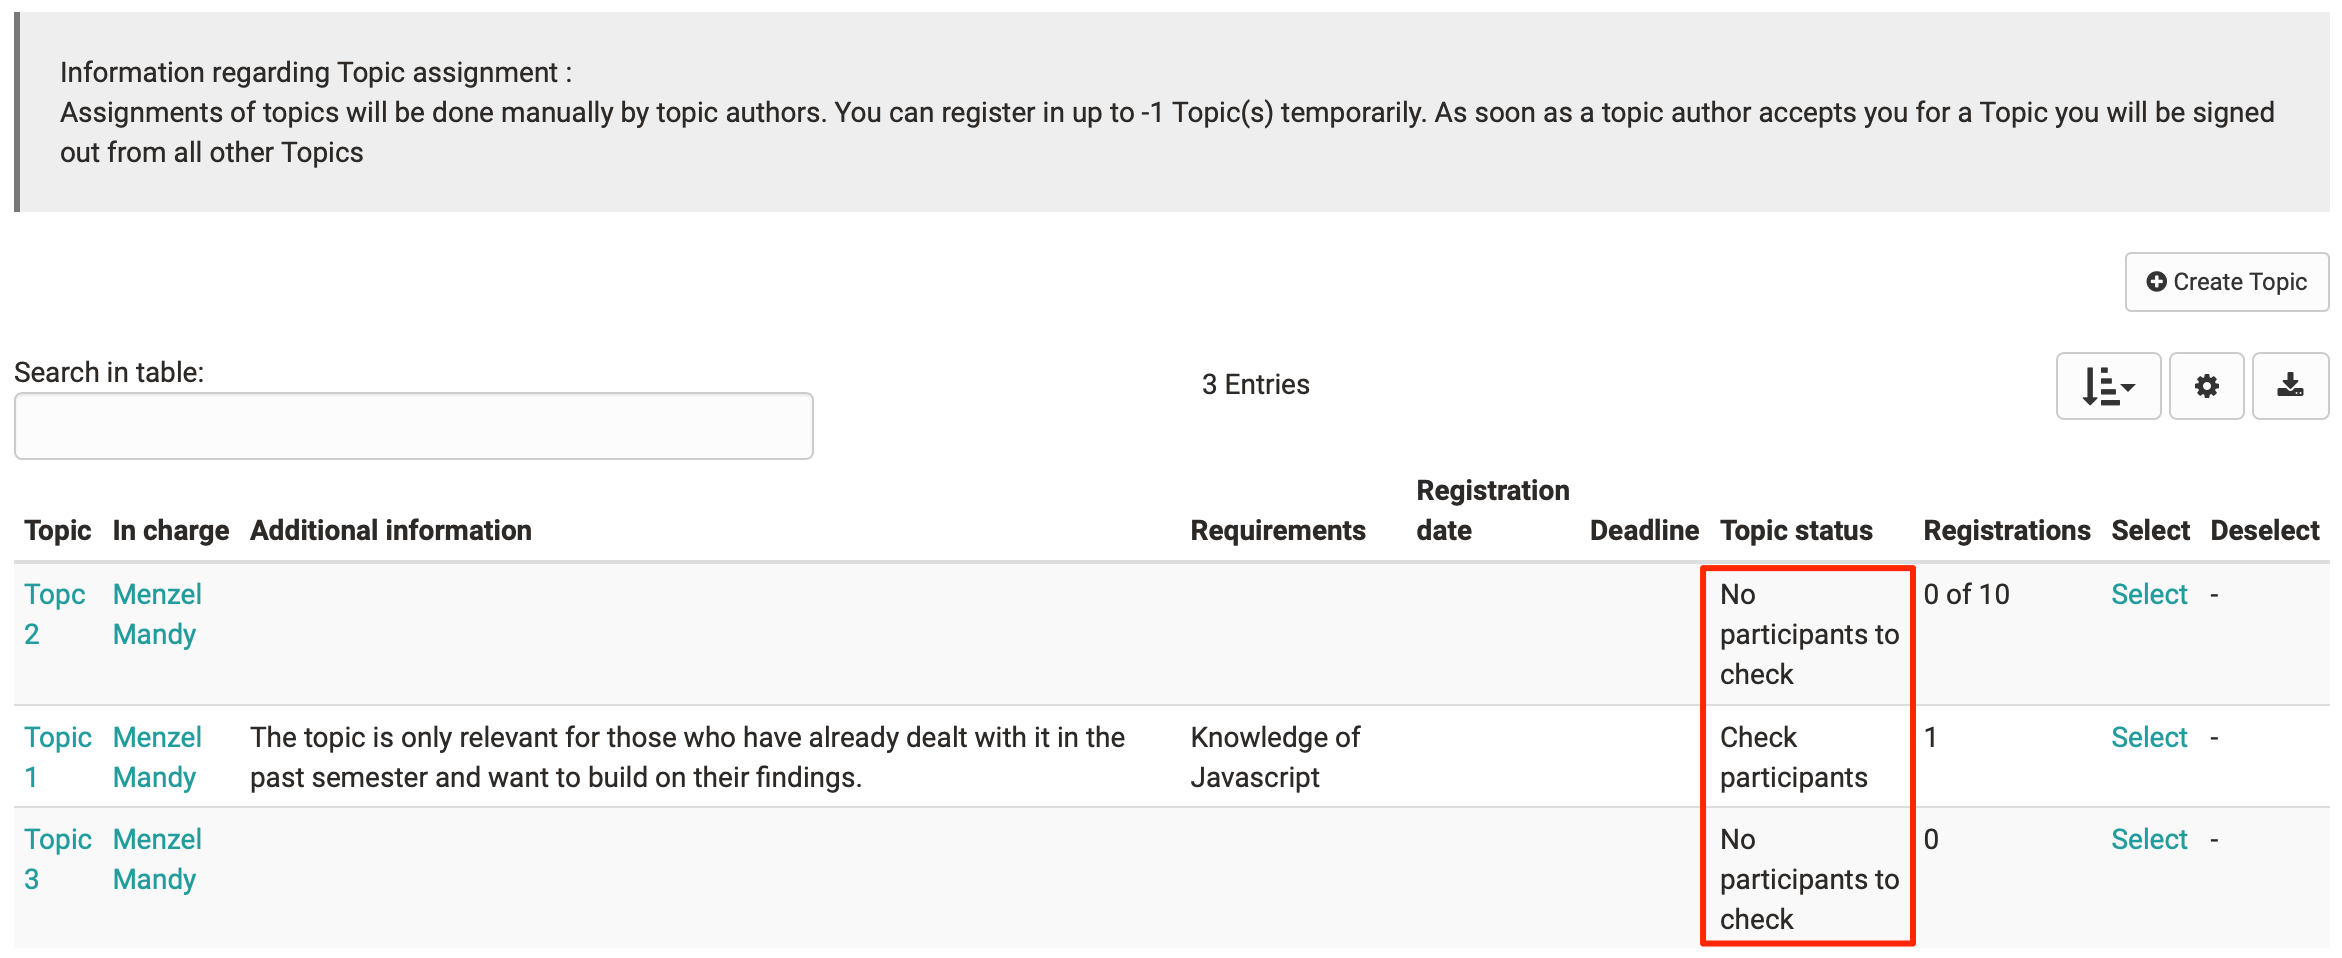
- Topic status:
This field automatically displays the topic status.
If you are the topic manager or course author and no participants have registered for your topic yet, the topic status is set to "No participants to check". If participants have already registered, the status is set to "Check participants". If you have already selected participants from the possible candidates, the status "Participant accepted" is displayed.
- Number of vacancies (filled/total):
Topic authors can limit the number of vacancies.
-
Allow unsubscribe from topic: If activated, participants may also unsubscribe from a topic.
-
Additional fields: There are so-called "Additional fields" course authors can define. Course authors determine if topic authors should select within the so-called "Topic assignment : add additional fields" a value from a pull-down list or if they are to indicate a value of their own. Here you can either indicate some free text or choose a value from a list.
-
Registration deadline:
If topic authors define a registration deadline you will only be able to select or deselect a topic within a certain period. Before and after that deadline the links "Select" and "Deselect" will be deactivated; users will not be able to sign in or out of your Topic . The person responsible for that topic can nevertheless sign users in or out manually.
- Due date:
If topic authors define a deadline you will only be able to upload documents to the drop box within a certain period of time. Please indicate either a start date or a Deadline or both.
- Attachment:
In the field Attachment topic authors can upload a file. Several files can be uploaded as single ZIP file.
- E-mail notification when selecting/deselecting Topics:
When choosing this option you will get an e-mail notification in case a course participant selects or deselects your Topic.
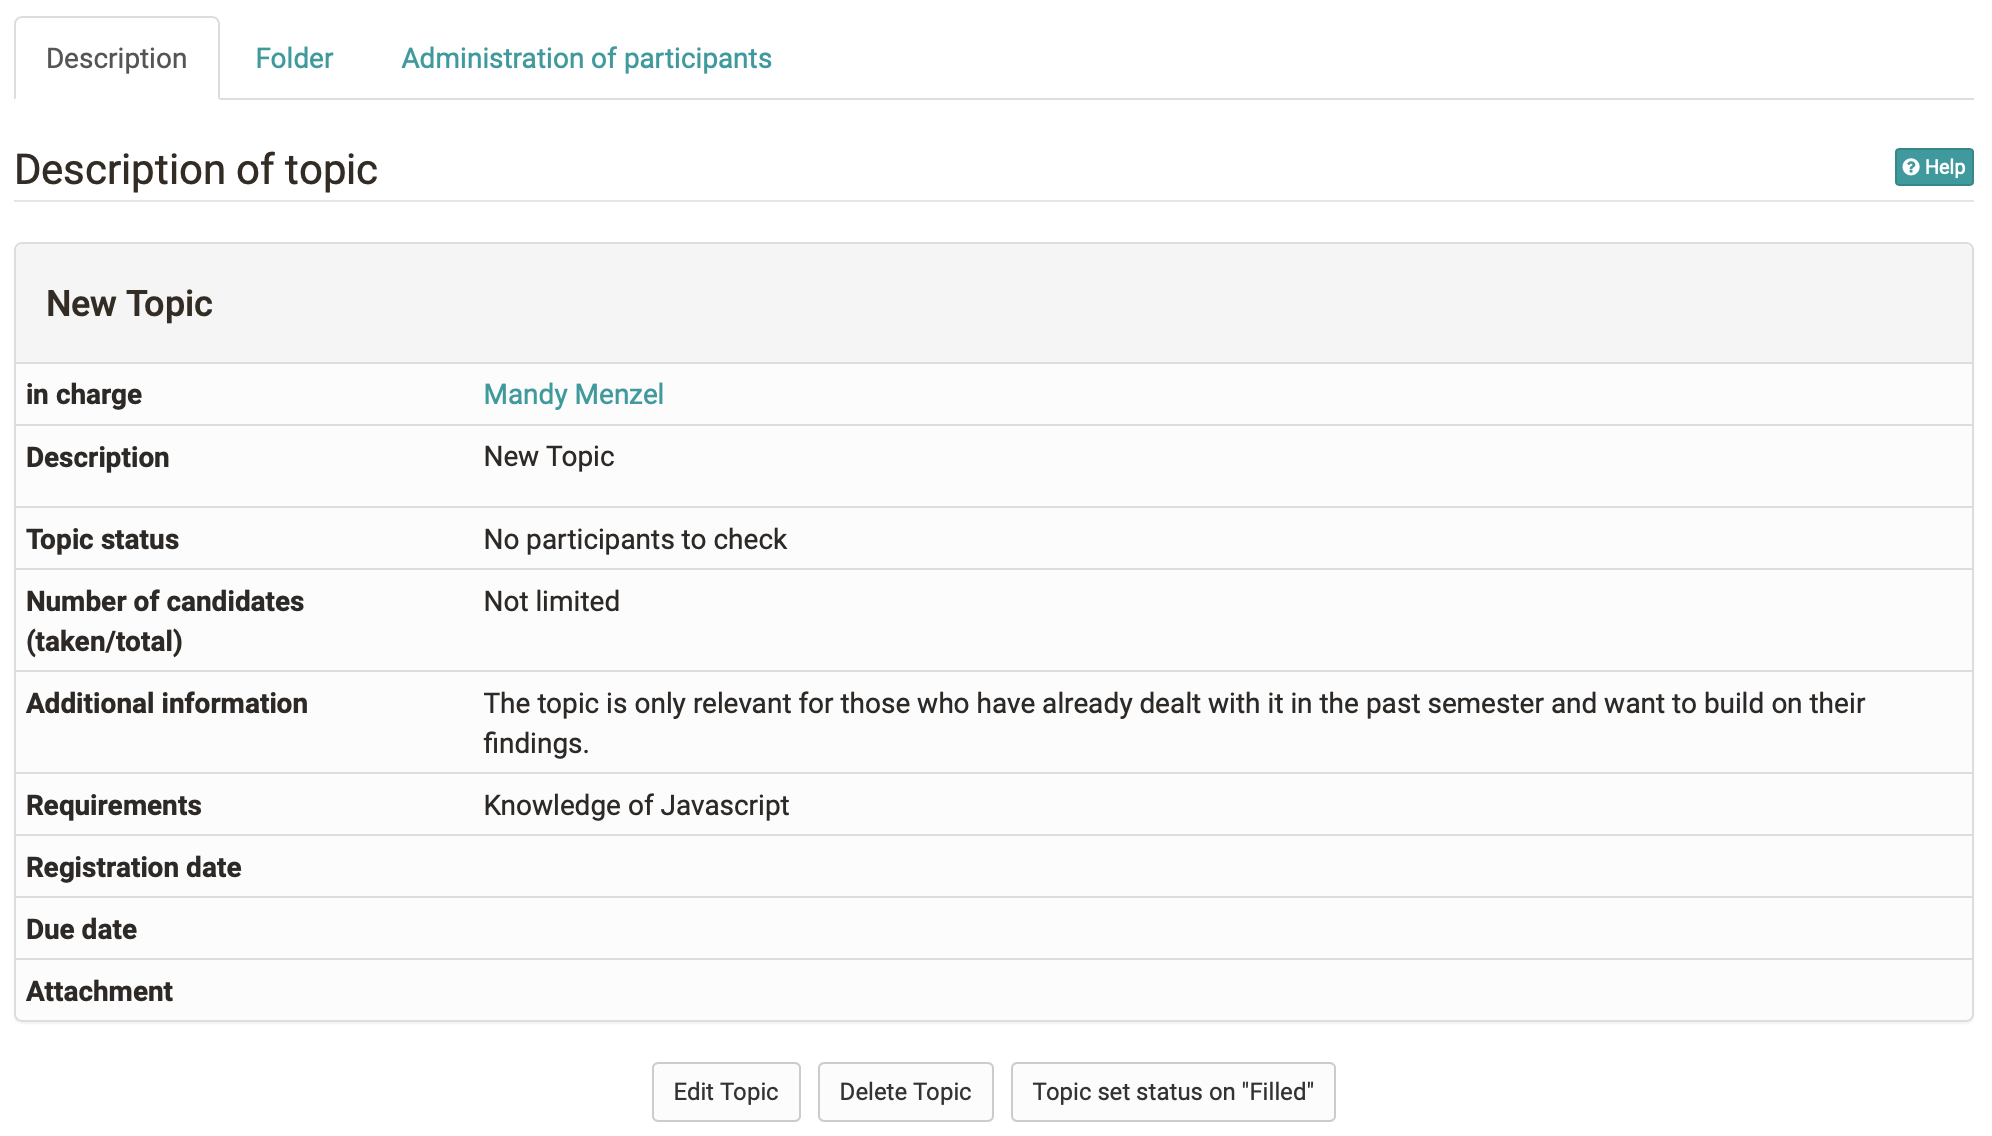
Via "Edit Topic" you will get to the editing mode.
Click on "Delete Topic" to delete your topic from the Topic assignment.
Choose "Topic set status on "Filled"" if no further participants should be able to select a Topic .
Via "Reset Topic status to "Vacancies"" you can open a Topic anew--even if there are participants that are registered and accepted already.
Attention
Please keep in mind that the last two buttons will only be visible if the course author has provided the Topic assignment with the option to accept participants manually.
"Folder" and "Administration of participants" tabs
How to manage participants
If the configuration of your topic assignment requires that course participants have to be accepted by the topic author you will see on the home page of topic assignments the note "Check participant" in a table as soon as somebody has applied for your topic.
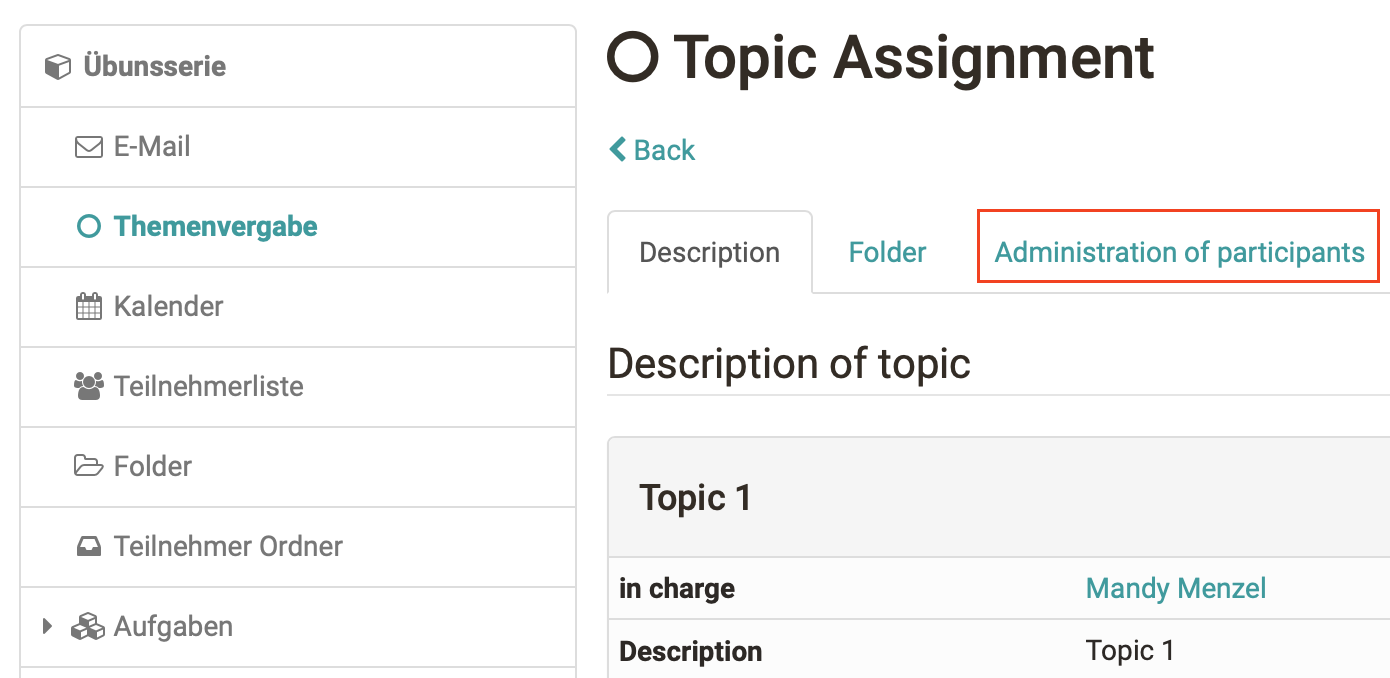
Now open the tab "Topic assignment" and accept the application of your candidate(s).
Candidates are course participants applying for your topic. By means of "Accept participant as" you can decide to whom your topic should be assigned. All participants accepted will be added to the list "Participants accepted" and can be notified via e-mail if you wish. Just highlight those candidates you do not accept and click on "Delete." If you wish those candidates will be notified via e-mail as well.
If you have not limited the number of vacancies you can repeat this procedure several times. Please remember to select "Topic set status on "Filled" in the tab "Description" to avoid further applications for your topic.
It is also possible to add or remove participants in this tab manually, as well as additional topic administrators. Participants will not be allowed to edit their Topic.
How to upload and return files
In the tab "Folder," section "Drop box," you will find all those files course participants have submitted. In the section "Return box" you can put files already corrected. There will be one sub-folder for each course participant.
From the user's perspective:
If the topic status is set to "Free", users can register for a topic, as long as they have not exceeded the maximum possible topic selection. If the topic status is set to "Occupied", no further users can register. If you have already selected a topic, the topic status is either "Provisionally assigned" if the person responsible for the topic has to accept you as a participant, or "Assigned" if the registration is automatic. As soon as the topic owner accepts you as a participant, the topic status is set to "Definitively assigned".
Course Element: Link list

The course element "Link list" enables the author to quickly assemble a collection of links relevant to the course. No HTML proficiency is required. Simply open the course editor, navigate to the link list course element, open the "Configuration" tab and enter either the URL of the website you wish to add as a link, or select a target file by clicking on the magnifier icon. You can upload files in the now open modal window. Next, select whether the link should open in a new or in the same window, and enter the title of the link. A description or other additional information on the link can be added through the comment field, located beneath the address field. Remove or add links by using the trash / + buttons.


Course Element "Assignment of dates"

Here you can create and edit those dates for which users can enroll. It is also possible to define if cancelling an enrollment shall be allowed. Furthermore you can manage your participants.
The assignment of dates can be set in the course editor in the tab "Configuration" as well as when the editor is closed.