Elements
Adding Course Elements
A course can comprise any number of course elements. In a course you can use several course elements of the same type; they can be nested as well. However, the development of an online course should always be sensible and didactically well thought out.
Select the course element under which the new element should be inserted. Click on the course element of your choice in the selection window "Insert course element" in the toolbar. The new element will be positioned beneath the currently selected course element. If the top course element is selected, the new element will be automatically inserted at the end of the course. Course elements can be easily re-arranged with „Drag&Drop“ at any given point in time.
If you place the cursor at the desired position before adding the block, you do not need to move the new block again.
Once the course element has been added, it can be further configured.
Configuration tabs of course elements
Each course element of a conventional course contains the tabs "Title and description" and "Layout". All course elements of a conventional course additionally have the tabs "Visibility" and "Access". Course elements of a learning path course on the other hand additionally contain the tab "Learning path".
In addition there are one or more tabs for individual configuration of that course element.
Configuration of "Title and Description"
In the tab "Title and description" you can describe your course element further. The field "T itle " is mandatory. This "Title in course menu" serves as labeling of your course element in the course navigation and is restricted to 25 characters. All symbols and numerals are allowed. This short title appears in the navigation menu as well as in the contents area as heading, if selected. Do not use slashes or periods for the Short Title and Title fields. The use of such special characters can cause problems when archiving courses.
The content in the field " Title " serves as additional description of your course element and has a maximum of 255 characters. This title will also be displayed when moving the cursor over the element's short title in the course navigation. Avoid using slashes or full stops in the fields "Short title" and "Title." These special characters can cause problems when archiving courses later on.
In the field " Description " you can provide detailed information on your course element.
You can also enter even more information in predefined fields when you expand the corresponding area.
In the content field " Learning objectives " you can communicate concrete learning objectives for an individual course element. This is especially useful for course elements that are linked to more complex actions or for structural elements that bundle several other course elements and activities.
In the field " Instructions " you can provide information to the participants how they should use the respective course element.
In addition, you can also provide instructions for all course coaches that will not be seen by the participants.
Use as short a text as possible (1-2 words) for the "Title", otherwise the left navigation will be too broad and confusing.
The "Description" is not intended for extensive contents, tasks or other information. Only the function of the task module is to be explained in more detail in the description. 3-4 sentences are suitable here as a rule.
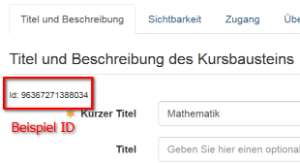
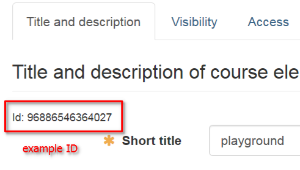
In the tab "Title and description" you will also find the ID and the information you need if you want to link to this course element.
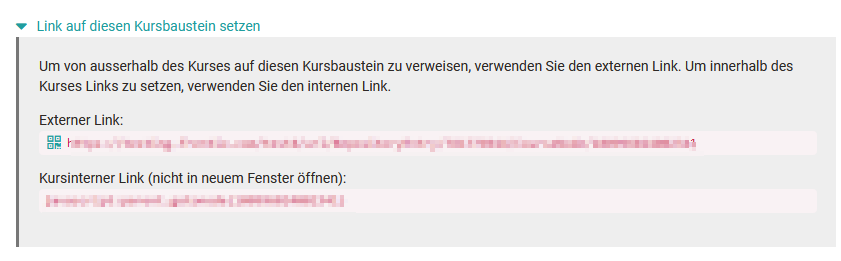
External link : To link to this course element from another OpenOlat course or outside OpenOlat, simply use the external link. You can also send the link by e-mail or integrate it into HTML pages.
Internal link (does not open in new window) : In order to link from a course element within the OpenOlat course to this course element, you can set the internal link as href attribute in the desired HTML page.
You need the ID number in the upper left corner of the field to refer to another course element in its preconditions (e.g. visibility). Each course element has its own ID number.
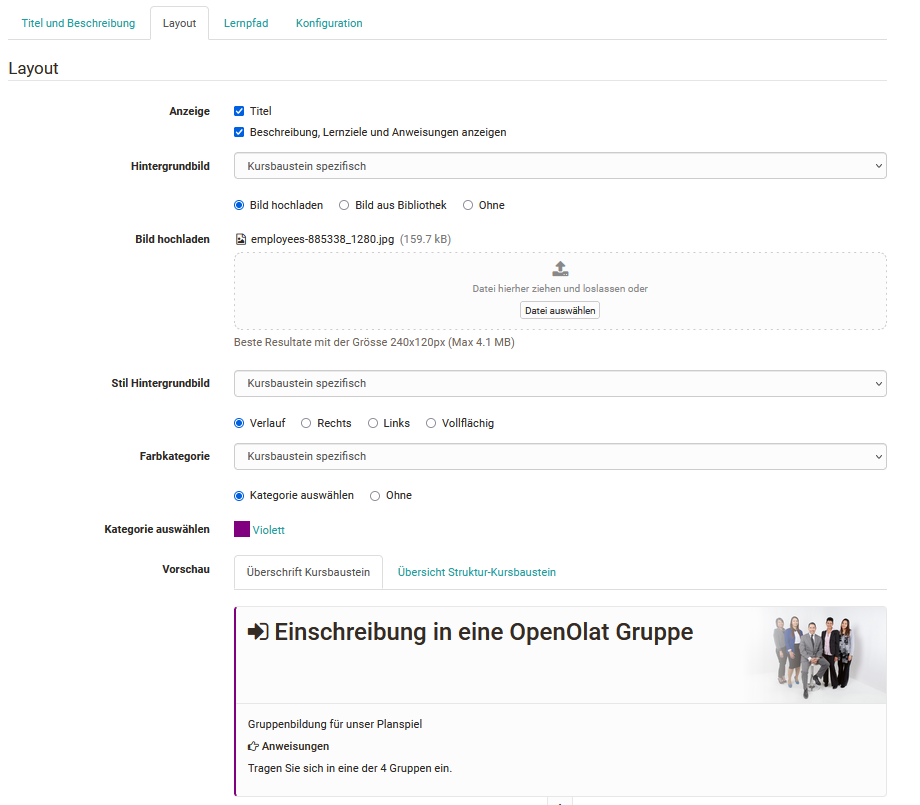
Tab Layout
In the tab Layout you can define which of the components entered in the tab "Title and description" will appear in the course display. This includes whether a title should be displayed and if so, which of the two title types should be selected. Furthermore, a background image for the header of the course element can be defined here. You can choose between a course standard image, which is defined in the course settings in the tab Layout, an inherited image and an element specific background image. The same applies to the style of the background image and the color category. The background image can be displayed on the right or on the left as well as full-surface or with a gradient. Under Color category, a color can be selected or the color coding can generally be switched off.
With the help of the preview you can quickly see the effects of the settings and recognize how the headings of the configured course element will appear in the course and how the overview structure of the course element will look like.
Configuration of the Tabs "Visibility and Access" of conventional courses
The Visibility and Access tabs can be used to restrict access to a course element and all subordinate course elements so that only certain persons have access to this element. If the restriction is set to access , the module is visible to all course members, but only certain persons have access to the module. If the visibility is restricted, the module is neither visible nor accessible for certain persons.
If a course element is visible but not accessible for a course participant or OpenOlat user, it is recommended to add a corresponding explanation in the Visibility tab which explains the background of the blocked access to all excluded persons of the course.
In most cases, a limitation to set either visibility or access is sufficient.
The following settings and restrictions are possible in both tabs:
- Blocked for learners
- Depending on date
- Depending on group
- Depending on assessment
- Only in assessment mode
Blocked for learners: All persons who are exclusively registered as course or group participants do not have access to this module. This can be used, for example, if certain areas should (initially) only be visible to teachers.
Depending on date: Here you can define a start and/or end date incl. time for the visibility or the access to the module. For example, you can activate a questionnaire only at the end of the course or make teaching materials available on a weekly basis.
Depending on group: In this way a course element can only be made available for a certain group. It often makes sense to apply the group dependency to a structure module and to subordinate all modules relevant for this group to it.
Depending on assessment: In this way, certain course elements or areas can be provided depending on other assessable course elements such as tests, tasks, portfolio tasks, checklists or assessments. You can check for a certain minimum score or for an "passed" of another course element. For example, certain areas of the course can only be activated once a certain test has been passed.
Only in assessment mode: If you want certain course elements to be displayed or accessible only during an OpenOlat assessment situation, select this setting. For more information, refer to the section Assessment Mode.
In order for a restriction to apply to course owners and group coaches, the option " Apply rules also for owners and tutors " must be selected. If you do not check this box, the administrator and the owner can always see the course element - regardless of which visibility rules you have set.
The "Display expert mode" button takes you to an input field where you can make a more complex configuration according to your needs. It is also possible to first make a basic setting using the general settings and then extend the syntax in expert mode. Expert mode offers a wide range of options for linking different restrictions to each other. For example, it can be configured that a certain course element is only activated from a certain date and only if two tests have been passed or if at least 10 points have been reached in a checklist or if the person is a member of a certain group.
All restrictions on course elements are inherited by subordinate course elements.
Furthermore the course element " Structure " offers the possibility to store a password. All subordinate course elements will then only be visible to persons having the appropriate password. That way you can e.g. integrate additional content within a course that is only available to persons who have paid for that additional content or activate course elements for certain levels in the context of gamebased learning.
Learning path courses do not allow these restrictions. If you need these specific selective releases, you must use a traditional course.
You can find information about the tab "learning path" here.
~~ ~~
~~