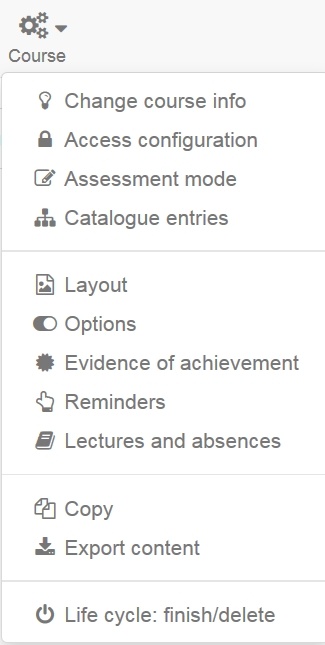
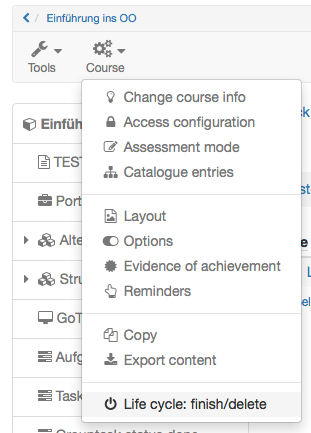
In addtion to the course editor and the course tools there are other features and settings at your disposal. For the course, the drop-down menu "Course" lists all of the functions following below.
For other types of learning resources, this drop-down menu has the name of the respective learning resource type. Generally, available features and settings depend on the type of learning resource you are working in.
Change course info
Here you can modify the learning resource's reference, title, its description, the execution period, work expenditure, objectives, requirements, certification as well as a cover image and a teaser movie. This will be the title of the learning resource appearing in the course list or in queries via the search mask.
The execution period can be set with individual start and end dates, or you can choose a pre-defined semester from the drop down menu. Execution periods of learning resources are also visible in the table display. If you uploaded a teaser movie for the learning resource, it will be displayed in the description section of the info page. If no cover image was uploaded, "no preview is available" will be shown in the list and catalog view. Detailed information on included meta data can be found on page Info Page: Add Meta Data.
The course info will be visible as soon as a learning resource or a course has been published for users (OAU, OAUG, members only). This holds true even if the course content itself is not accessible yet. The course info can thus be used as preliminary announcement for bookings, for example.
Access configuration
Access configuration serves to define who is getting access to a course or a learning resource. The following options are available: provide access for owners, for owners and other authors, for all registered OpenOLAT users (with or without guests), or for specific members (owners, coaches, participants), respectively. If choosing the option all registered OpenOLAT users (with or without guests), you may add a booking method, e.g. an access code. Furthermore, you have the option to give other authors additional rights. They may, as an example, copy your learning resource.
Publication
A learning resource newly created is only accessible for its owner. There are five categories of OpenOLAT users you can grant access rights:
Owners
Only owners of that learning resource: All owners (co-authors) hold the same rights as the author, i.e. they can edit, copy, delete that learning resource as well as assign these rights to other OpenOLAT users. All owners have the right to delete other owners.
for Authors
Owners and other OpenOLAT authors: You enable all other authors to have a look at your course before publication. Authors cannot edit or delete your learning resource, nor appoint new owners. It is only possible to copy or export your resource if an owner has granted that option.
for Users
- All registered OpenOLAT users: OpenOLAT users will be able to find your learning resource via the search mask or in the course list. Access can be restricted by adding a booking method.
- Registered OpenOLAT users and guests: Even via the guest access you can search for learning resources. Guests will hold limited access to your course, i.e. they will not be able to enroll in groups, nor might they contribute to forums, or perform a task, etc.
- Members only (owners, coaches, participants): If you chose this option, only participants may open the learning resource. The learning resource is invisible to all non-participants. Participants must be added in the members management and cannot enroll themselves any longer. Administrators identify learning resources with this special set of rights by the lock icon.
One of the three settings needs to be chosen to give access to the course for users.
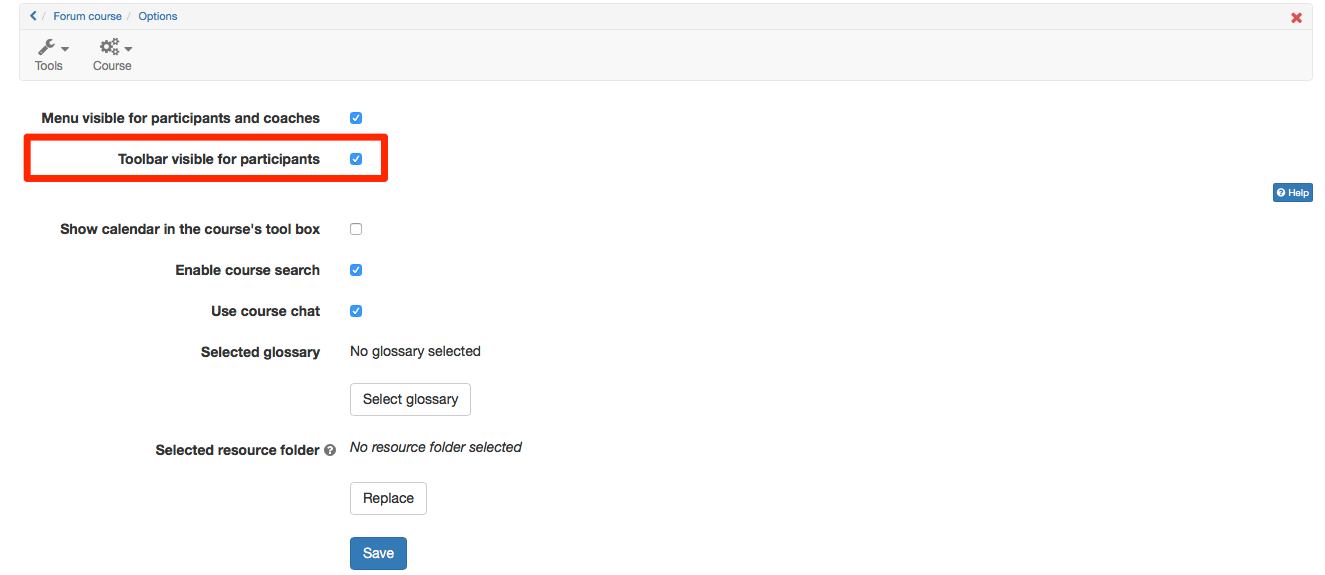
These settings in OpenOLAT courses allow you further to determine the use of additional features (course chat, glossary, course calendar, resource folder, etc.). For more information please go to the section "Using Additional Course Features".
Membership configuration
The system administrator determines in the administration tab whether course participants are per default allowed to leave the course at any time, never, or after the course end date. You can override the default setting anytime. The following options are available:
- At any time (Default): Participants may leave the course at any given time.
- After course end date: If an execution period has been configured for the course, this options allows participants to leave the course at the end of this time period. If this option was selected without a configured execution period, participants are not allowed to leave the course at any time.
- Never: Participants may never leave the course.
If members are allowed to leave the course, they can do so by selectind the "Leave course" entry in the "My course" menu.
Configure booking methods
Depending on the user group selected above, the view expands to show the booking methods for that user group, in order to configure the access control to the specific learning resource. Here you define the conditions to allow booking of resources by users. Booking can be understood as a synonym for register, enroll or buying.
If a learning resource is published for all registered users you can specify the terms to launch this resource here.
- The resource can be launched by all users with no restrictions and no explicit booking. In this case you will not know who launched this learning resource and you will have no access to run-time data like test results (only available in courses). This is the default behavior.
- A booking method is configured and the user himself can book the resource. In this case you will have an overview of the resource participants in the member management area. Read below to learn which booking methods are available at your disposal.
Select the button "Add booking method" to add one of the following booking methods:
- Freely available: Select the free booking method if no other restrictions shall apply. All users can book the resource. Using this booking method adds users as participants to the resource, but will not add them to a group, thus working like the enrolment course element. Once the feature "Auto-booking" is activated, users will automatically be directed to the course view, without the need to confirm the booking through the booking dialog.
- Access code: Select the access code booking method if booking shall be restricted to people in possession of a specific access code. The access code must be provided to participants, e.g. by email. The participants must enter the access code before they can open a corresponding course. This is the method of choice when providing payable courses, or courses with otherwise limited access, respectively.
- PayPal and credit card (only available if unlocked by an administrator): Select the PayPal/Credit card payment method require a financial payment to access a resource. When using this booking method you can define an amount of money required to be payed in the currency defined in the system configuration. This amount can then be payed by either a PayPal account or by using a credit card (Visa/Mastercard). (This feature is only available for users with author rights)
Optionally, you can add a validity period to each booking method in order to control resource access in addition to the use of visibility and access rules. In that case the booking method is only available during this period. It is also possible to specify just a start or just an end time. If you don't want to restrict the booking method to a specified period, just leave the fields empty. You can edit booking methods at any time after the initial setup.
You may also configure more than just one booking method. The user will then have several booking options to choose from. As an example, you can combine course codes for users form different contexts, or set the time point for a course such that it is first freely accessible and only later requires a password to log in, respectively.
You can delete configured booking methods at any time. The already booked orders will not be affected by this.
Assessment mode
The assessment mode allows you to create exam setting where tests and assessment are carried out in safe mode during a fixed time span, during which only access to previously defined course elements in the respective course is allowed. All other OpenOLAT functions such as courses, groups, notes are masked and thus not accessible. Students are only allowed to log out during such an assessment. Detailed information on the assessment mode and how to configure exam settings can be found in the "eAssessment" chapter, section "Assessment mode".
Catalogue entries
As soon as a learning resource has been activated it can be inserted in the catalog with the help of the info page. Just select "Course" --> "Catalogue entries". Afterward you choose the category to which your learning resource should be related to by using "Add to catalog". Learning resources can be inserted more than once at different spots in your catalog, just repeat the before mentioned step. All selected categories will be displayed under "Catalogue entries", where you can delete them as well.
Layout
To define the layout of a course, choose a suitable layout template under "Layout". The default template is "Standard". Depending on the settings managed by the OpenOLAT administrator, additional system templates are available. Furthermore, course owners may choose from css layouts which are stored in the storage folder. This allows you to individually design text font and colours, titles, links, the menu or toolbox, and to add a suitable logo.
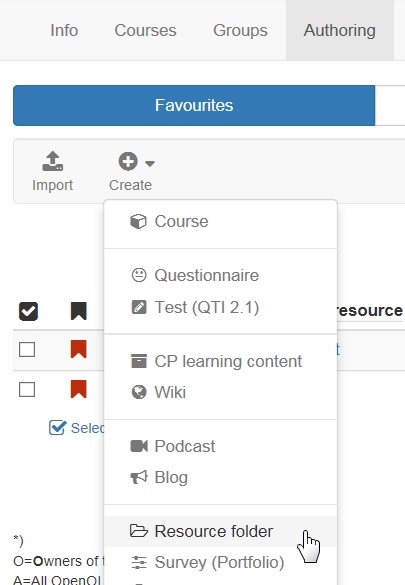
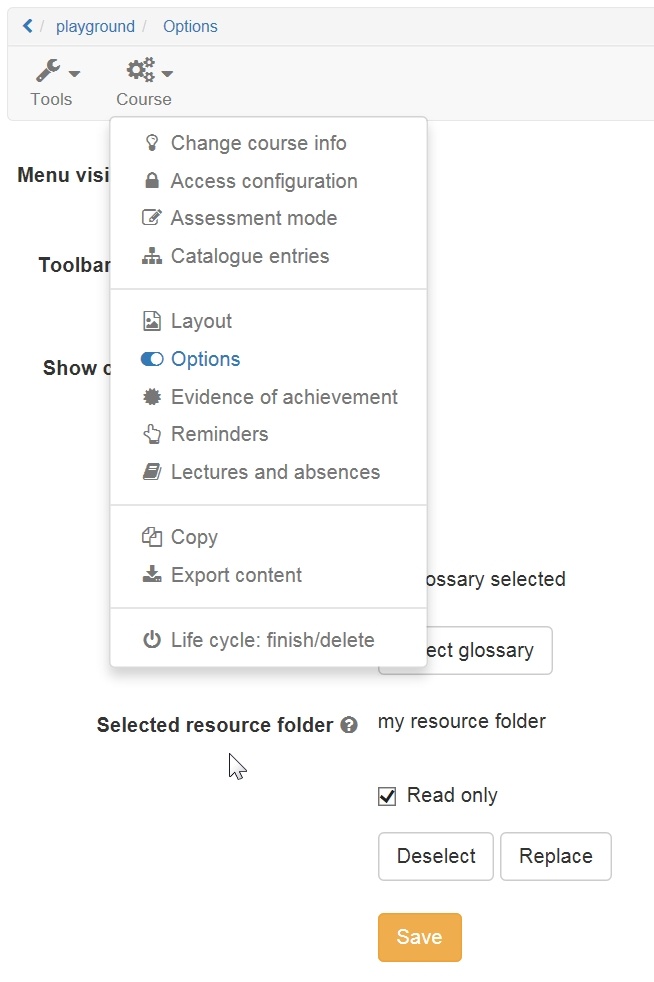
3. Afterward you can find the files of the corresponding resource folder in the storage folder of the course, in the automatically created sub folder "_sharedfolder". These files can know be added like all others files to the single page.
By default in the course all files of the resource folder are read only and the edit of the files is neither in the storage folder nor in the course editor when embedding into a single page possible. If edit should be possible in the course, this option need to be deselected in the course settings at "Read only" (see step 2).
You can only add one resource folder to a course. We strongly recommend to first define a general strategy: Which files should be stored in an overall resource folder, and which files are preferably stored in a storage folder within a course, respectively.
Evidence of Achievement
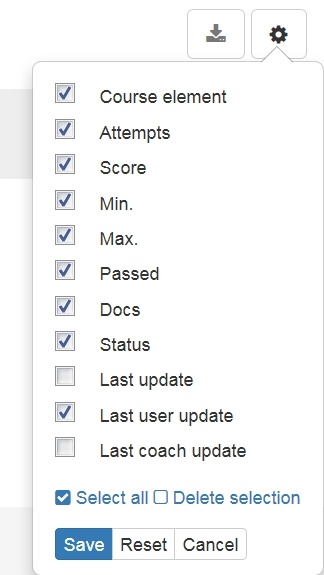
An evidence of achievement is the confirmation of an efficiency control and can include taken tests or submitted and assessed tasks. If you want OpenOLAT to create such evidences of achievement please activate this option here, or you can enter the assessment tool of the course and navigate to the menu item "Evidence of achievement". Course participants can retrieve their evidences of achievement in their personal menu, section "Evidence of achievement", starting with the beginning of the course.
The according link will only appear in your course if there is also an assessable course element, and the course participant has received at least one automatic or manual assessment. This could be, e.g., a test attempt or the assessment of a task. Which information is shown exactly depends on the chosen columns.
If you do not want to offer evidences of achievement anymore you can either deactivate this option via the "Course" drop-down menu or the assessment tool of your course, as described above.
Evidences already existing will then no longer be visible. As soon as you offer this option anew your participants can dispose of their evidences along with new data. If you choose to delete a course that contains evidences of achievement your users will still be able to see their own evidences.
Generate PDF certificate
You can additionally determine here if a printable certificate, stating the successful completion of the course, is to be issued to course participants. This can also be issued without the use of the evidence of achievement. The certificate can either be issued automatically after passing the course, or manually by the tutor. This selection allows for the use of certificates in courses without any assessable course elements.
If or when a user passes the tests depends on whether he or she can meet the requirements previously set in the course root node, tab "Score". Coaches can issue the certificate manually in the assessment tool by navigating to the assessment overview of a user.
Users automatically receive an email notification as soon as a certificate has been automtically issued.
By default, certificates for a course are issued once only. If for any reason a certificate needs to be re-issued on a regular basis, e.g. for language certification, re-certification can be allowed. Select a given number of days, weeks, months or years for the period of time required before a new certificate can be issued.
To control the validity of a certificate the attribute certificateVerificationUrl needs to be added to the template. It allows to generate the certificate again later on, thanks to a QR code. It can then be compared with the already available version. If both versions are consistent, the certificate can be validated.
Usually, a systemwide PDF template, specified beforehand by an administrator, should be available. If however, you wish to utilize your own individual template, you can upload one in the Certificate template section. A PDF template though is no ordinary PDF file, but has to be either a PDF form created with e.g. Acrobat Pro or LibreOffice, or a HTML form.
The form fields then must contain specific variables, which will be replaced by the system upon certificate creation with the respective values. In order to be able to format date-values there is the"dateFormatter"-object. It offers methods to format the "*Raw" formats. To just format a raw format there is the "formatDate()" function. To add a given period of time there is the formatDateRelative(Date baseLineDate, days, months, years) which adds the period given in days/months/years to the baseLineDate.
Allow re-certification: This enables the issuing of a new certificate after a specified period.
Reminders
The course reminder function allows you to create rule sets in order to trigger automated e-mail notifications once all conditions are met. Frequency and the default sending time are determined system wide by your system administrator. Reminders may be send on demand though, depending on the fulfillment of the complete rule set. Detailed information on the course reminder function can be found in the „Course Operation" chapter, section „Course Reminder“.
Copy
Learning resources can be copied; therefore it is possible e.g. to use an old course structure for your next course. When copying a course its structure, folder content, its HTML pages and group names (but not the members) will be adopted. User data such as forum entries, group members, etc. not. As owner of a learning resource you can determine (section "Access control") if your learning resource can be copied by other OpenOLAT authors as well.
Export Content
Export your learning resource as ZIP file. Tests, questionnaires, CP and SCORM learning content can be imported into other LMS supporting the same standard. Courses, Wikis and glossaries can be imported into other OpenOLAT installations. As owner of a learning resource you can determine in the section "Access control" if content may be exported.
Life cycle: finish/delete
Learning resource
A learning resource can only be deleted (by the owner only), but not deactivated. And this only if it is not used within a course at that moment. When deleting embedded learning resources (e.g. in a test) you will get a message indicating the relevant course. First you have to delete the course element "Test" in that course to be able to delete that test in learning resources in the authoring. The data will be deleted definitely and cannot be recovered. Thus a confirmation is necessary before deleting.
Course
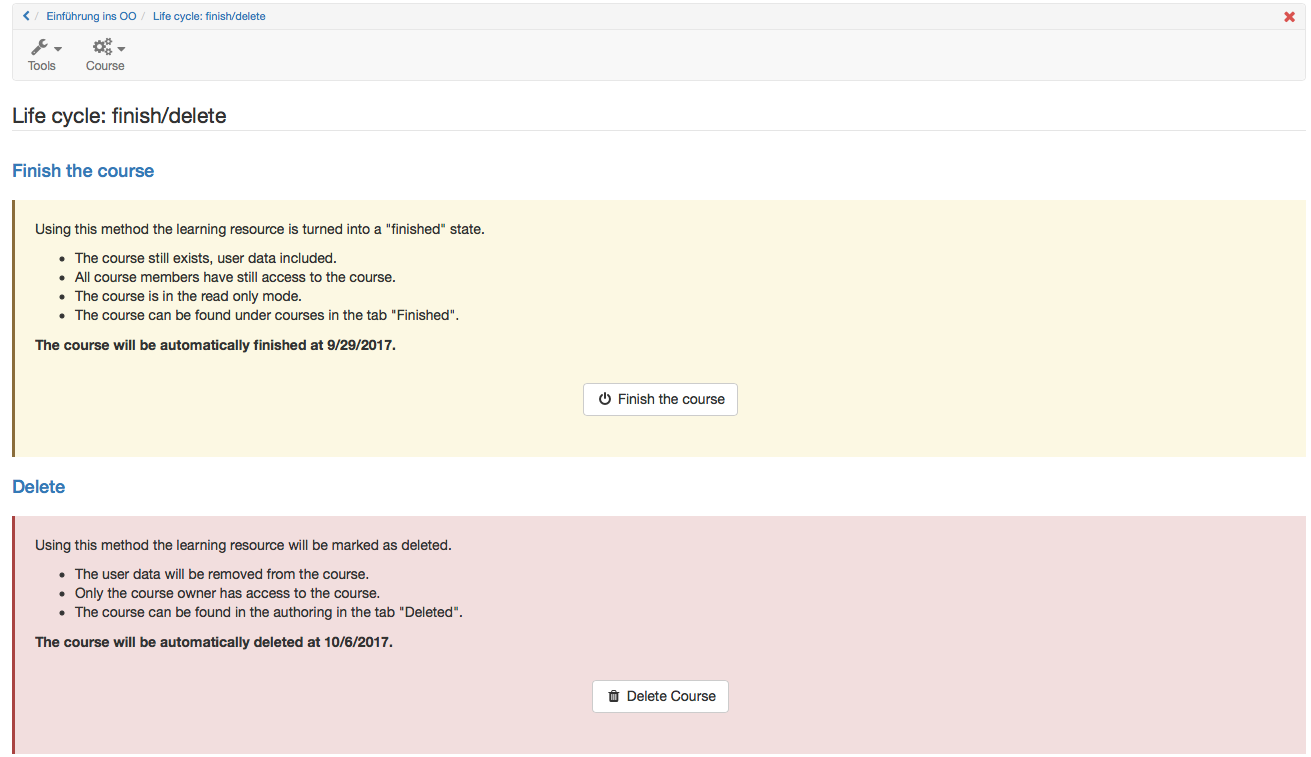
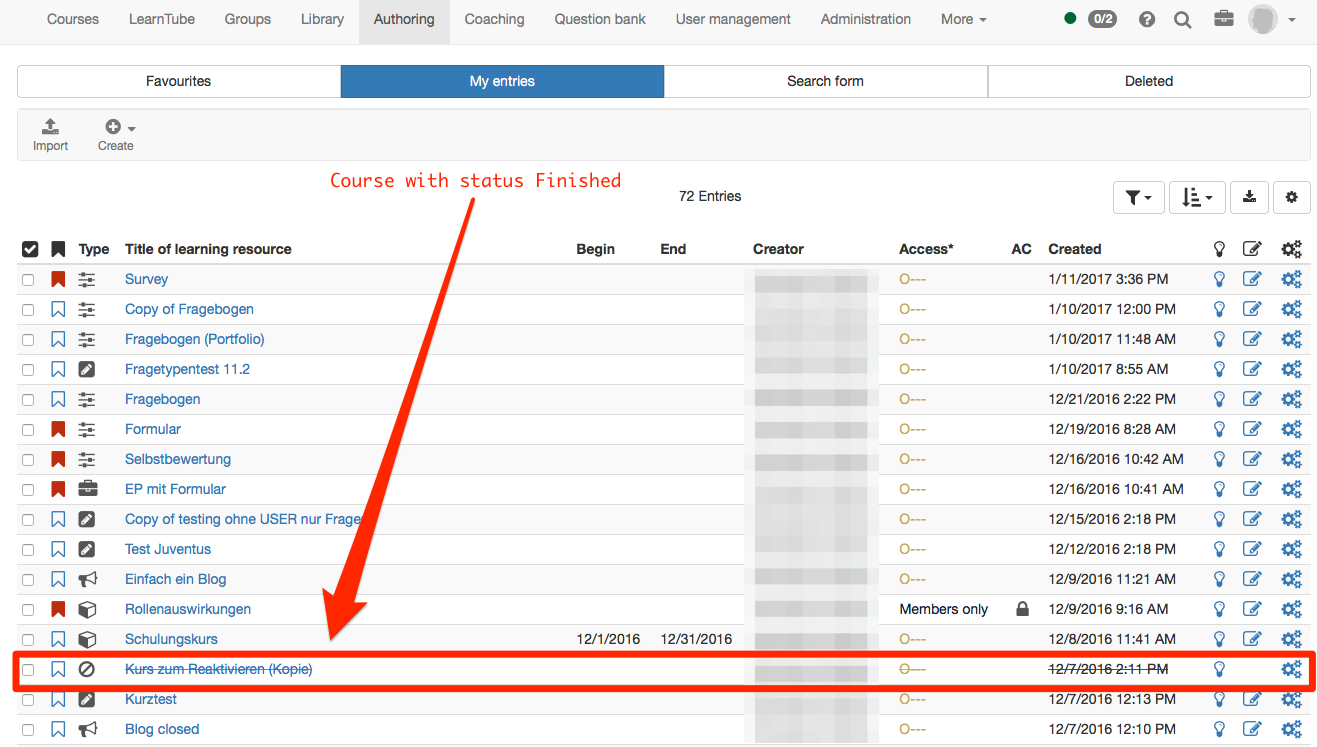
If a course is finished, it is read only. All user data are kept and all course users still have access to the course. The course cannot be found in the tab "My courses" anymore but in the tab "Finished" next to it. In the authoring the finished course is shown with a new icon and it is striken.
If a course needs to be reopened, open life cycle of the course again and click on "Reopen".
But if a course is deleted, all user data are removed. Course users and coaches do not have access anymore. Only the course owner still has access and the course can be found in the authoring in the tab "Deleted". There the course can be restored, but without any user data, these are deleted definitely. Delete a course definitely is only possible by the administrator.
Finish and delete a course can be done automatically. The corresponding settings need to be done by the administrator in Administration.
