On this page you get an overview of the course tools of the "Administration". Some course administration tools are presented on separate pages.

Page overview
On further pages you will find information about:
A number of tools are available in the "Administration" area of your course. You can organize course participants and course-related groups. Groups can also be bundled in learning areas. The course structure and the course tools are set up in the course editor. Furthermore, you have access to the storage folder of a course. During the course itself the assessment tool is relevant. Course-related reminders and lectures can also be organized. The assessment mode is suitable for online exams. Certain statistical data can also be retrieved and data archived. And of course courses and learning resources can be copied, exported or deleted.
Here is an overview of the individual menus:
Storage Folder
The editor tool "Storage folder" in a course serves the storage of files used in the course, e.g. all used HTML pages or documents from folders. A storage folder is course specific. It the zentral place for the storage of course related files. However, the content of the storage folder cannot be viewed directly by learners, but can be accessed indirectly, e.g. via the course elements "single page" or "folder". A storage folder is always course-specific.
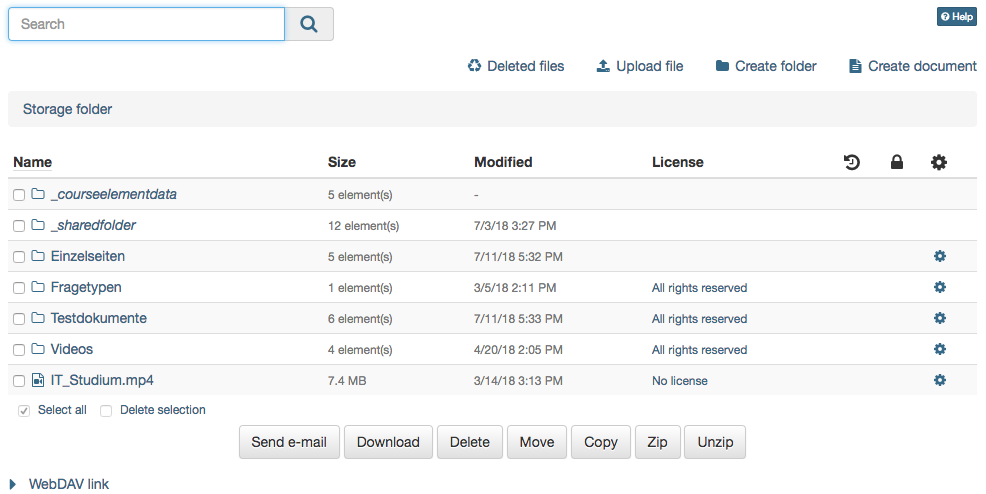
In the storage folder files can be uploaded, deleted, moved, searched for, zipped, un-zipped or created. By default, HTML documents can be created in OpenOLAT. If additional document editors are activated in the administration, further file formats can be created. For example, if Only Office is used, Word, Excel or PowerPoint files can also be created.
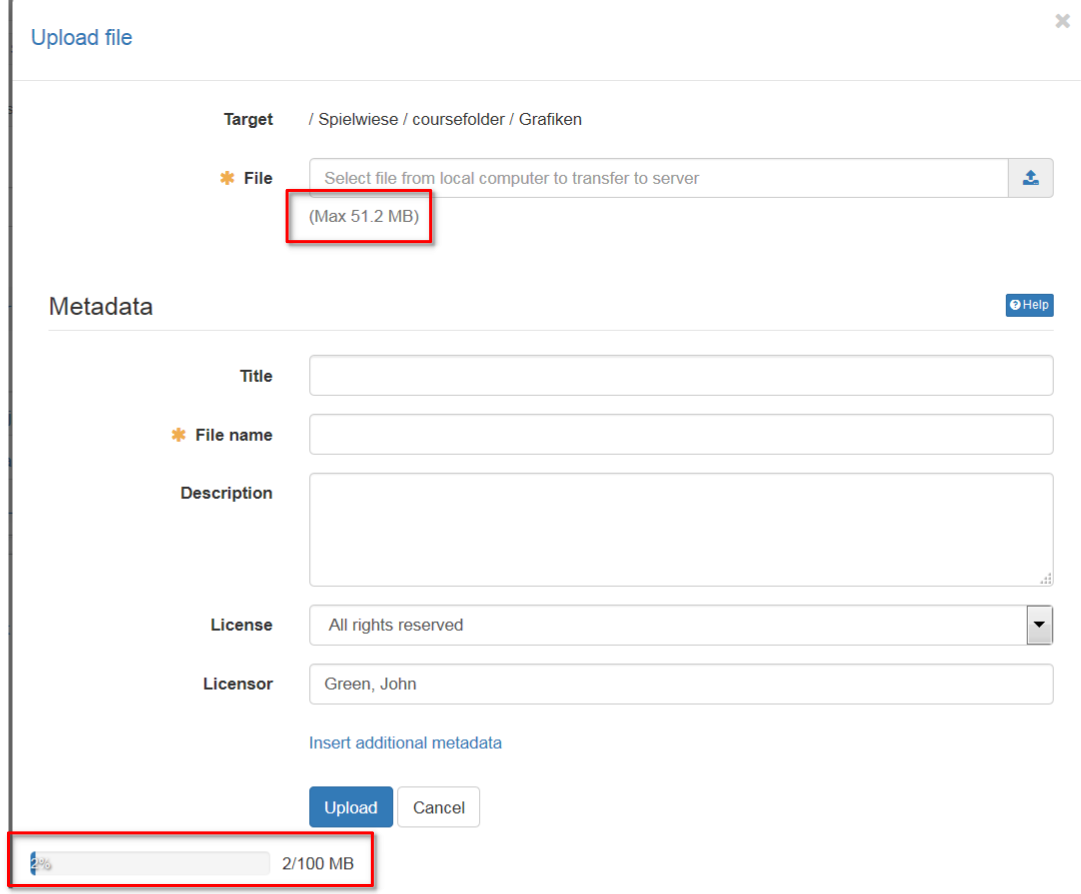
When uploading a file the file size limit as well as the folder space limit has to be taken into consideration. Also those limits apply when uploading files via WebDAV.
In the storage folder subfolders can be used to create a systematical structure of course related files. In addition OpenOLAT automatically creates the folders „_courseelementdata“ and „_sharedfolder", respectively, when a course contains at least one course element "Folder" or a course is linked with a resource folder.
In the subfolder "_courseelementdata" you can find all course elements "folder" of this course. The corresponding folders appear here automatically after they have been created in the course editor and can be edited here as well.
Via the subfolder „_sharedfolder“ you can view the linked resource folder of the course, but you can not edit it by default. Editing can be enabled in the course options by deactivating the option "read only" for the selected resource folder.
Link course element "Single page" to storage folder:
Single web specific pages (e.g. html, pdf) which are stored in the storage folder can be made visible in the course with the course element "Single page".
Additionally the checkbox "Allow links in the entire storage folder" can be selected. Thus it becomes possible to link html-files, which can be found in the storage folder, directly. This is helpful to show linked charts of a html-page or other linked files.
As soon as the checkbox is activated, the path for other files of the storage folder is visible. Thus it becomes possible, to call up files, which are determined in the storage folder but aren't published in the course itself.
Assessment Tool
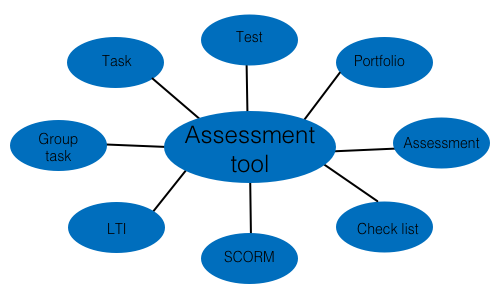
The assessment tool is used to assess or modify existing assessment of the following course elements:
All owners of courses have access to the assessment tool as well as members of a corresponding right group and, last but not least, all coaches. Owners may assess all course participants, tutors only those they have been assigned to. The course elements which should be assessed, first need to configured either in the tab "Assessment" or "Test configuration". Only if the assessment is turned on an assessment in the assessment tool becomes possible. To pass a course, the tab "Score" in the course element needs to be filled in.
Subscribe to the notification service to be informed on new test results or new generated certificates in your drop box.
Further information about the assessment tool you can found here.
Course Statistics
This course function provides you with statistics regarding access to your OpenOLAT course. All course owners have access to those statistics. You will receive data in the form of tables as well as in the form of charts. Table data can be downloaded as Excel files (e.g. for further processing) to your computer.
Relevant for your total of course accesses are user clicks on a single course element; however, clicks on this element's content will not be counted. If a user selects the Wiki from course navigation and clicks it three times, three clicks will be counted; no click will be counted though when clicking on a link within that Wiki.
Statistics can be created per hour, per day, per weekday or per week. Furthermore you can choose a certain period of time per day and per week during which any course access should be displayed in your statistics.
When selecting a course element in your table its corresponding chart will be displayed. If you select the number of clicks in the row "Total" your chart will show all accesses sorted by course element.
Test / Survey statistics
The test & survey statistics provide you with a anonymized statistical evaluation of all tests and questionnaires embedded in your OLAT course.
Other than the assessment tool which offers a wealth of information on test results of individual users, the test and survey statistics tools enable you to evaluate tests as a whole. This includes e.g. information on the average completion time, item difficulty of individual questions, number of participants and how many participants passed the test. Single questions are analysed just as detailed. Typical item analysis parameters facilitate the evaluation of a test with regard to difficulty or suitability.
You can download both the graphical analysis as well as the raw data in the tool. The test and survey statistics tools use the same raw data as available in the archive tool.
Only coaches have access to the test and survey statistics. As a coach, you will get the analysis for all your coached participants.
Data Archiving
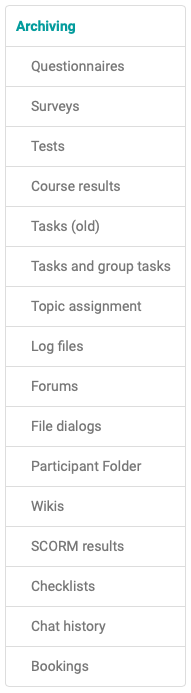
Data archiving can be used to store the results of various course elements of a course. In particular, saving the results of surveys, tests, self-tests, tasks, group tasks and course results are important elements that you should save at the end of the course.
The archives are usually in zip format and contain Excel files or rtf files for text formats. If other files are included in the archiving, they will be provided in subfolders within the zip file.
To save the results, first select a tool-specific block in the "Data Archiving" area and then select the concrete blocks that you want to save. Of course you can also click on "select all". The results can then be downloaded by selecting the "Archive" option. The user will be informed by mail if the download takes longer, as is the case with the log files.
Archived self-tests and questionnaires contain anonymous user data, tests are stored in a personalized way and contain all test results. Course results contain the summarized overall evaluation of a course, not individual elements. The Wiki packs all pages and uploaded files into one ZIP file. The participant folder is saved according to the folder structure of this module. Further details on the recorded log files can be found in the chapter "Record of Course Activities".
In the archive tool you can also delete the chat history by clicking the button "Delete" under "Chat history".
When deleting a course all course data (but not the course elements!) will be stored in your personal folder automatically.
All course owners have access to the data archiving tool as well as members of groups with rights to the data archiving tool.
Learning Areas
Learning areas are used to easily assign groups to different elements within a course.
By using the button "Create learning area" you can create a new learning area before allocating single groups to this learning area. If a learning area already exists you can use this one to allocate linked groups. All you have to do is editing the learning area, and then selecting the designated groups in the tab "Group assignment".
Learning areas are suitable for using the same course element within a course in several groups or if there are a lot of groups to choose from along with only one single registration element. Learning areas spare you the selection of each single group.
Instead of explicitly listing all relevant groups in the access and visibility rules, just add the learning area. If group access / visibility rules are added or modified, you need to republish the course. If, on the other hand, a learning area is edited by adding or removing groups, no access rule needs to be modified, and thus the course doesn't need to be published.
Add groups
Provided that groups have already been embedded in the course, these will appear in the tab. By means of check boxes you have the possibility to decide which groups your learning area shall contain. If no groups have been created the following text will appear: No learning groups found. Please create a learning group first by using the menu on your right.
You select learning areas in the course editor by means of the course element "Enrolment." All groups within a learning area will then be offered when registering. Additionally you can choose from learning areas in the tabs "Visibility" or "Access" if the option "Depending on groups" is activated.
Course DB
Here you can create a new course-specific database that can store certain course-specific information.
Booking methods
Here you will find an overview of all the people who have booked your course.
Copy learning resources
Learning resources are copied in order to be able to reuse an old course structure for a new semester, for example. When copying a course, the structure, folder contents, HTML pages and group names (without group members) are copied. User data such as forum entries, group members, etc. are not copied. As the owner of a learning resource, you can determine (under "Access configuration") whether your learning resource can also be copied by other OpenOLAT authors.
Export content
Export your learning resources as a ZIP file. You can import tests, questionnaires, CP and SCORM learning content into other LMSs that support the same standard. Courses, wikis and glossaries can be imported into other OpenOLAT installations. As the owner of a learning resource, you determine whether the content may be exported under "Access configuration".
Delete learning resources
You can delete them using the menu item in the "Administration" area. When deleting integrated learning resources (e.g. a test) you will receive a message with the display of the corresponding course. You must therefore first delete the course element "Test" in the course so that you can delete the test in the authoring area. The data is definitely deleted and cannot be restored. Therefore a confirmation is necessary before deleting.
However, if the course is deleted, all user data will be removed. Course participants and authors no longer have access. Only the course owner has access and finds the course in the authoring area under the tab "Deleted". There the course can be restored, but without user data, these are permanently deleted.
The final deletion of a course is only possible by the administrator.
When you delete a course, user data (e.g. test results) is first archived as an Excel file in your personal folder and then deleted.
It is possible to inform other course owners via e-mail about the completion or deletion of a course. This can either be optionally selected in the Finish/Delete dialog or set in the administration system-wide.
A course can also be closed or deleted automatically. The administrator makes the appropriate settings under Administration.
