Course Element: Structure
The course element " Structure" serves to arrange your course. By default it offers an automatic overview of all sub-elements along with short title, title, and description. Use this course element to arrange your course content and/or to clearly separate your modules.
An exception to this is the course root node. It cannot be deleted or moved, and you can't set a password. If you wish to issue an evidence of achievements for users for this course, the settings in the "Score" tab need to be configured accordingly.
Overview
You can choose between four display modes for the course element "Structure" in the tab Overview and thus generate an automatically generated overview, integrate your own HTML page or simply display the first subordinate course element.
- If you select the button «Automatic overview», a list of the subordinate course elements generated by OpenOLAT will be displayed.
- By selecting the radio button «Automatically generated overview incl. preview» you can choose up to ten subordinate course elements whose preview will appear in one or two columns (preview generated by OLAT).
- If you select the button «Your HTML page », a file of your choice will be displayed from the storage folder (*.html, *.htm, *pdf, *jpg, *png, *.mp4). Saving it will extend the tab by the field «Select, edit or create page ». In OpenOLAT there is even an integrated HTML editor at your disposal if you want to design a HTML page according to your needs (e.g. a welcome page).
- If you select the button «No overview, activate first visible child node», no overview will be displayed, but this structure node will delegate to it's first visible and accessible child-node.
Display in two columns: Please select the check box Display in two columns to display the automatically generated table of contents or the preview in two columns.
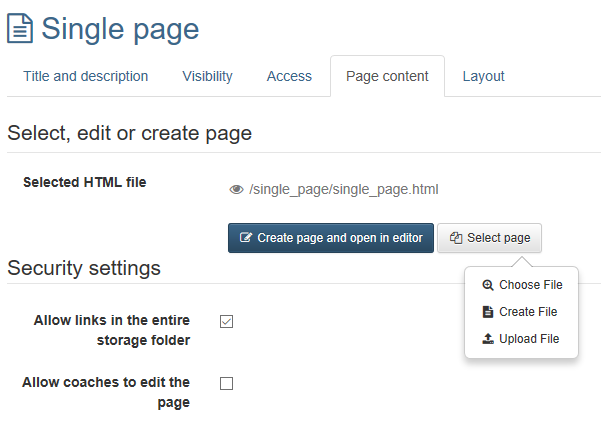
If you have chosen your own HTML page and this contains links to graphics or other files stored in OpenOLAT, you must select the option "Allow links in the entire storage folder" under "Security settings". You can also allow coaches to edit the HTML page without access to the course editor.
Score
By means of this field you can process results of course elements of the type Structure, Assessment, Group / Task, SCORM learning content, Checklist, LTI page, Portfolio task and Test. The summarized results will appear when clicking on the course element Structure in the ongoing course. According to the display of your choice you have to select in the tab "Score" the corresponding option in the section "Calculate score?" or "Calculate passing score?".
Calculate score?: If you select «From elements», assessable course elements of your course will be displayed by means of Total score of. You can now select those whose score shall be generated on the course element Structure
Calculate passing score?: If you select «As of minimum score», you can enter the minimum score in another field. This refers to the course elements selected above, i.e. on the course element Structure a «Passed» is displayed, if the total score is greater or equal to the selected minimum score.
If you select «Adopt from course element», assessable course elements of your course are displayed by means of Passed by . You can now select those whose "passed" value should result in the "passed" value of the course element Structure with a boolean AND-link. I.e. if the course element Structure should show a «Passed», all selected course elements have to have a «Passed»
- Failed as not passed: As long as the conditions for passed are not reached, the structure is shown as "Failed".
- Failed as not passed after end date of course: As long as the conditions for passed are not reached, the structure is shown as "Failed". This calculation is only done after the end date of the course is reached. Before the end date is reached no status or Passed is shown when the conditions are reached.
- Set manually: Failed needs to be set manually.
In case you wish to utilize an evidence of achievement or be able to check the Passed status in the coaching tool, you must check the option Calculate passing score? in the course root node.
By means of the button "Display expert mode" an entry field will appear in order to be able to make a more complex configuration according to your needs.
Course Element: Single Page
In the course element "Single page" you can insert various files in your course. It is possible to announce general information there such as your program or recommended literature regarding your course. There are three possibilities to embed a page's content in your course:
- Create new HTML page online
- Select any file from the storage folder
- Upload file in storage folder
For further editing of HTML pages you can use the OpenOLAT Editor. It works similar to a word processing program. The automatically created file when you create a page for the first time already has the name of the course element. The pages created with the HTML editor can then be found in the storage folder of the course.
You can also upload files that you have previously created to the storage folder of the course and link them with the help of the course element. All file formats (e.g. doc, xsl, pdf, jpg, mp3) can be uploaded. If a file type is not supported by the browser used, a download link is displayed for this file. However, it is recommended to use HTML files. The Files can also be swapped later using the link "Replace page". Click on the "Select page" link to display all files in the storage folder.
Under "Security Settings" you can specify whether references in your HTML pages are only possible to files in the same folder and its subfolders, or whether all files in the storage folder can be referenced.
Furthermore, you can define under "Security Settings" whether coaches are allowed to edit the stored HTML file. The coaches do not need any coach rights or access to the course editor.
In the "Layout" tab you can define the settings for the display of page contents. Here you determine whether the page should be displayed unaltered, or optimized for OpenOLAT. The display mode "Optimized for OpenOLAT" allows you to e.g. apply the course layout to the page content, or to enable the course glossary.
Multiple single pages
This option makes it easy to add and organize single pages to the course and quickly make the files visible in the course structure. Clicking on "Multiple single pages" opens the display of all files available in this course for selection. You can add additional files using the storage folder.
Select all files you want to add as single pages in the course and decide whether the selected files should be inserted after or as subfolders of the current course element. The sequence can then be changed.
This function is useful if you have already created several HTML files or complex hypermedia files externally and stored them in the storage folder of the course. For complex pages with various links to graphics, etc., make sure to activate the option "Allow links in the entire storage folder". Furthermore you should name the file names as they should appear later in the course, because the file name is used as course element title.
Course Element: External Page
With the help of the course element "External page" you can call up an external website. Simply enter the desired URL in the configuration in the tab "Page content" to integrate the external page into your course navigation. For the display of the linked page, the variants
- "Embedded (source hidden)",
- "Embedded (source visible)",
- "New browser window" (source visible) and
- "Integrated completely (source hidden)
are offered.
For pages that require authentication and whose source is hidden, you can activate "Page pass-word controlled" and enter the corresponding values in the "User" and "Password" fields.
It is recommended to use this course element when planning to include pages containing database queries (e.g. research tools, online exercises, etc.). It is only possible to link external pages via HTTP or HTTPS protocols.
If you are not sure which variant is the right one for your case, start with the option "Integrated completely" and test the other display options until the linked page is displayed as desired.
Course Element: CP Learning Content
Das CP können Sie entweder direkt in OpenOLAT erstellen, was im Kapitel "Fünf Schritte zu Ihrem Content-Packaging" erklärt wird. Oder Sie erstellen das CP extern, beispielsweise mit eLML .
CP means "Content Packaging" and is an e-learning standard for learning content. Use the course element "CP learning content" to include learning content in the IMS CP format (IMS CP version 1.1.2) in your course. You can create CPs directly within OpenOLAT; what is explained in the chapter "Five steps to your content package". Or you can create a CP externally, e.g. with eLML.
In the tab "Learning content" just click on "Create, select or import CP learning content" in order to assign a CP to your course element or to create a new CP. CPs can either be imported to the course editor or by means of the "Authoring" section; further information can be found in the chapter "Actions in the 'Authoring' section", section "Import". If you have not yet selected any ZIP file as CP learning content, the title Selected CP learning content shows the message No CP learning content selected .
After adding your CP content its title will be displayed as a link. Follow this link to get to the preview.. To change the assignment of a certain CP learning content later on just click on "Replace CP learning content" in the tab "Learning content" before selecting another CP.
In the section "Display" you can determine whether the navigation of your Content Packaging shall be visible.
In the "Layout" tab you can define the settings for the display of the CP. The setting options are identical to those of a single page. Further information can be found here. Die Einstellungsmöglichkeiten sind identisch mit denen einer Einzelseite.
Course Element: SCORM Learning Content
SCORM means "Sharable Content Object Reference Model" and is another standardized e-learning format supported by OpenOLAT. Use the course element "SCORM learning content" to include learning content in SCORM format (SCORM version 1.2) in your course. Your SCORM package has to be created externally, e.g. with eLML.
In the tab "Learning content" just click on "Select or import SCORM learning content" to assign a SCORM learning content to your course element. Click on "Import" to upload a new SCORM package or select an existing SCORM package from your entries. SCORM packages can either be imported to the course editor or by means of the "Authoring;" for further information please go to the chapter "Actions in the 'Authoring' section", section "Import". If you have not selected a ZIP file as SCORM learning content yet the message No SCORM learning content selected will appear in the title Selected SCORM learning content.
After adding your SCORM content its title will be displayed as a link. Follow this link to get to the preview.. In order to change the assignment of your SCORM learning content you have to click on "Replace SCORM learning content" in the tab "Learning content" before selecting another SCORM package.
In the section "Settings" you can determine how your learning content should be presented to course participants.
In the "Layout" tab you can define the settings for the display of the SCORM package. You can either use the layout configuration settings from the learning resource, or modify the standard settings. If you choose the "Modify" option, the following settings are available. You can then determine whether the SCORM package should be displayed unaltered, or optimized for OpenOLAT. The display mode "Optimized for OpenOLAT" allows you to e.g. apply the course layout to the SCORM package.
Course Element: Folder
In the course element "Folder" you can offer files to be downloaded. Often folders are used to provide course participants with scripts or slides regarding your course. Using the external link available in the meta data, you can link directly to a specific file from outside of OpenOLAT.
When uploading content such as pictures, text, audio and video files you can assign a license and a licensor in the metadata. You can choose from all for the folder element available licenses.
The license is marked with a symbol in a new column in the folder element. In the corresponding overview of the course element «folder» as well as the authoring area all assigned licenses will be shown in the column «License». By clicking on a license, detailed license information will be displayed.
In general all course participants have the permission to download files from that folder. All course authors additionally may upload files. These preset rights can be adapted according to your needs in the tab "Access" of the respective course element.
Folder: write permission
By default, only course owners or persons with permission to use the course editor have the possibility to upload files to the "Folder" course element. In the tab "Access" you can also give learners or course participants the right to upload files by unchecking the "Blocked for learners" option under "Write (upload)".
Read permission
By means of this box you can define the reading access to the course element "Folder," i.e. you can determine under which conditions your folder contents can be read. If you do not make any modifications the folder's contents will always be readable for all course participants.
For more information on the other restriction options, please go to General Configuration of Course Elements.
If you want to use more than one folder, e.g. one for each course event, it is recommendable to introduce the course element "Structure" before subordinating your folders to that structure. All restrictions regarding visibility and access then have to be configured in the course element "Structure" only.
Often, however, a course element "Folder" is sufficient, as further subfolders can be created within a course element. Several course elements are only necessary if the individual course elements are linked with different settings for release.
Configuration
The tab "Folder configuration" allows you to define the specific target and file path for this folder course element within the course storage folder. For this OpenOLAT can either automatically generate a folder or you select a specific folder from the storage folder of the course.
If the option "automatically generated folder" is selected, OpenOLAT creates the _courselementdata subfolder. All files of the folder course element are now saved here.
If you select "Use folder from course storage", you must first select or create a corresponding folder in the storage folder. This way you can also integrate previously created resource folders into the course. In the following dialog select the option _sharedfolder or a subfolder of the linked _sharedfolder.
If you need to make files accessible for users across various courses, it would be best to embed a resource folder. It allows you to comfortably manage files in the authoring tab in one resource, instead of managing the same files across various courses.
Course Element: Podcast
The course element "Podcast" can either be used to easily provide others with your own audio and video files or with external podcast episodes in OpenOLAT. Course participants can see episodes directly within OpenOLAT; or they can subscribe to podcasts, upload those by means of online services such as iTunes before copying them to a mobile device.
Add the course element "Podcast" to your course. Create your podcast in the tab "Podcast learning content" before editing it. Determine at first if you want to integrate an external podcast or if you prefer to create episodes on your own.
Click on "Create your own episode" if you want to create podcast episodes within OLAT. Audio as well as video files can be uploaded by means of a special form. Users with access to that podcast will then be able to subscribe to your episodes via RSS Feed.
In case you already own a RSS Feed and want to make it available in OLAT please select "Embed an already existing external podcast". In that case you will not be able to edit your episodes in OLAT due to their external source.
How to create a podcast step by step and further information on other configuration possibilities can be found in the chapter "Creating Podcasts".
After adding your content its title will be displayed as a link. Follow this link to get to the preview. Now you have the possibility to select another content via the button "Replace blog/podcast." By means of the button "Edit" you will be able to edit your podcast.
permission to moderate a podcast
The access as moderator allows you to read, comment, edit, delete or create entries. Additionally moderators can modify the Feed's title and description.
Write permission
The access as moderator allows you to read and comment existing entries as well as create new ones. Entries once created cannot be modified or deleted later on.
Remove the check mark under "Blocked for learners" in the "Read and write" area to allow students to upload their own audio or video files. Please note the upload and storage limits defined by the OpenOLAT administrator and try to upload rather small files.
Only read permission
The access as reader allows you to read and comment all published entries. However, you cannot create your own entries.
For more information on the other restriction options, please go to General Configuration of Course Elements.
Course Element: Blog
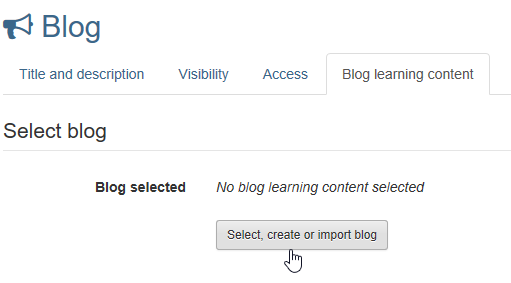
By means of a "Blog" you can inform your course participants on news in the form of texts, pictures or videos. Add the course element to the course and create the concrete blog in the tab "Blog Learning Content".
On the appearing page you can either select an existing blog learning resource, import a blog or create a new learning resource blog.
Close the course editor and the first time you open your new blog you will be asked whether you want to include an existing external blog or create the entries in OpenOLAT yourself.
External Blog
You can choose an existing blog if you already run a blog independently of OpenOLAT or if you want to include a well-known blog as content or discussion basis in your OLAT course. In this case you cannot create your own blog posts but the external posts can be rated and commented with asterisks.
OLAT internal Blog
Click on "Create entries yourself" if you or other course participants want to create and edit blog entries directly in OpenOLAT.
Users with access to the blog can then subscribe to your entries via RSS feed.
By default, only course authors and moderators are allowed to create blog entries. In the tab "Access" of the course element you can adjust this setting according to your wishes. For example, a course-related blog can be created by the entire course group contributing blog posts or you can create one blog per group by the group documenting its progress.
In the course editor in the tab "Blog Learning Content" the selected blog can be exchanged again at any time.
How to create a blog step by step and further information on other configuration possibilities can be found in the chapter "Creating Blogs".
Course Element: Video
Use the course element "Video" to include videos in MPEG-4 format (.mp4) in your course. Your video has to be created externally. More information on video formats and uploading videos into OpenOLAT can be found in the Video chapter.
In the tab "Learning content" just click on "Select or import video" to assign a video to your course element. Click on "Import" to upload a new video or select an existing video from your entries. Videos can either be imported to the course editor or by means of the "Authoring" site. For further information please go to the chapter "Actions in the 'Authoring' section", section "Import". If you have not selected a video yet the message No video selected will appear in the title Selected video.
After adding your video its title will be displayed as a link. Follow this link to get to the preview. In order to change the assignment of your video you have to click on "Replace Video" in the tab "Learning content" before selecting another video.
In the "Options" section you can define the settings for the display of the video. You can allow users to comment on the video and add a rating in the course view. If you check the "Video autoplay" box, the video automatically starts playing as soon as the course element is in full display. The description field allows you to either add a custom description, the resource description from the info page or none. The description will be displayed beneath the video in the course element.
Course Element: card2brain
The course element card2brain allows learning with flashcards. To use this course element an enterprise login of card2brain is compulsory. Clients of frentix please contact card2brain@frentix.com. Non-clients please contact card2brain directly.
As soon as the pre-settings are done, the course element can be added as all other course elements are added in OpenOLAT. After title and description and as required the visibility and the access have been adapted, the "Alias of flashcards" need to be added in the tab Set of flashcards.
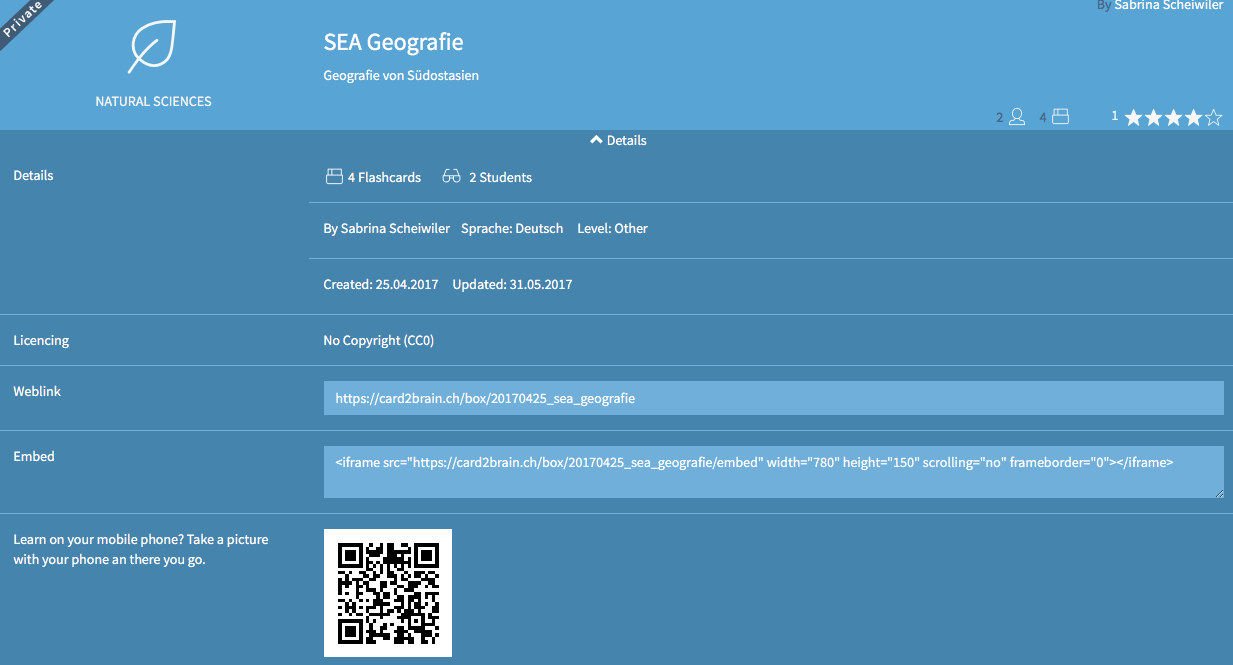
To add this alias, a set of flashcards need to be created at www.card2brain.ch first. The flashcards cannot be created in OpenOLAT directly. The flashcard is connected into OpenOLAT. As soon as a set of flashcards is created, the alias can be taken from the details. The alias is the last part of the weblink, e.g. 20170425_sea_geografie. Copy the alias and add it to OpenOLAT. Afterward the course element is saved.
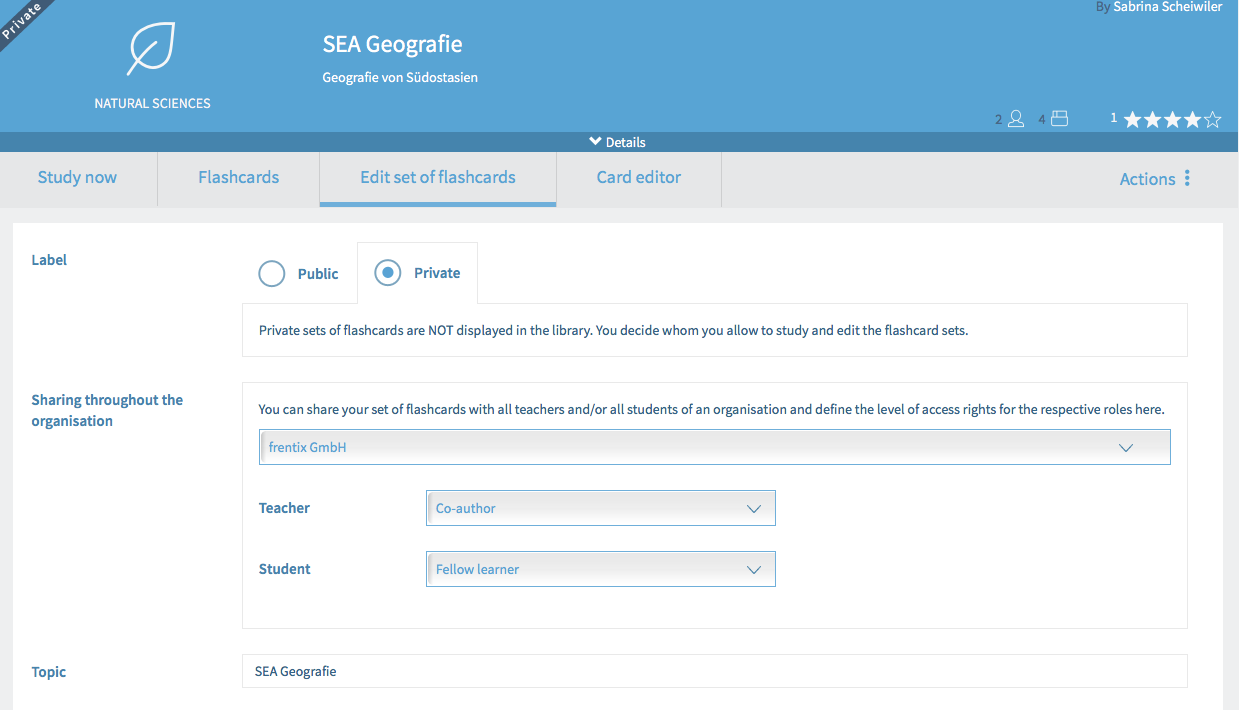
To make sure that the course participants are able to work with the course element the following settings of the flashcard are relevant:
This setting can be done in OpenOLAT. After publishing the course click on the course element card2brain. Click then on Edit set of flashcards. In Sharing throughout the organisation an organization is already chosen. It is added during the creation of the set of flashcards in www.card2brain.ch For teachers you choose Co-author and for student Fellow learner. Thus all users who are coaches for this course can edit the flashcards as well. And all course participants can learn with the flashcards.
The flashcards are only for a learning purpose and not for a test. In OpenOLAT no score is saved and the course element card2brain is not assessable.
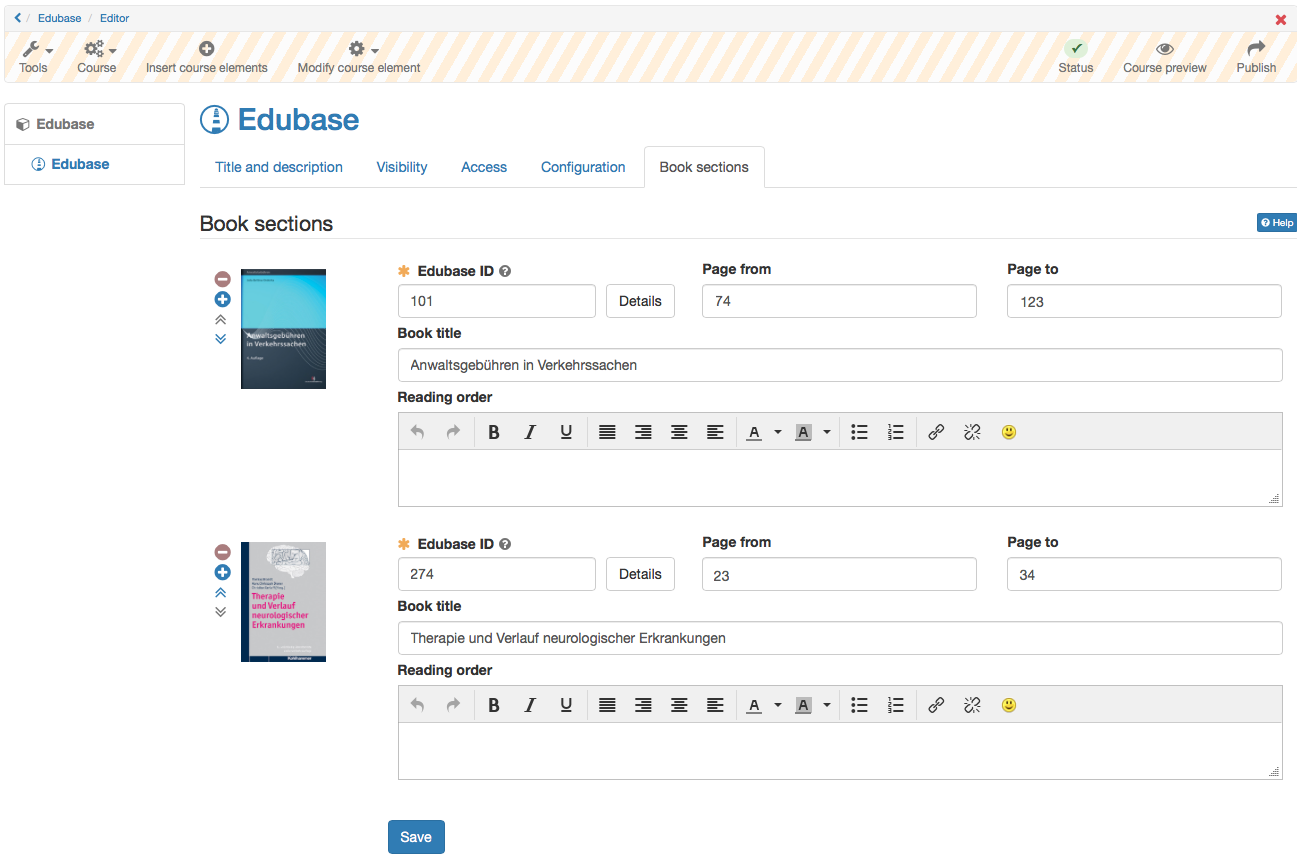
Course element: Edubase
This course element allows you to link to e-books from Edubase. The e-books can then be opened in OpenOLAT. A prerequisite for using this course element is an Edubase account, plus the allowance to use a specific e-book. Clients of frentix please contact edubase@frentix.com. Non-clients please contact Edubase directly.
As soon as the pre-settings are done, the course element can be added in OpenOLAT. By using the editor, you can define specific reading orders for the users for an embedded e-book.

