Zum Ende der Metadaten springen
Zum Anfang der Metadaten

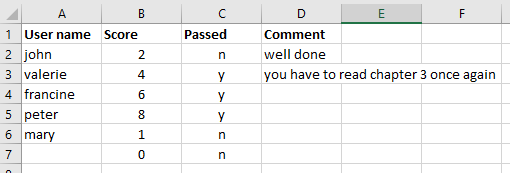
By means of the bulk assessment you can assess several course participants simultaneously at any given time. All you need is a list of rows with values separated by tabs or commas. You will always need a user identification (user name, registered e-mail address or institutional identifier), the score, the passed status and, if so desired, a comment. The easiest way is to use a table from Excel or OpenOffice and fill it with values.


Bulk assessments can be made for the course elements task, group task and assessment. Bulk assessment for the modules task and assessment is carried out via the tab "Users". The bulk assessment for groups is done via the tab "Groups".


Creation of a bulk assessment for the course elements task or assessment

Use an external table processing program, create the required columns and enter the value assignments. Then copy the table data to the bulk assessment input field.

Depending on the configuration of the course element, different options are available. If the "grading" option is not activated in the course element, no bulk assessment can be carried out.

 How to create a bulk assessment

Select the assessable course element for which a bulk assessment should be carried out. All course elements are displayed for which at least one of the following assessment features is configured:

  • Score
  • Passed
  • Comment
  • Files

You can then start bulk assessment.

The individual steps of a bulk assessment:


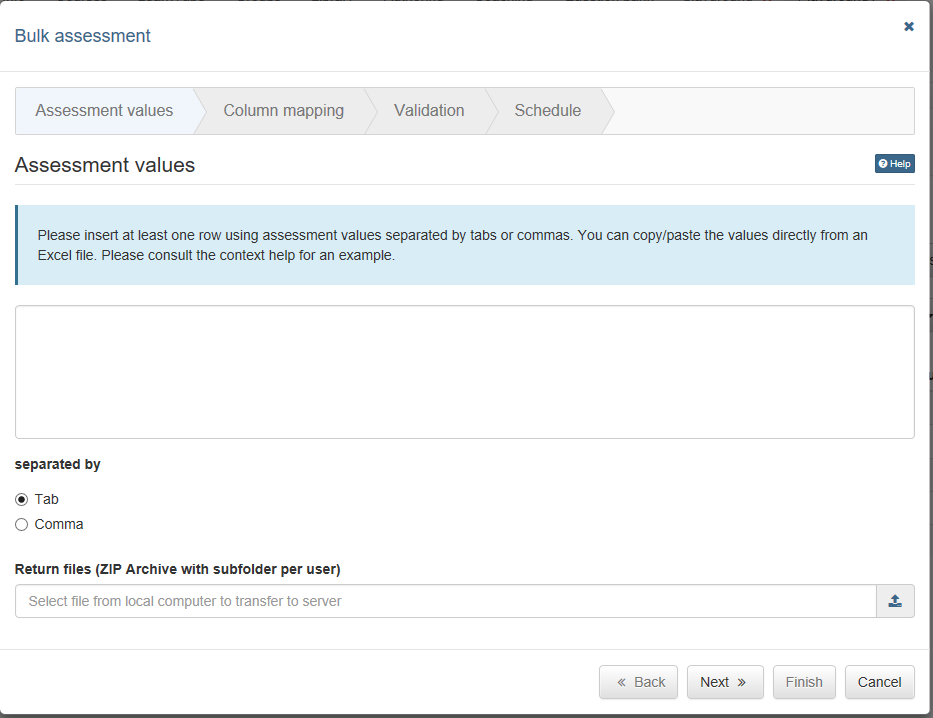
1. Assessment data

Upload the assessment data created outside of OLAT by inserting the information into the free field with copy+paste.

A data line must always contain the following information:

  • User identification (user name, registered email address or institution number/matriculation number)
  • Number of points. Subpoints can be entered with commas or dots (Note: commas cannot be used if commas are used as separators)
  • Status (see below)
  • If desired, a comment can be entered in fourth position.

You can also enter data manually. Select "separated by comma" for correct input format. See below for some examples.

alesend,5,y,HervorragendThe user gets a score of 5, a passed status and a comment added.
aalesend,,y,HervorragendIf no score is required, you can omit it, but you still have to use a placeholder.
alesend,4,y,""Already existing comments can be resetted by adding "".

Use the following entries to set the passed status:

Passed: y, yes, passed, true, 1
Failed: n, no, failed, false, 0


Only for bulk assessment of the task module:

Create a folder for each individual student who receives a return file. Enter the individual feedback for each person there. Zip the file and upload it in the first step under "Assessment values".

2. Column mapping

Here you can define which columns of your externally created scoring stand for which field (for example, identifier, score, passed, comment). If you have not selected these options, the step can be skipped.

3. Validation

Here you can see again which information is transferred how and if there are any problems.

4. Schedule

Here you can define whether the valuation takes place immediately or only on a certain date.

You can also enter data manually. To do this, you must select "separated by comma" to accept the data correctly.

Proceed in the same way for group assessment. Select the desired group in the tab "Groups" and start the option "New bulk assessment" in the menu that appears.
  • Keine Stichwörter