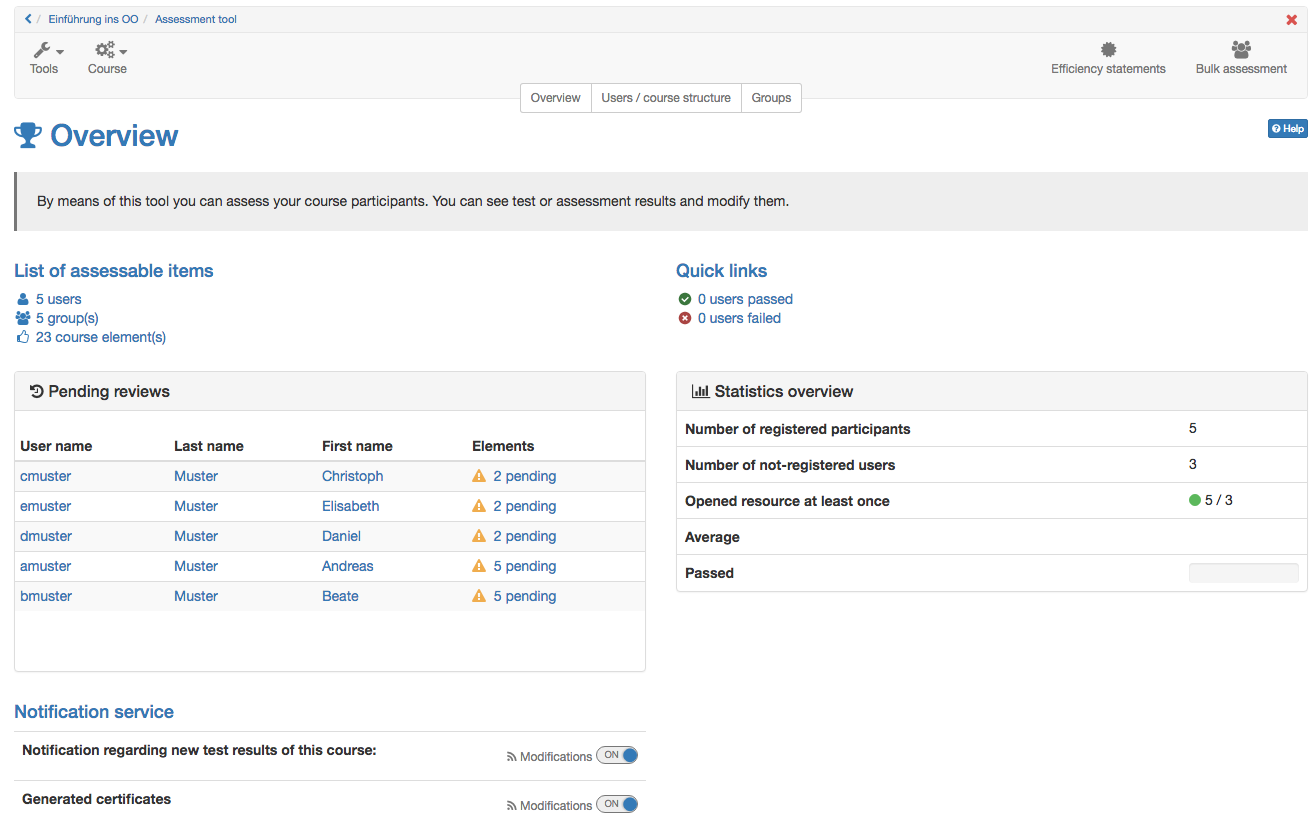
The following view is visible as soon as you open the assessment tool in a course:
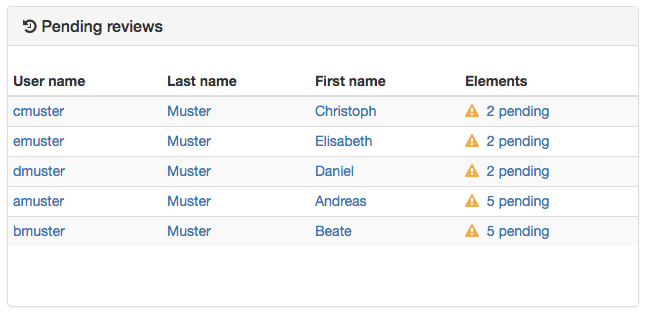
Pending reviews
At a glance it is visible for which user a review is pending. It is also shown how many elements for a user need to be assessed. If there is only 1 element to assess it is listed directly. With a click on this element your directly in the corresponding assessment.
Only pending reviews are shown. Already realized reviews are not listed.
List of assessable items
This list shows the number of users, groups and course elements which can be assessed. If you click on an entry you're entering directly the corresponding view like in "Assessment user/course structure or groups".
Assessment Users/course structure or Groups
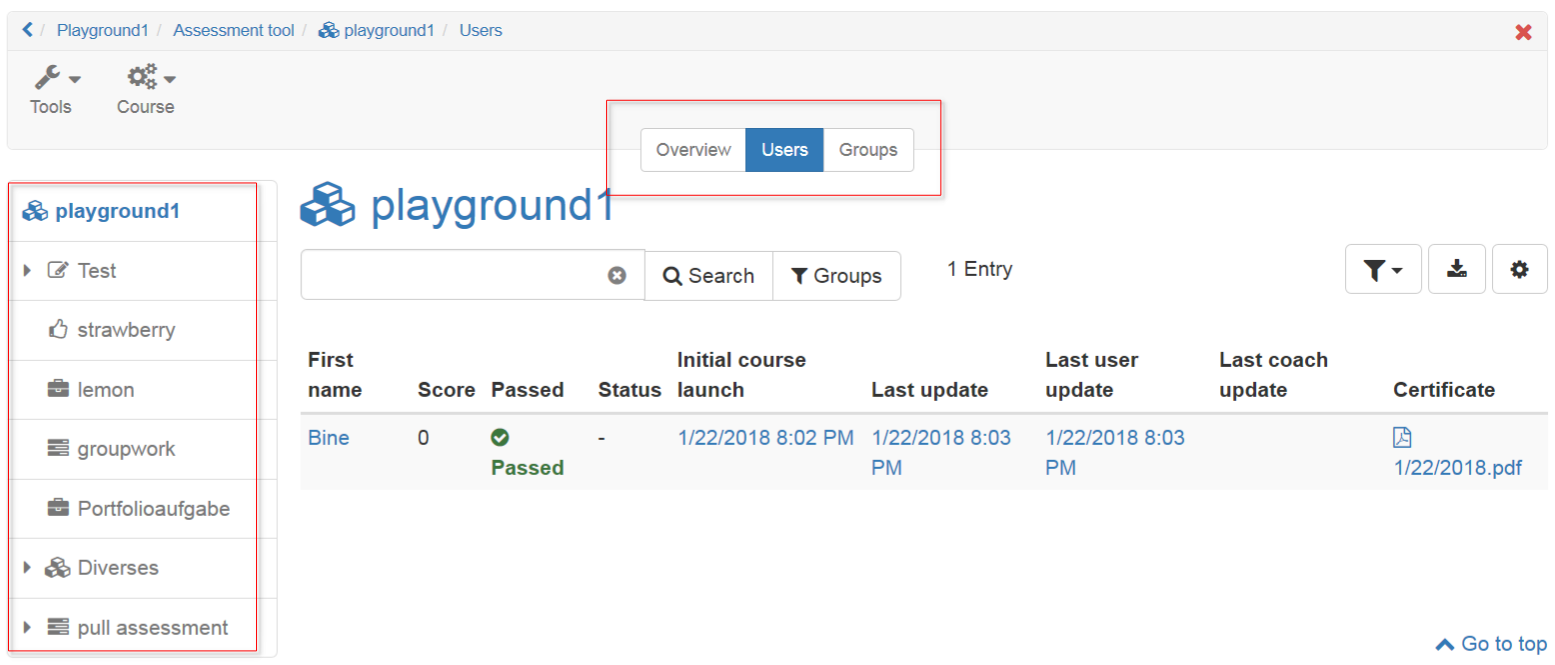
With the tabs "Users" or "Groups" you will get to the real assessment. In general the assessment is undertaken for Users or Course structure. In the menu on the left a course element can be chosen.
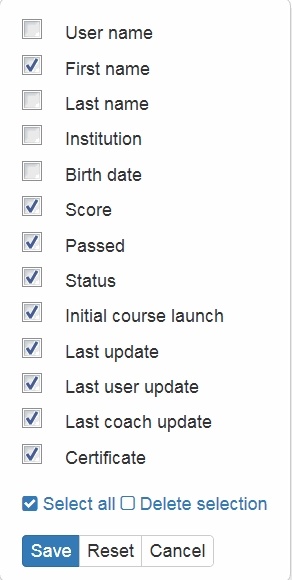
The visible columns of the table can be adapted. Especially information about attempts, status and the last updated can be helpful. Especially the information about the score, attempts and last update are used often. For the update the columns can be differentiated between the update which has been done by the coach or the user, and the technical update.
Attention: The columns in the single areas can vary between course elements.
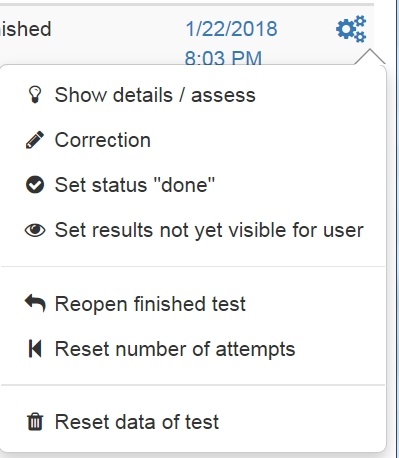
In the cog wheel central settings are available. These are:
- Show details/assess: to get to the corresponding test results
- Correction: to do a manual assessment
- Set status "done" or Reopen assessment: change to the corresponding other status
- Set results (not yet) visible for user: To show or not the results to the users
- Extend test time: if the test is in the status started
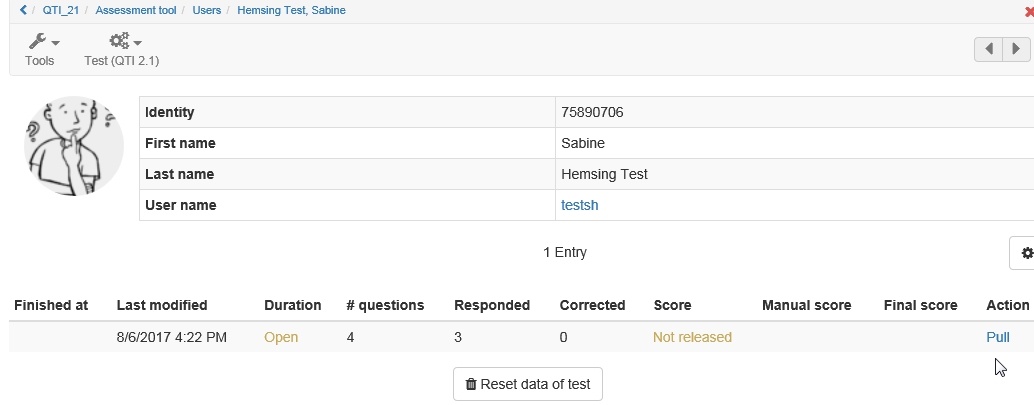
- Pull running test: It pulls the running test, the user cannot continue his test. However, the results are saved
- Reopen finished test: The user can continue his test where he had finished. If the test is limited to 1 attempt, the attempts must be reset as well so the test participant can continue with his test
- Reset data of test: all data of the test is reset and cannot be restored
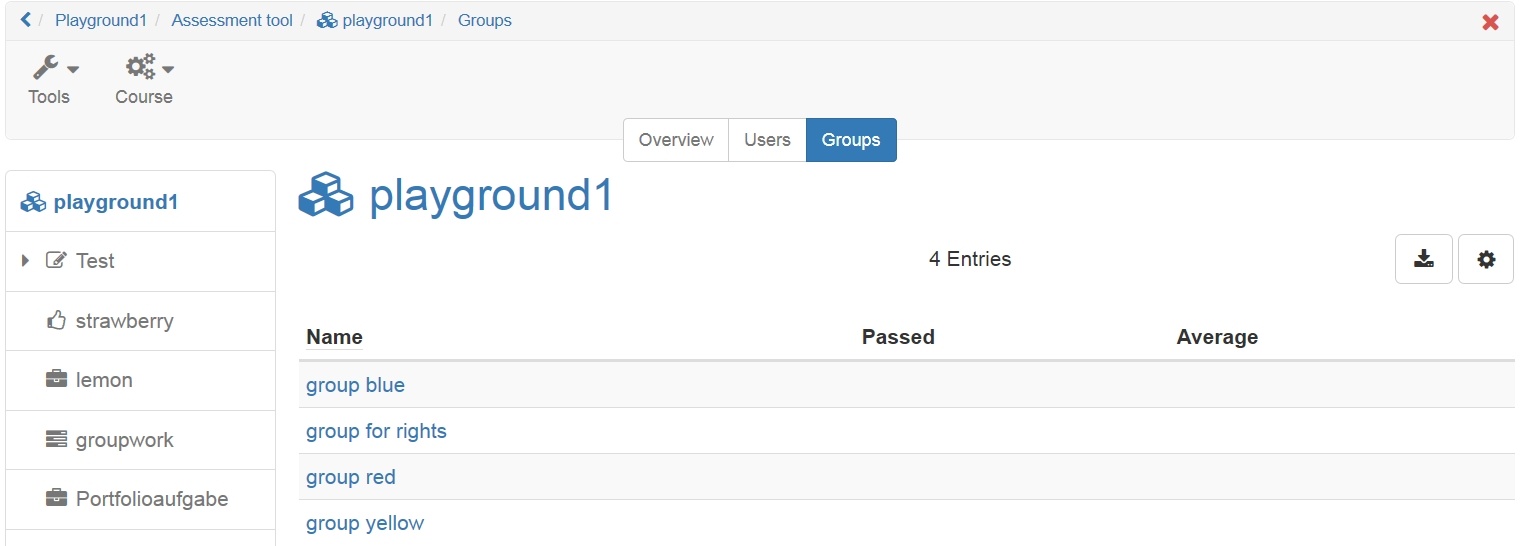
Assess course group
If there is a group available, the assessment can be undertaken for a group as well. In the overview all groups of the course are shown. First a group is selected and afterward the corresponding participant, if desired.
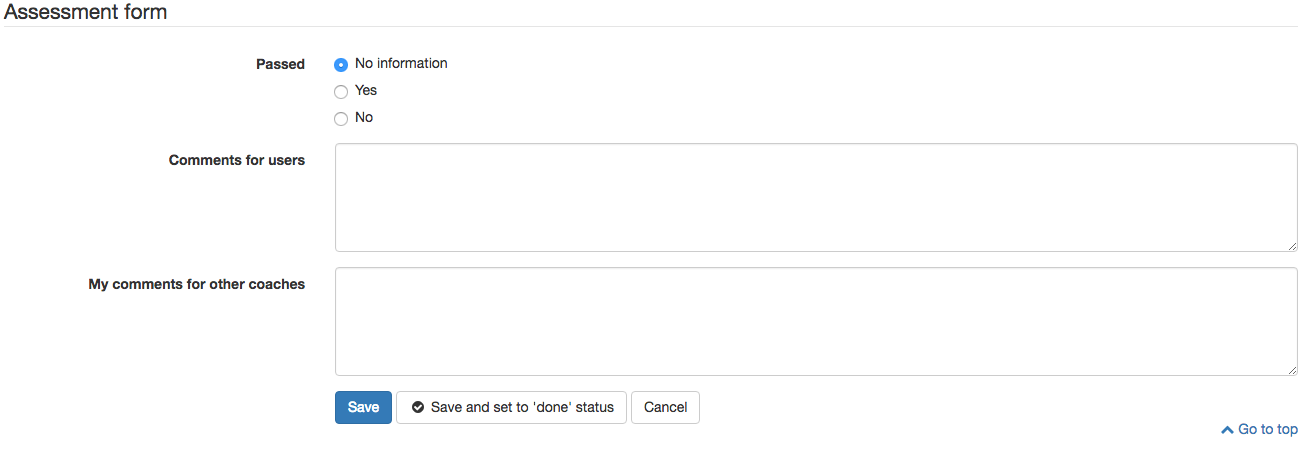
Assessment form
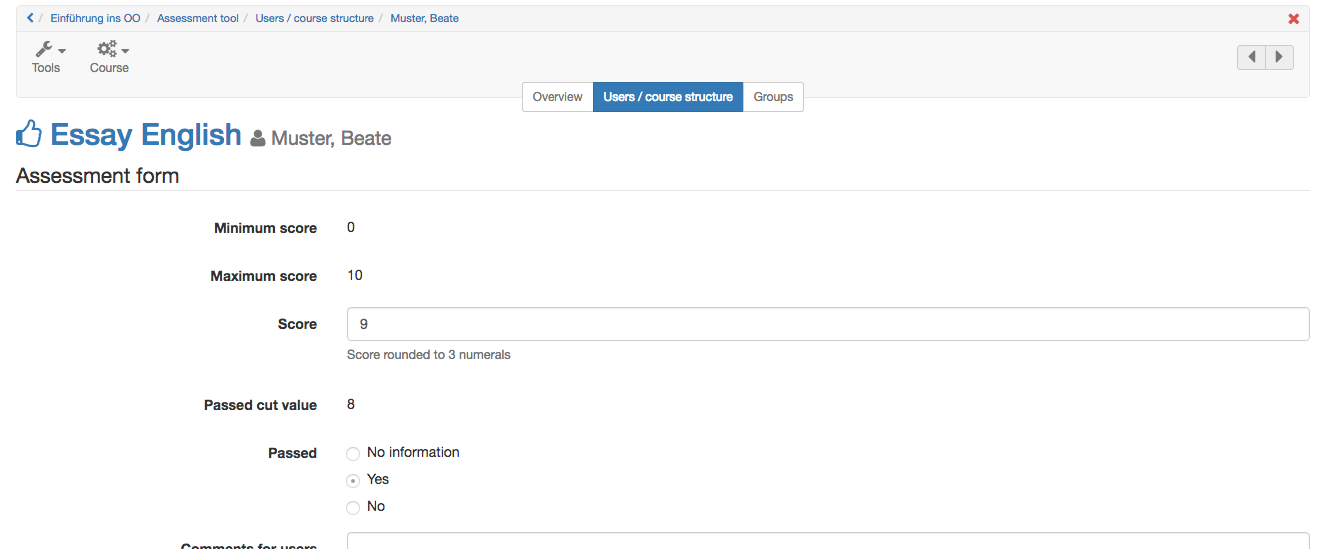
For all assessable course elements an assessment form is available. The corresponding setting options vary between course elements. In general here you can:
- create short feedback
- distribute assessment document
- define passed/failed
- score
- set the visibility of the feedback for the learners
- make comments for other coaches
- close the assessment
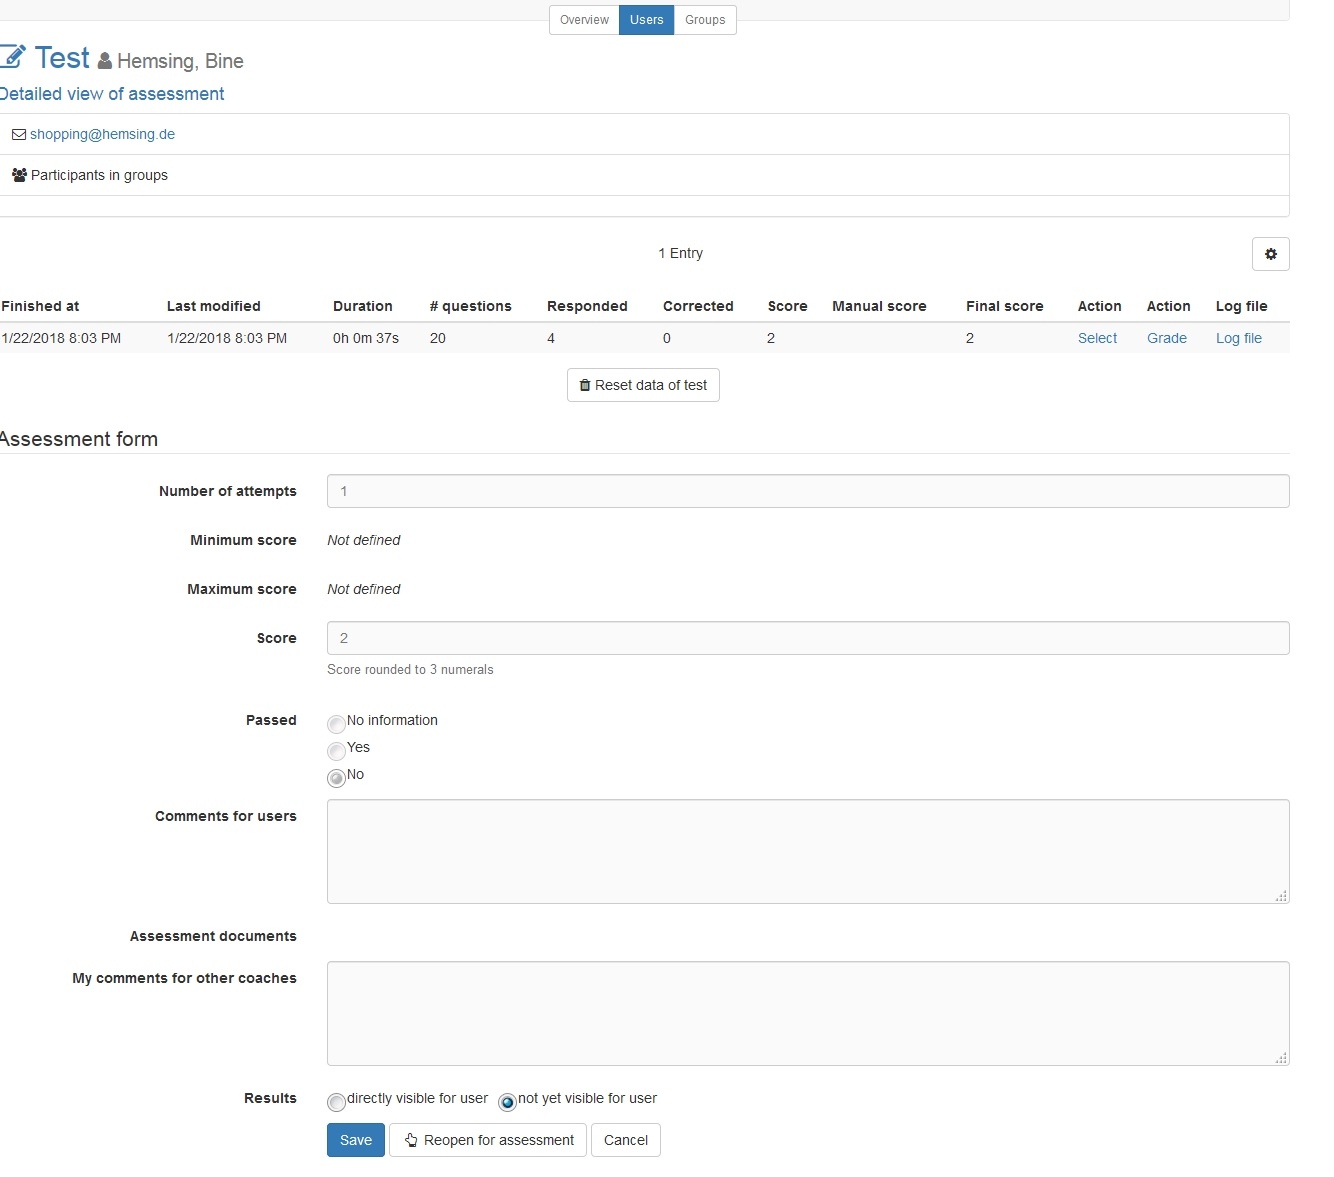
For the course elements test all completed tests are listed in a table above the assessment form including score, attempts, log file download option etc. The single attempts can be shown in detail if desired.
For the course element task the process is shown.
Afterward the form is saved. With "Save" all entries are saved. With "Save and set to `done` status" all entries are saved and the participant gets the status Assessed in the overview. Changes are only possible, if "Reopen for assessment" is chosen. The status does not have any influence on the visibility of the results.
Visibility of results
As soon as a result as score or Passed/Failed is added to the assessment tool, it is visible for the user. But in some cases the result should be available for all users at the same time. This can be a task, a semester work or a test. For such scenarios the visibility of the result can be limited and can be set to visible at the desired moment.
By default all results of all assessable course elements are shown immediately. Only exception is the test, when manual correction is selected. The visibility can either be changed in the assessment form for a single user or for all users together in the overview.
To set the visibility of a single user, open the desired user. In the assessment you can see two possibilities next to results:
- Directly visible for user: as soon as the assessment form is saved, the result is visible for the user
- not yet visible for user: If the assessment form is saved, the result is saved in the assessment tool but not yet visible for the user. It will only be visible for the user if the result is set to visible manually.
"Save and set to `done`status" means that the status in the overview changes from To Review to Assessed. The status done does not have any impact on the visibility.
If files have been handed in with the assessable course element the number of attempts can be changed manually.
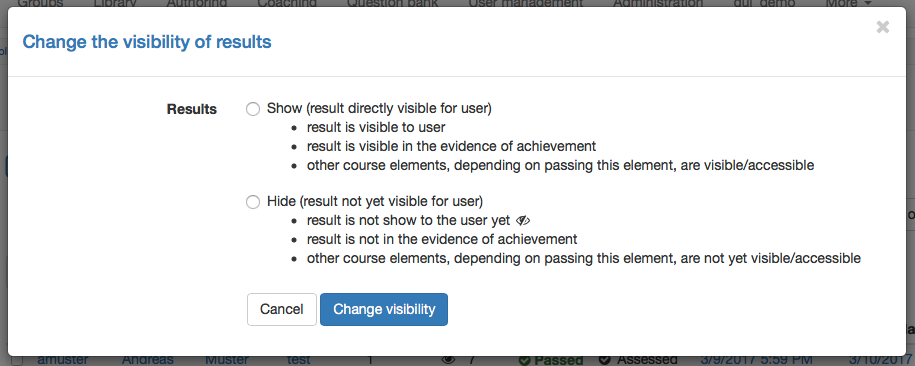
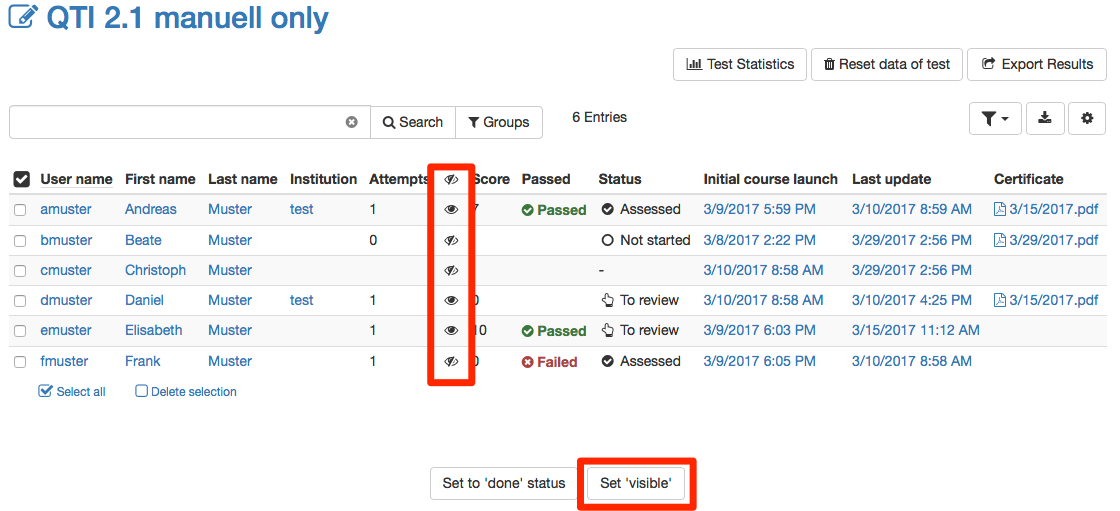
To change the visibility for several users at the same time, open the overview of the corresponding course element in the assessment tool. A column is shown. In this column it is shown, for which users the result is visible (), respective not yet visible (). As no icon is shown, the default setting is valid. To change the visibility, the desired users can be selected in the column on the left. After confirm with the button "Set `visible`". The following dialogue appears:
All selected users can be set either visible or invisible now. As soon as a user is set to visible he can see his result, the evidence of achievement will be updated and all following course elements depending on this one will be visible or accessible.
With the button "Set to `done`status" the status in the column status is changed. All users which have been set to done get the status assessed. This status helps you to keep an overview of the assessed users. This status does not have any impact on the visibility of the results for the user.
Assessment of a single course element
The diverse assessable course elements can be assessed differently. Therefore a short overview follows:
Tasks and group tasks
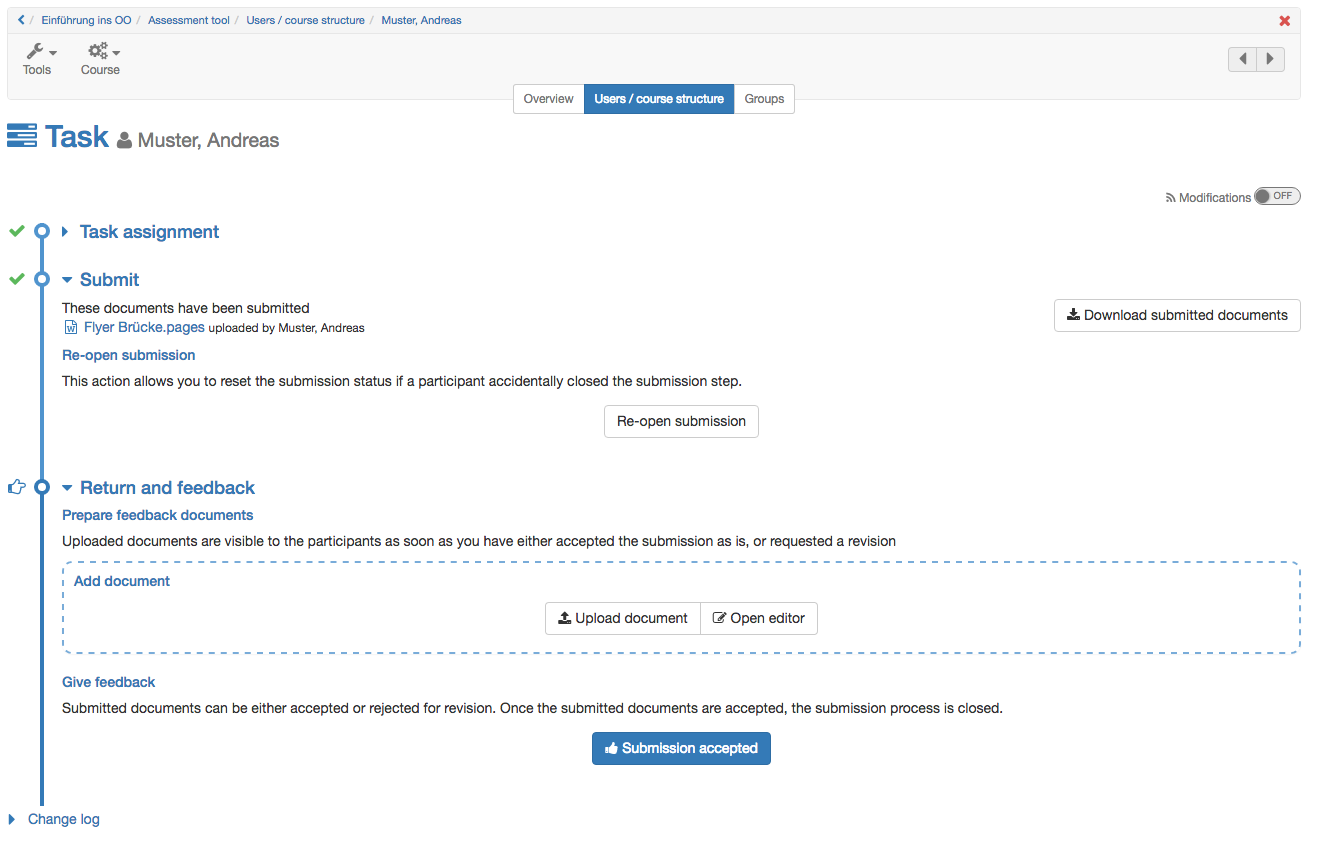
For the assessment of tasks and group tasks download first the submitted documents or the last revised version which has been uploaded by the user. Afterward the assessment form can be filled in.
If desired and configured appropriately a feedback document can be uploaded. This can for e.g. be about a detailed assessment table.
As soon as the assessment of a task is done, the button "Submission accepted" can be exerted. Thus the editing and the assessment of a task is completed definitely. An appropriate notification is sent to the user.
As soon as a user submits a task, no further submission or exchange is possible anymore. If a task is submitted accidentally or the wrong document has been uploaded, the task can be activated with "Re-open submission".
How a task or group task should be assessed e.g. with passed/failed or with a score needs to be defined in the configuration of the course element "task". In the assessment tool the assessment options cannot be changed anymore. Assessments for single or group tasks can be conducted in the course element directly.
Tip
If several attempts have been uploaded or many students need to be assessed, it is recommended to download "All submitted files" for all attempts of all students at once. In the downloaded folder you can find the task assignment as well.
Group grading
For a group task the grading can be given for the whole group. Therefore both check boxes need to be ticked.
If not the whole group passed or not all of them will get the same score "For the whole group" must not be selected. Thus an individual grading per user is possible.
Test
Depending on the question type a test can be assessed automatically. As soon as there the test consists of types with text answers, the assessments needs to be done manually. The manual assessment or possible adaptations can be done right here. The following buttons are available:
Test Statistics: Select the detailed test statistics for every question.
Result reporting: Here all test results can be exported as zip file and thus archived. The zip file title consists of the name of the test, the assigned course as well as the date and time of the download. The result download contains an html file with the user overview, folders with user results and additional files. If the test receipt is activated, it is exported as well.
Resultate exportieren: Hier können die Testresultate als zip file exportiert und somit archiviert werden. Der Titel der zip Datei zeigt den Namen des Tests, den zugehörigen Kurs sowie Datum und Uhrzeit des Downloads an. Der Ergebsnisdownload beinhaltet eine Benutzerübersicht als html-Seite, Ordner mit den jeweiligen User Ergebnissen sowie weitere Dateien. Wenn die Testquittung aktiviert ist, wird auch diese exportiert.
Pull tests: Tests can be pulled after the end of a test session. Thereby also tests are pulled which have not been handed in or finished by the users.
Grade: With grade tests can be corrected by question type (instead by User). Thus you can see an overview of all entries from all users and you can fill in the result directly. Not the complete name but 1. assessed user, 2. assessed user etc. is shown.To every answer a comment can be added. This comment will be shown to the user in the result report afterward. Additionally for the assessable course elements essay, file upload and drawing a score can be added. In "Overview and closing" the results of all users are filled in one more time and the adaptions are shown. Then the assessment can be closed.
Reset data of test: Hereby all data of the current test are reseted. It means that all data including the results are deleted irrevocable. It is also possible to reset a single test, directly in the corresponding user settings.
Extend: Here the preset test time can be extended.
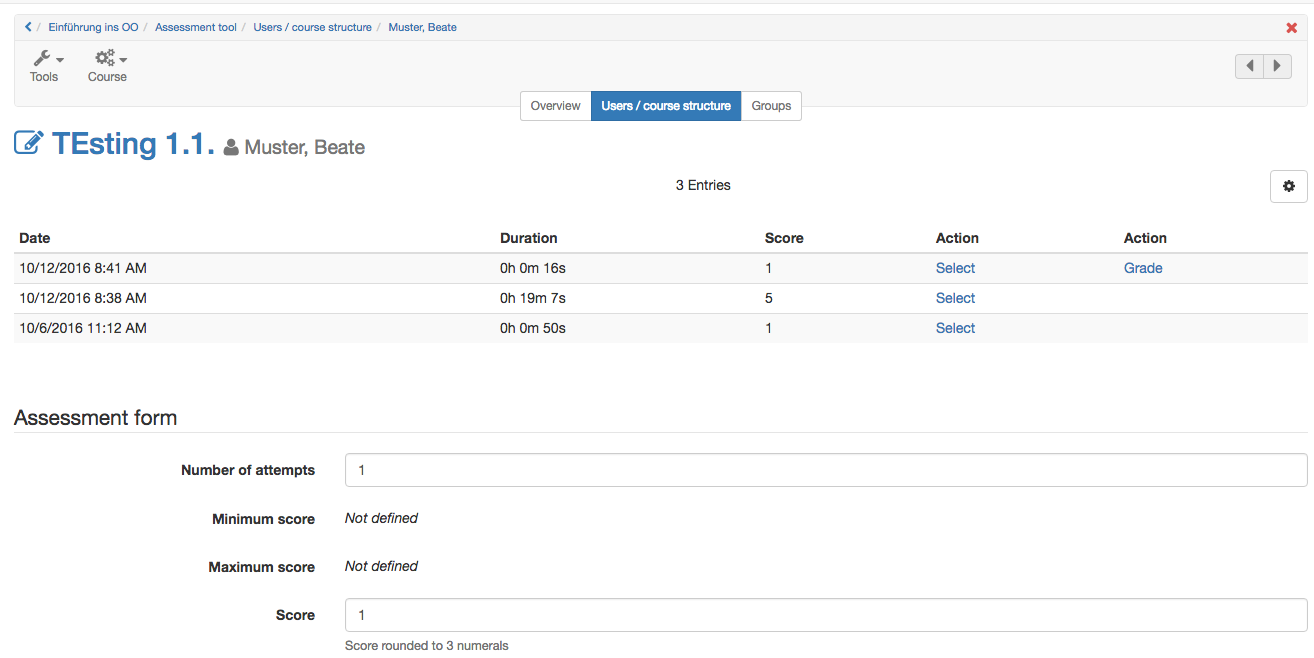
To undertake a manual assessment, every user needs to be selected separately afterward. The assessment form will then be opened and several actions are possible eg. adapt score, add assessment documents or save the log file.
Finally "Set to 'done' status" needs to be selected. All chosen users will get the status "Assessed".
If any further adaptions should be necessary, the corresponding user can be opened and with "Reopen for assessment" adaptions can be added anyway.
Depending on the question type the test can be assessed manually. As soon as there are question types with text answers in the test, a manual correction is mandatory. This manual assessment or possible adaptions can be made here.
To conduct a manual assessment chose the corresponding user. The assessment form opens and adaptions can be done, e.g. adapt score, add assessment documents or save log files.
In the overview table the desired columns can be shown. The score can be shown differentiated between automatically generated score, manual score and final score. With "Reset data of test" all attempts of a user can be deleted.
Assessment
For the assessment of the course element "Assessment" the assessment form needs to be filled it.
Portfolio
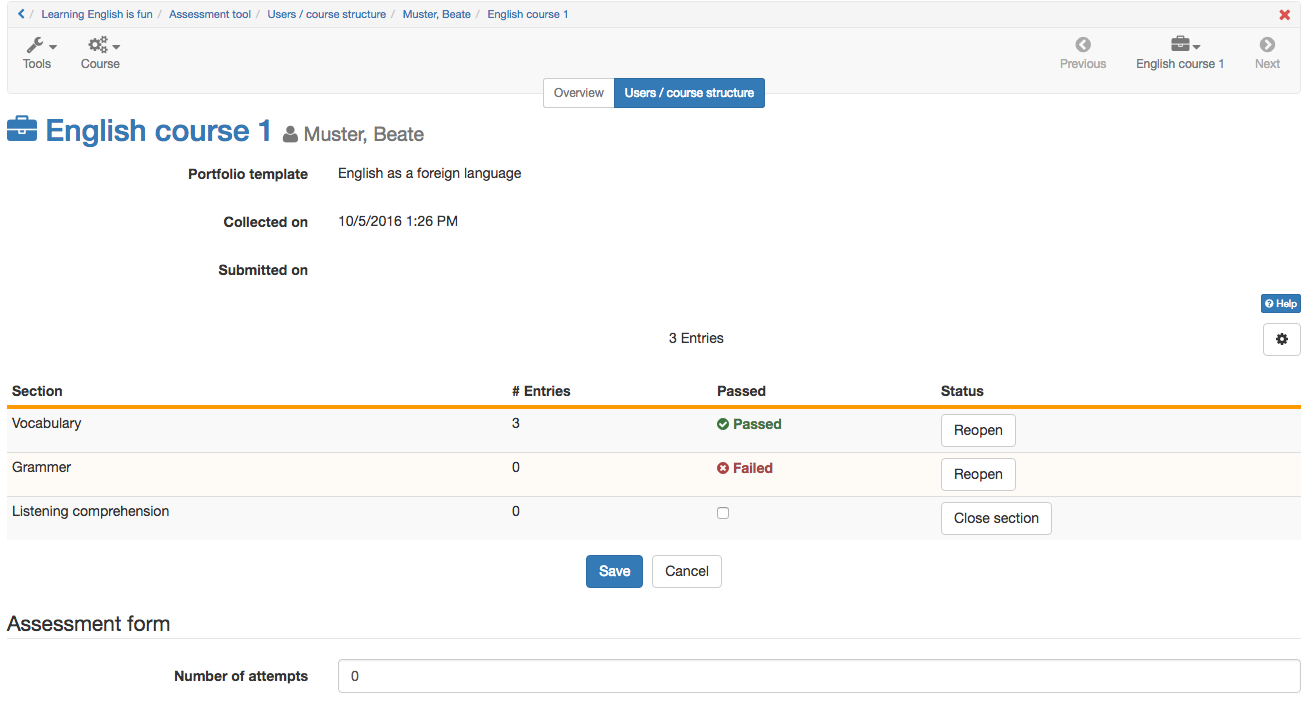
The assessment of the portfolio is the same in the assessment tool as in the tab grading in the portfolio itself. But here the individual sections cannot be opened, but only assessed. Thus it is recommended to undertake the assessment in the portfolio directly.
Check list
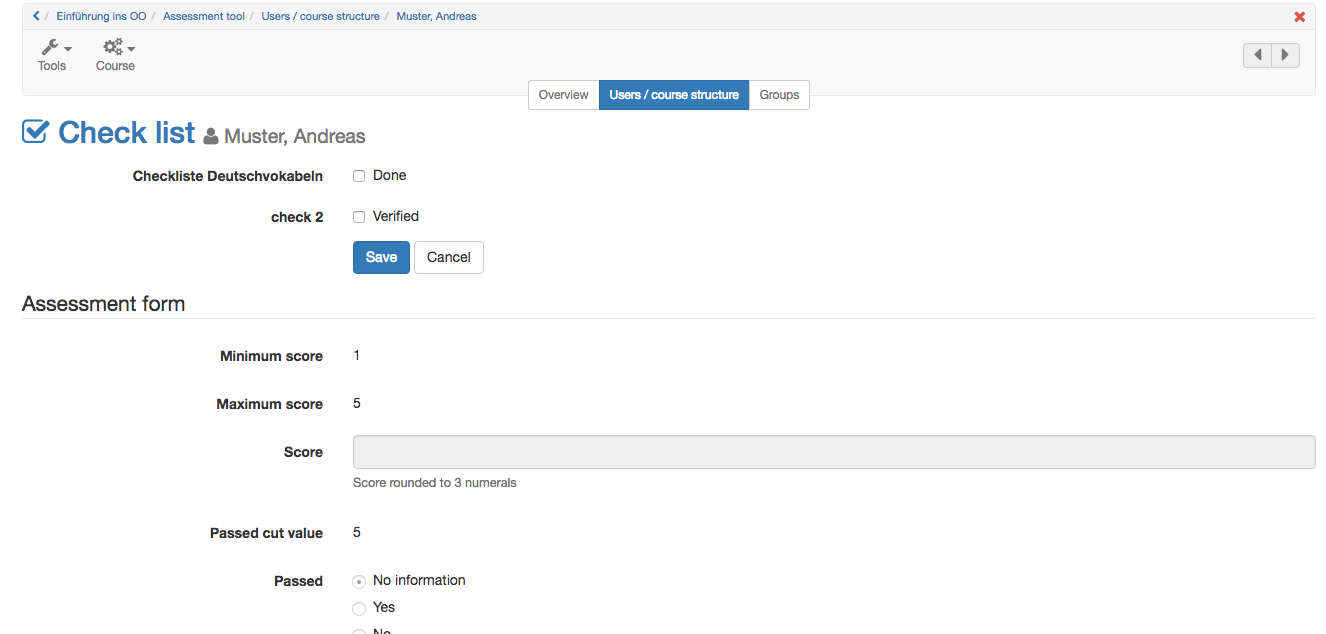
The check box of the individual users can be completed manually and the assessment form can be filled in. Depending on the configuration of the course element either a score can be granted and/or the status Passed can be given. Further information to the check list can be found here.
SCORM
For the SCORM element the assessment form needs to be filled in. It is important, that in the course element in learning content either the Transfer score or passed is selected. Further information you will find here.
LTI
Also for the LTI element the assessment form can be filled in and adapted. In the course element in page content "Transfer score" must be selected coercively. According as a scaling factor or the score needs to be defined for passing. Further information about the configuration oft a LTI page you can find here.
Assessment structure or course
Not only is it possible to assess single course elements, but also structure elements or a whole course can be assessed.
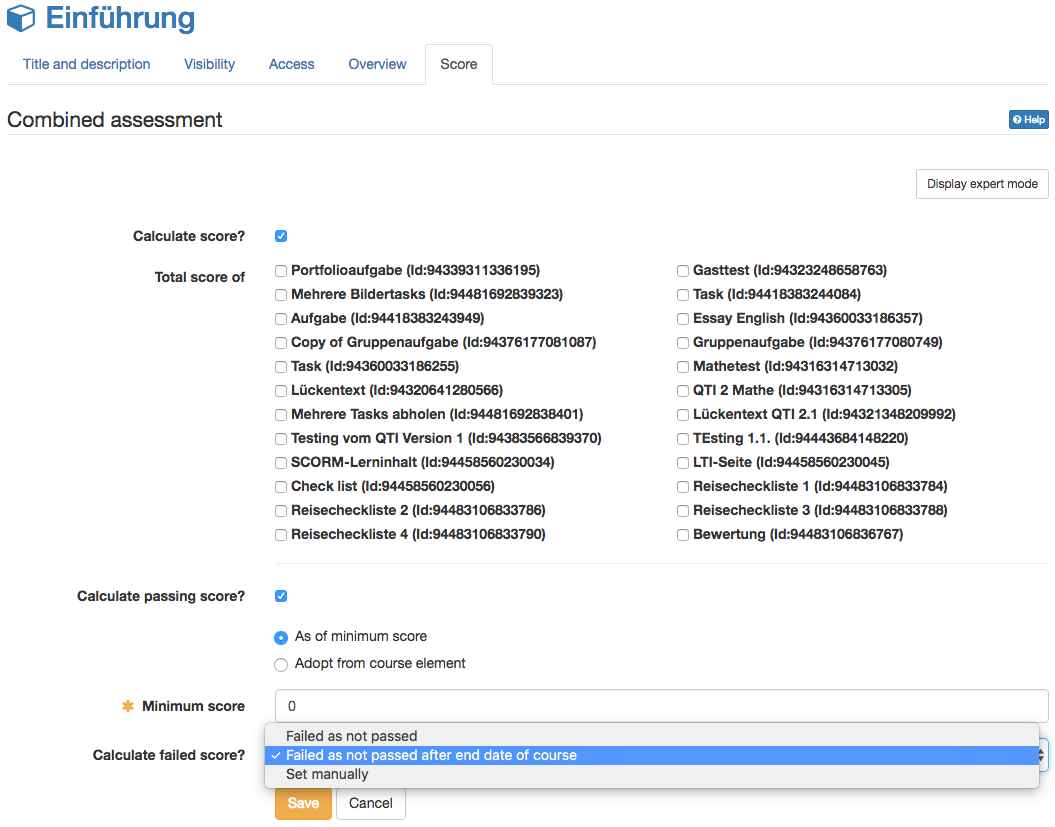
Therefore open the tab score the corresponding element. Now, either score and/or passed can be calculated.
Calculate score
If this checkbox is selected, the score of all assessable course elements can be calculated. Every course element which should be included in the calculation need to be selected. Like this it becomes possible to calculate the total score of the desired course elements.
Attention: The set up of the assessment of the course element structure needs to be done in the course editor. In the assessment tool only the results are shown.
Calculate passing score
If a course is passed can be adopted either from a minimum score or from course elements. For the minimum score the checkbox Calculate score on top needs to be selected. Afterward the minimum score can be defined.
Alternatively it can be defined, that certain assessable course elements need to be passed, to pass either the course or the structure element.
As soon as the requirements for passed are met, the user gets the status Passed.
Finally the failed score can be calculated. In general failed is shown to the user as long as the requirements for passed are not met. But if for example not all assessable course elements are edited yet, the requirements for passed cannot be met. If then the user gets shown a failed nevertheless it can be confusing. Therefore 3 possibilites exist for how to calculated the failed score:
- Failed as not passed: As long as the requirements for passed are not met, failed will be shown (as described above)
- Failed as not passed after end date of course: The calculation of the failed score is only done, when the end date of the course is reached.
- Set manually: Failed is only shown to the user if set manually.
Bulk assessment
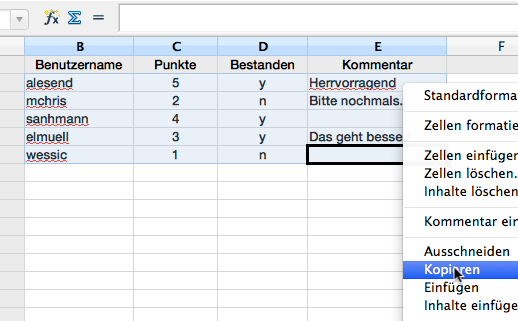
By means of the bulk assessment you can assess several course participants simultaneously at any given time. All you need is a list of rows with values separated by tabs or commas. You will always need a user identification (user name, registered e-mail address or institutional identifier), the score, the passed status and, if so desired, a comment.
The bulk assessment assists you with mass assessing the course elements task and assessment.
The overview of planned bulk assessments provides you with miscellaneous information such as:
- Status: shows the status of the scheduled bulk assessment
- Date: provides exact date and time at which the assessment will be executed
- Course element: shows the course element for which the bulk assessment is scheduled
- Score: is checked if a score is allocated
- Passed: shows if the passed/failed status is assigned
- Comment: shows if comments were added
- Files: shows if files are added to the users‘ return box
- # Users: the number of users that are being assessed with this bulk assessment
- Created by: name of coach
Scheduled bulk assessments may be edited as well as deleted. You will receive a mail notification upon completed assessment.
You can also start bulk assessments of the course elements task and assessment from the group or course structure view.
