Opening the Course Editor
The course editor is there to modify your course. You open it by clicking on the "Edit" icon in the table in the authoring section. If the course view is already opened just select the link "Course editor" in the pull-down menu "Course tools" in the toolbar. You will recognize the activated course editor by the additional tools in the toolbar.
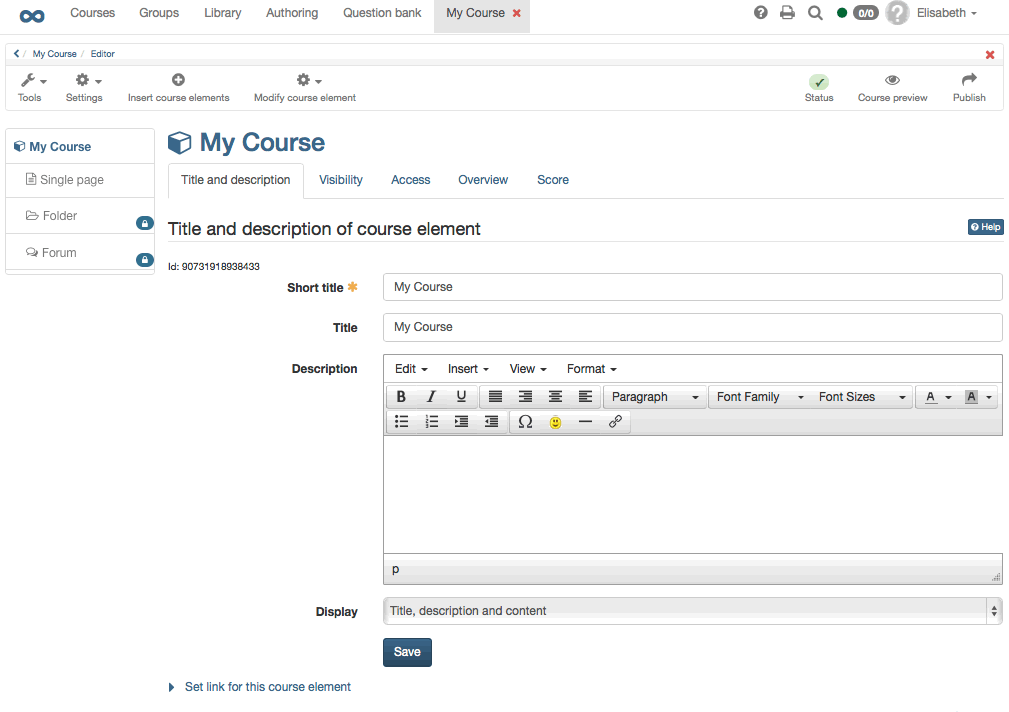
In the toolbar you will find the pull-down menu "Tools" containing the links to the eight course tools as well as the pull-down menu "Settings". Via the icon "Insert course elements" opens a selection window providing a list of all available course elements. The pull-down menu "Modify course element" contains further actions regarding course elements (e.g. delete). On the right side of the toolbar, you will find the status display as well as the editor tools "Course preview" and "Publish".
Adding Course Elements
A course can comprise any number of course elements. In a course you can use several course elements of the same type; they can be nested as well.
Select the course element under which the new element should be inserted. Click on the course element of your choice in the selection window "Insert course element" in the toolbar. The new element will be positioned beneath the currently selected course element. If the top course element is selected, the new element will be automatically inserted at the end of the course. Now you can configure your new course element.
Course elements can be easily re-arranged with „Drag&Drop“ at any given point in time.
In the course navigation you will see most of the time a symbol next to each course element indicating its characteristics or pointing out any missing or wrong settings. In the toolbar you can find the status display containing the corresponding explanations to those symbols.
Configuration of Title and Description
Each course element always comprises the tabs "Title and description," "Visibility," and "Access." In addition there are one or more tabs to configure your course element individually.
In the tab "Title and description" you can describe your course element further. The field "Short title" is mandatory. This short title serves as labeling of your course element in the course navigation and is restricted to 25 characters. All symbols and numerals are allowed. This short title appears in the navigation menu as well as in the contents area as heading, if selected.
The content in the field "Title" serves as additional description of your course element and has a maximum of 255 characters. This title will also be displayed when moving the cursor over the element's short title in the course navigation.
Avoid using slashes or full stops in the fields "Short title" and "Title." These special characters can cause problems when archiving courses later on.
In the field "Description" you can provide detailed information on your course element. That description will appear on the course homepage if you have selected "Automatic overview" in the tab "Overview".
By means of "Display" you determine what course participants will see when clicking on a course element. A click on course elements such as "Single page," "External page," "CP learning content," and "SCORM learning content" will result in displaying the default setting "Only content." All other course elements will show "Title, description and content" by default. You can choose between five different display configurations.
Set link for this course element
In order to refer from outside your course to a course element you have to use an external link. In order to set links within a course you have to use internal links.
External link In order to embed a link to this course element from another OLAT course or from outside just add an external link as href attribute to your favored HTML page.
Internal link (do not open in new window) In order to embed a link to this course element from another course element within that particular OLAT course just add your internal link as href attribute to your favored HTML page.
You need the ID number on the above right in this field to be able to refer to this course element from another one in pre-conditions (e.g. visibility).
Configuration of the Tabs Visibility and Access
You can limit the access to course elements in three ways. If you want to limit a course element's visibility it will no longer appear in the course navigation. If you plan to limit its access it will still appear in the course navigation, however, when clicking on it your participants will get a message that this course element is not accessible. In addition to that, the course element "Structure" may be protected with a password in the access tab.
If a course element is visible but not accessible you can provide an explanation for excluded users in the tab "Visibility" to clarify your reasons.
All restrictions on course elements will also apply to their sub-elements. This means that if you add a password or restrict the top course element's visibility those settings will also apply to your entire course elements.
By means of the button "Display expert mode" an entry field will appear in order to be able to make a more complex configuration according to your needs.
Access and visibility rules are usually applied in an identical manner. In some exceptions though, i.e.
- Folder
- Blog
- Podcast
- Wiki
- File discussion
- Forum
- Notifications
further information concerning access rules can be found in the corresponding manual section.
Visibility
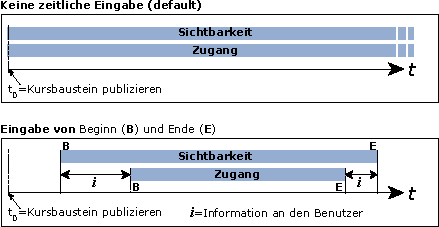
In the tab "Visibility" there are five options: "Blocked for learners", "Depending on date", "Depending on group", "Depending on assessment" and "Only in assessment mode"; by means of these options you can determine who will see when and under which circumstances a certain course element in the course navigation. OpenOLAT users excluded by those predefined rules will not be able to see certain course elements. You can e.g. determine that registration is only possible within one week (option "Depending on date").
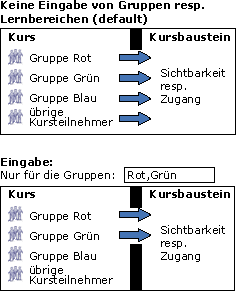
It is also possible to grant access to a particular folder only to registered course participants (option "Depending on group").
Or, you could e.g. provide a questionnaire only for those course participants who have passed a test (option "Dependening on assessment"). Course elements of the type test, assessment, task, and structure are at your disposal. If you select "Check for "passed"" you can choose "Course element" in the entry field; this course element has to be passed in order to be visible. If you select "Check score" you can enter a score by means of the "Passing score" of the element selected in the drop-down menu that is necessary to make this course element accessible.
In order to include course authors and tutors into these rules you have to activate the option "Apply rules for owners and tutors". By not checking this box tutors and administrators can always see the course element's link, no matter which visibility rules you have set above.
Activating the option "Blocked for learners" leaves the course element exclusively visible for tutors and course administrators only. All other OLAT users will not get access. By checking this box further configuration possibilities will be inactive.
If a course element should only be visible during a configured assessment, in the so-called "Assessment mode", check the option "Only in assessment mode". The course element will not be accessible outside of the assessment.
Access
In the tab "Access" there are the same five options mentioned above: "Blocked for learners", "Dependening on date", "Depending on group", "Depending on assessment" and "Only in assessment mode"; by means of these options you determine who will be able to access when and under which circumstances a certain course element. OpenOLAT users excluded by those predefined rules will see certain course elements but will not be able to open them. In order to include course authors and tutors into these rules you have to activate the option "Apply rules for owners and tutors".
Furthermore, for the course element "Structure", you can activate the password protection and set the password here.


